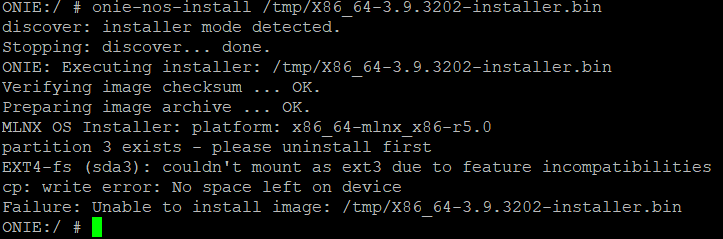
Latest posts

ESXi Config Restore

Having a backup is great, but it only helps if you know how to restore it. Previously I showed you how to take an ESXi Config Backup. Now let me show you the process to restore that ESXi config backup.

The Process

  • Make a note of your current ESXi build number and the build number of the ESXi config backup file.

If you aren’t sure how, here’s a post I made about how to get your ESXi Build Number without vCenter for your current ESXi and your ESXi config backup file.

Your current ESXi build number and the ESXi build number in the ESXi config backup file must match.

Technically you can still restore with mismatching build numbers however that is a bug and it could cause unexpected behavior and based on VMware’s documentation it would likely not be supported if something goes wrong later on.

You can read more about this bug on my post called ESXi Config Restore Bug.

  • Rename the ESXi config backup file you want to restore to configBundle.tgz
  • Enable SSH by right clicking on the host and selecting Services > Enable Secure Shell (SSH)

Onyx (MLNX-OS) BIOS Password Reset

Recently I’ve been playing with some Nvidia/Mellanox switches specifically the SN2410. An issue that I ran into was that I didn’t have the BIOS password.

All of the documentation says that the default BIOS password is admin. That password did not work on my switch.

You can absolutely use the switch even without the BIOS password, however it may limit some of your options in the future specifically recovery options if needed.

The documentation that I found says that if the default password doesn’t work you need to contact Mellanox/Nvidia support. The issue with that is I’m playing with this switch in my home lab so I don’t exactly have a support contract to contact support.

I took the switch apart and there doesn’t appear to be a CMOS battery to pull to clear the BIOS either. There might be a jumper for it but it wasn’t obvious which one it might be and I didn’t want to risk breaking it.

Inside the SN2410 switch

In the end I ended up figuring out a way to reset the BIOS password back to default.

Here’s how to do it.

Intune Dynamic Device Groups

Intune aka Microsoft Endpoint Manager can be extremely powerful but as it always goes with great power comes great responsibility.

To make sure I’m only targeting the devices I want, I like to make a few dynamic device groups that I’ll use for various Intune policy targeting.

The dynamic device groups I create are:

  • Windows AAD Joined for all the Windows devices joined to Azure AD.
  • Windows Hybrid AAD Joined for all the Windows devices that are hybrid joined to Azure AD.
  • Windows AAD Registered for all the Windows devices that are registered to Azure AD this is typically BYOD (Bring Your Own Device).
  • Windows Personal for all the personal Windows devices.

By creating these groups I can correctly target my Intune policies to always have the intended outcome.

Here are the dynamic membership rules I use for the dynamic device groups.

Lenovo Remote Physical Presence

On Lenovo servers the default configuration has a physical presence policy enabled. When a physical presence policy is enabled it prevents you from doing a few tasks on the system either in BIOS or IPMI. Lenovo calls their IPMI XClarity Controller (XCC).

With an enabled physical presence policy your only options to do some of those task is to either physically go move a jumper on the motherboard or to make some tweaks in XCC or BIOS to assert your physical presence even if you are remote.

Here’s how to do it in IPMI or BIOS.

Upgrading Duo Authentication for Windows Logon

Duo Authentication for Windows Logon and RDP is great tool that I like to use to add MFA to Windows systems specifically servers, as it could help prevent lateral movement in the network.

When you only have a few systems running Duo Authentication for Windows Logon and RDP upgrading it is short and painless. When you have many systems it can be a bit of a painful process as the only method seems to be to do it manually.

Naturally to solve this I wrote a PowerShell script to do the work.

PowerShell Script

The PowerShell script will check if Duo Authentication for Windows Logon is installed. If no Duo Authentication for Windows Logon install is found it will just exit.

ESXi Config Restore Bug

While I was looking into various ways to restore an ESXi config backup I came across a bug.

If you read VMware’s documentation about how to restore an ESXi config backup (you can find that here) you will see that it is full of references saying the build numbers must match.

The bug is that you can restore an ESXi config backup even if the build numbers don’t match. Which according to the VMware documentation should not be possible.

Even though it is possible to restore an ESXi config backup when the build numbers don’t match, I do not recommend doing this as there has to be a reason why VMware says that the build numbers must match.

In my testing I was able to replicate the bug in ESXi 7 and ESXi 8. I even went all the way back to ESXi 6.7 which had some interesting findings. I didn’t fully test everything in ESXi 6.7 as general support has ended on that version.

Here are my findings and how to replicate the bug.

Generating Backup Files

In order to test everything as much as possible I wanted to have a few ESXi config backup files. This is how I generated the ESXi config backup files that I used in my testing.

  • Fresh install of ESXi 7 Update 2e Build Number 19290878.
  • Took an ESXi config backup from ESXi 7 Update 2e Build Number 19290878.
  • Fresh install of ESXi 7 Update 3d Build Number 19482537.
  • Took an ESXi config backup from ESXi 7 Update 3d Build Number 19482537.
  • Fresh install ESXi 7 Update 3k Build Number 21313628.
  • Took an ESXi config backup from ESXi 7 Update 3k Build Number 21313628.

Restoring from ESXi 7 Update 3d to ESXi 7 Update 3k

Once ESXi 7 Update 3k Build Number 21313628 was installed I tried to restore an ESXi config backup that was taken from ESXi 7 Update 3d Build Number 19482537.

When I do the restore using the vim-cmd hostsvc/firmware/restore_config method it works.

No errors when restoring ESXi 7 U3d to an install of ESXi 7 U3k using the restore_config method

Due to the fact that the restore worked I then reinstalled ESXi 7 Update 3k Build Number 21313628 again.

ESXi Build Number without vCenter

Knowing your ESXi Build Number can be very useful. It’s really easy to do with vCenter. Without vCenter it’s not as straight forward. Here are a few ways to get your build number when you don’t have vCenter.

Console

If you have access to the console of the ESXi host via IPMI or iLO or iDRAC or physical access, you can get your ESXi build number right from there, you don’t even need to login.

Help Menu

You can also get your ESXi build number right from the Help menu in the Web UI.

  • Login to the Web UI of your ESXi host
  • Click on Help > About

You will now get a screen that show you your ESXi build number.

It should look something like this

In this example we know that my ESXi build number is 19482537.

SSH

  • Enable SSH on your ESXi Host by right clicking on the host and selecting Services > Enable Secure Shell
  • Login to your ESXi host with SSH
  • Enter the following command vmware -v

You will get an output that looks something like this

VMware ESXi 7.0.3 build-19482537

In this example we know that my ESXi build number is 19482537.

ESXi Config Backup File

You can also get your ESXi build number from an ESXi config backup file, which can be helpful if you want to know which ESXi build number was installed when a backup was taken.

To do this we will need something that can open a tgz archive. I like to use 7-Zip.

Cisco Aironet Won’t Connect to Wireless LAN Controller

I ran into an issue where some older Cisco Aironet APs (Access Points) stopped connecting to a Cisco WLC (Wireless LAN Controller). No config changes had been made and some of the Cisco Aironet APs would connect and some wouldn’t. All of them were the same model, the Cisco Aironet APs were able to ping the Cisco WLC and vice versa.

What happened is the Cisco MIC (Manufacture Installed Certificate) expired and the default setup of a Cisco WLC is to reject any Cisco Aironet AP with an expired MIC.

It looks like this could impacts every Cisco WLC when used with older Cisco Aironet APs that have an expired Cisco MIC. Cisco has a Field Notice about this issue, you can read it here FN63942.

Any Cisco Aironet AP that was manufactured from July 18, 2005 until 2017 will have a Cisco MIC that expires 10 years after the manufacture date. There seems to be no way to replace or renew that Cisco MIC, this will keep being an issue that could randomly show up until 2027 when all of them should be broken.

The reason some of my Cisco Aironet APs worked and some didn’t is because they were manufactured at different times even though they have the same model number.

The fix is super quick we just need to tell the Cisco WLC to ignore expired Cisco MICs.

Cisco UCS Upgrade with Firmware Auto Install

Recently I needed to upgrade a Cisco Unified Computing System (UCS) system and while Cisco does have documentation about it. The process can be scary and could use more screenshots. Here is my step by step guide on how to upgrade a Cisco UCS via the Firmware Auto Install with the Cisco UCS Manager.

Fully planning your Cisco UCS upgrade is very important. There are a lot of things that need to be checked to make sure the upgrade is a success and that everything is compatible. In the past I’ve needed to upgrade my ESXi to as high as they can go based on the VMware and Cisco Compatibility Matrix and then upgrade the Cisco UCS. Then go back and upgrade ESXi again and then upgrade Cisco UCS again.

Quick Cheat Sheet

Update Teams Machine Wide Installer

Recently I’ve ran into an issue with Microsoft Teams where the user sees a blocking message that says “Teams needs an update”. The user needs to action it before they can use Microsoft Teams again. Typically the user can just click on Update Teams which will take them to a download page for Microsoft Teams, they also need to pick the correct version of Microsoft Teams because now there are two of them.

Let’s have some faith in the user and say they do download the correct version, now they need to run the downloaded file and then it will update Microsoft Teams for them and finally they can use Microsoft Teams again.

That whole process isn’t a good user experience and that’s way too many steps. It’s worse if the user is in a rush because let’s say the system with the outdated version of Microsoft Teams is a meeting room computer and they are trying to load Microsoft Teams for their meeting.

There has to be a way to prevent this and a way to reliably fix the Teams needs an update problem. Here’s what I found in this rabbit hole along with the solutions I found.