Deploying Windows LAPS
I’ve been a fan of LAPS for a while and in 2023 Microsoft made LAPS even better by introducing a new version called Windows LAPS. Windows LAPS (Local Administrator Password Solution) is a great tool for managing your local admin passwords.
You might be thinking it’s ok I use one complicated password for my local admin accounts, it does not matter in fact it’s worse because if that local admin password hash is obtained then techniques such as pass-the-hash could be used or the password could be cracked and then all systems are compromised, it also sticks out on a penetration test.
Let’s be real, how often are you really changing those passwords even if they are all unique? Well, it doesn’t matter now because Microsoft has made managing all of it much simpler.
LAPS is not new, it has been around for years. In the past to use LAPS you needed to install a small client on the systems you wanted to manage with LAPS. You also needed to install the LAPS UI to retrieve the password or go digging in the AD attributes for the password.
After April 2023 all of that has changed as with the April 2023 security update systems running Windows 10 or newer and servers running Windows Server 2019 or newer now support Windows LAPS natively. No more extra programs are needed. There’s really no excuse for not using Windows LAPS.
The old way of doing Microsoft LAPS with the small client and LAPS UI is now called Legacy LAPS.
Here is step-by-step how to deploy Windows LAPS after the April 2023 update in on-premises Active Directory setup.
Prerequisites
- All domain controllers and systems managed by LAPS must have the April 2023 update or newer.
- An AD group for the users who can view LAPS passwords.
- An AD group for the users who can reset the current LAPS password. (You can use the same group for both if you want.)
- An Admin account that is a member of Schema Admins and Domain Admins.
- Domain Functional Level of Windows Server 2016 or higher.
Initial Configuration
- Login to a domain controller with an account that is a member of schema admins and domain admins
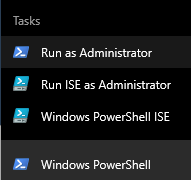
- Open PowerShell as admin
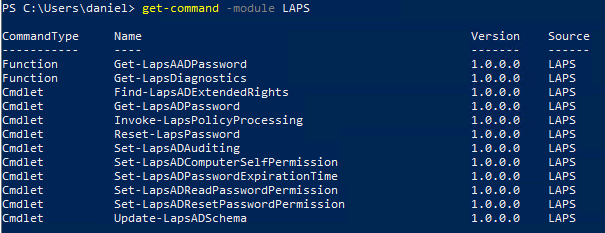
- Confirm you have the LAPS PowerShell module by running the following command
get-command -module LAPS
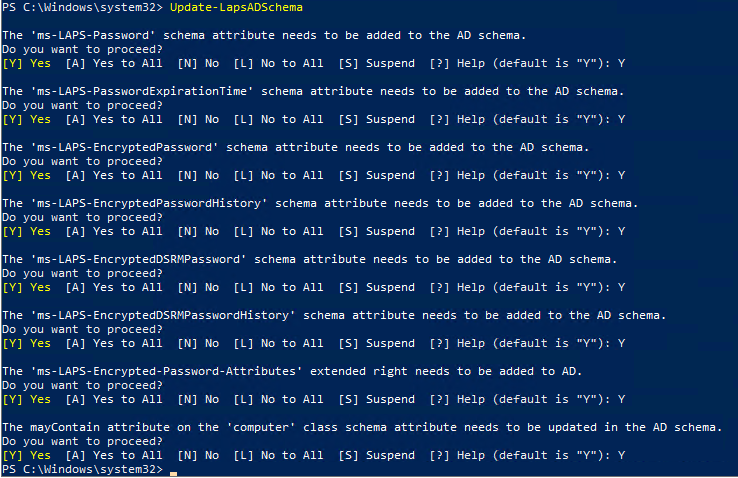
- Add the LAPS AD attributes by running the following command
Update-LapsADSchema
The AD attributes that will be added are the following:ms-LAPS-Passwordms-LAPS-PasswordExpirationTimems-LAPS-EncryptedPasswordms-LAPS-EncryptedPasswordHistoryms-LAPS-EncryptedDSRMPasswordms-LAPS-EncryptedDSRMPasswordHistoryms-LAPS-Encrypted-Password-Attributes
- Get the distinguished name for the OU that contains the computers objects that will be managed with LAPS. If you don’t know how to get the distinguished name here’s how to get a Distinguished Name.
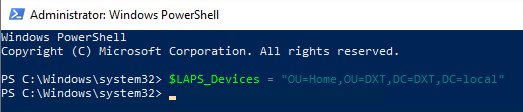
In my setup the OU that contains all my computer objects that I want to manage with LAPS is OU=Home,OU=DXT,DC=DXT,DC=local
- Define the OU to the PowerShell variable
$LAPS_DevicesI will do that by running the following command$LAPS_Devices = "OU=Home,OU=DXT,DC=DXT,DC=local"
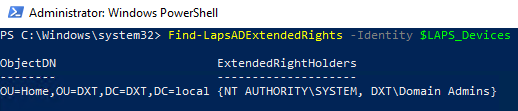
- Double check to make sure no one else can read the LAPS AD attributes by running the following command
Find-LapsADExtendedRights -Identity $LAPS_Devices
If the returned results are SYSTEM and Domain Admins you are good to go.
- Grant the computers permission to update their passwords by running the following command
Set-LapsADComputerSelfPermission -Identity $LAPS_Devices

- Grant LAPS password view permission by using the following command and replace DOMAIN\AD GROUP with your domain and the AD group that is allowed to view LAPS passwords
Set-LapsADReadPasswordPermission -Identity $LAPS_Devices –AllowedPrincipals "DOMAIN\AD GROUP"
In my setup my domain is named DXT and the group that is allowed to view LAPS passwords is named LAPS Viewers the command I will run is Set-LapsADReadPasswordPermission -Identity $LAPS_Devices –AllowedPrincipals "DXT\LAPS Viewers"

- Grant LAPS password reset permission by using the following command and replace DOMAIN\AD GROUP with your domain and the AD group that is allowed to reset LAPS passwords
Set-LapsADResetPasswordPermission -Identity $LAPS_Devices -AllowedPrincipals "DOMAIN\AD GROUP"
In my setup my domain is named DXT and the group that is allowed to reset LAPS passwords is named LAPS Reset the command I will run is Set-LapsADResetPasswordPermission -Identity $LAPS_Devices -AllowedPrincipals "DXT\LAPS Reset"

GPO Settings
Even thought you may have the PowerShell modules to setup LAPS you might not have the GPO template for it. If you don’t already have a central store you should create one. Here’s how to Create Active Directory Central Store.
- Using a computer that has the April 2023 update copy
C:\Windows\PolicyDefinitions\LAPS.admxandC:\Windows\PolicyDefinitions\en-US\LAPS.admlto your Central Store.
I recommend making a note that you’ve added an extra GPO template to the Central Store.
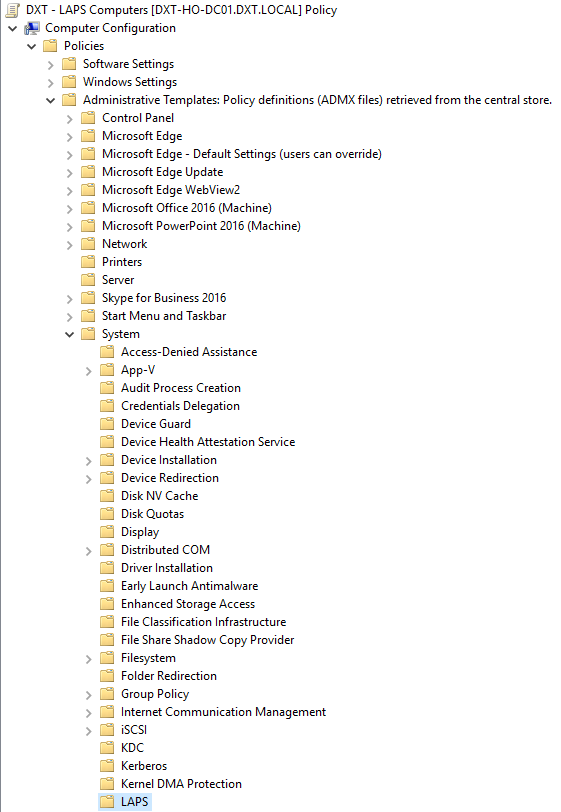
Now we need to make a GPO to tell the computer what settings to use with LAPS.
- Create a new GPO.
- Go to Computer Configuration > Policies > Administrative Templates > System > LAPS
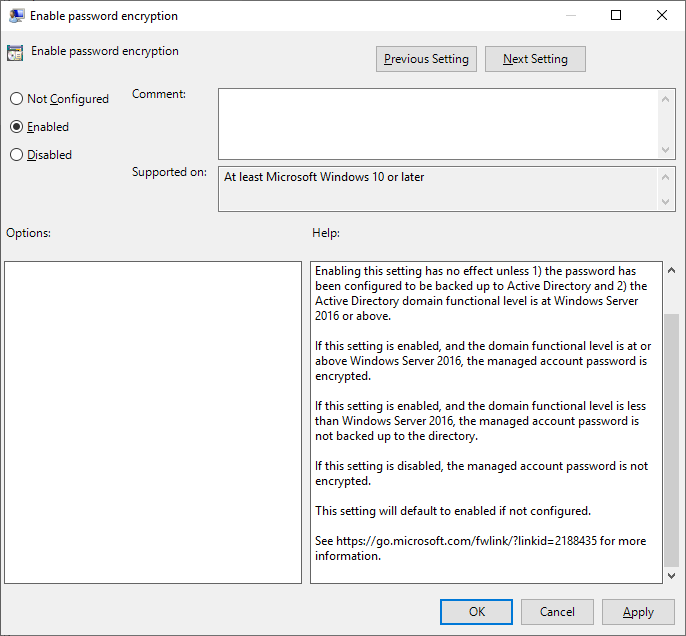
- Set Enable password encryption to Enabled.
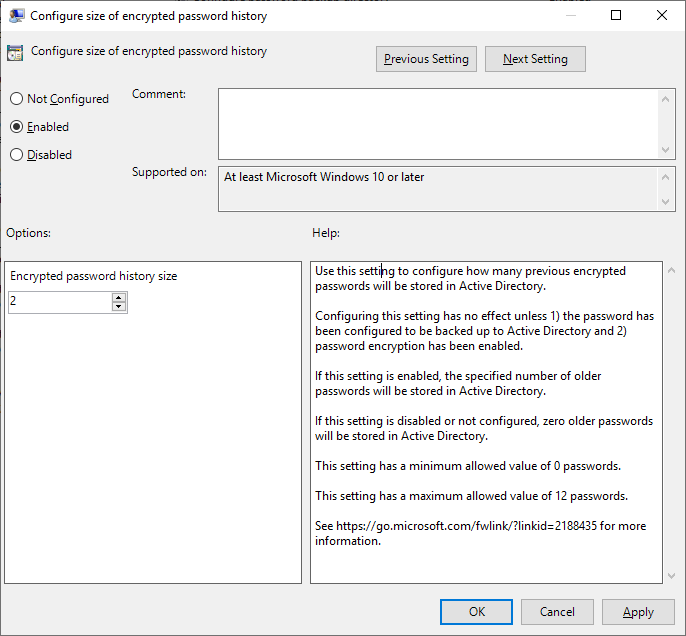
- Set Configure size of encrypted password history to Enabled and set the Encrypted password history size to 2.
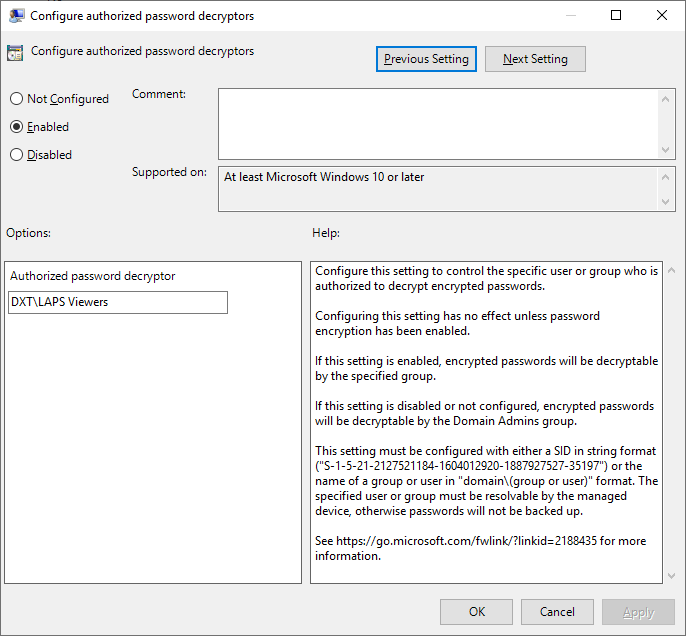
- Set Configure authorized password decryptors to Enabled and set Authorized password decryptor to the AD group that can view LAPS passwords. In my setup that is
DXT\LAPS Viewers
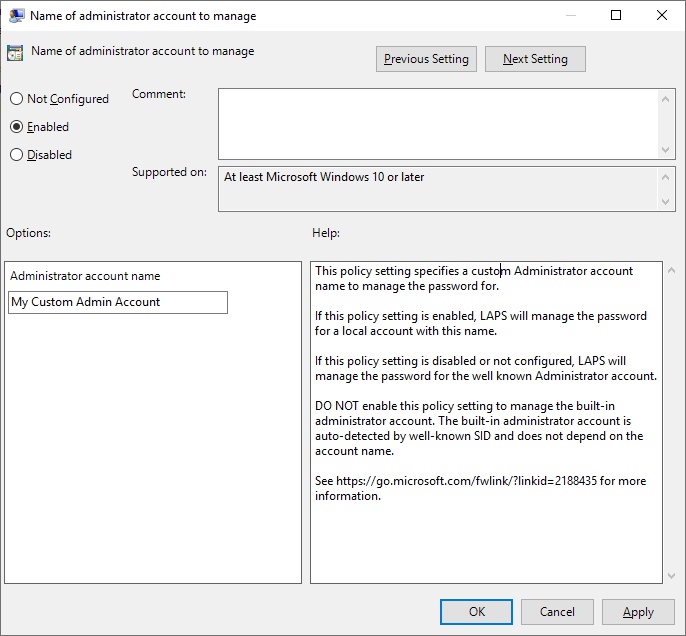
If you are using the default account named Administrator (even if you renamed it) then skip the settings for Name of administrator account to manage as you don’t need to do anything. However, if you use a different administrator account then you will need to configure that name in the options.
- Set Name of administrator account to manage to Enabled and enter the custom Administrator account name you use.
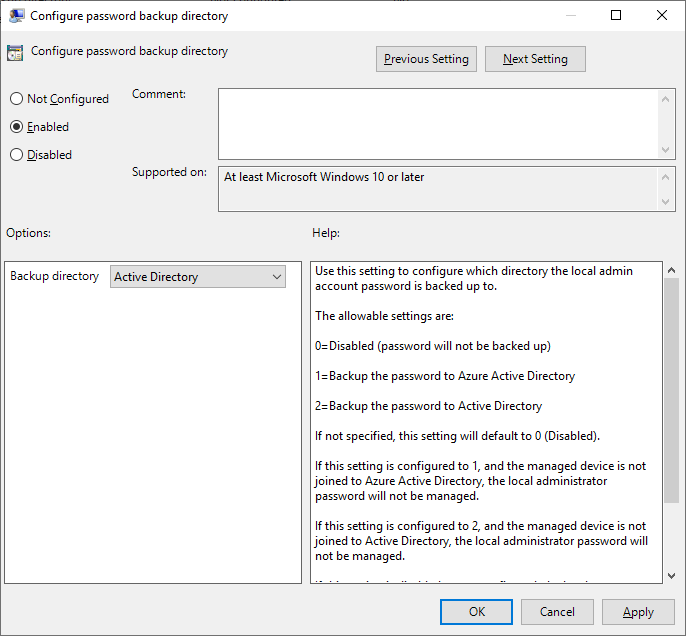
- Set Configure password backup directory to Enabled and and set the Backup directory to Active Directory.
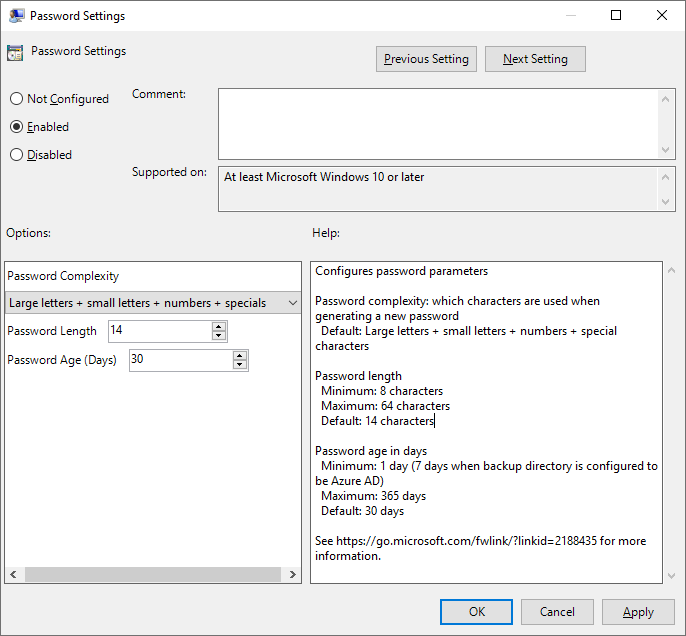
- Set Password Settings to Enabled and set the following:
- Set Password Complexity to Large letters + small letters + numbers + specials.
- Set Password Length to 14.
- Set Password Age (Days) to 30.
- Link that GPO to the OU of the devices you are managing with LAPS
- Wait for the GPO refresh interval for the settings to apply or manually run
gpupdateor reboot the device.
If you want to read more about the GPO options you can do so by reading Microsoft’s documentation about it here.
Retrieving LAPS Password
Here are a couple of ways to retrieve a Windows LAPS password.
The GUI Way
- Click on the object in AD.
- Select the LAPS tab.

- Click Show password

The PowerShell Way
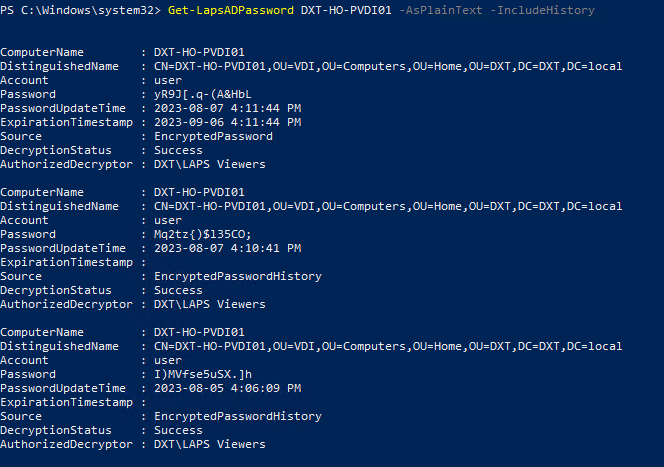
- To view the current LAPS password enter the following command and replace COMPUTER NAME with the name of the computer you want to view the LAPS password for
Get-LapsADPassword COMPUTER NAME -AsPlainText
For example if I want to get the LAPS password for the computer named DXT-HO-PVDI01 the command I will run is Get-LapsADPassword DXT-HO-PVDI01 -AsPlainText

- To view the LAPS password history you would add
-IncludeHistoryto the following command and replace COMPUTER NAME with the name of the computer you want to view the LAPS password history forGet-LapsADPassword COMPUTER NAME -AsPlainText -IncludeHistory
For example if I want to get the LAPS password history for the computer named DXT-HO-PVDI01 the command I will run is Get-LapsADPassword DXT-HO-PVDI01 -AsPlainText -IncludeHistory
Summary
That’s all it takes to set up and enable Windows LAPS after the April 2023 security update. I highly encourage you to consider deploying it in your setup, it’s an easy step to harden your setup.
If you want to learn more about Windows LAPS you can do so by reading Microsoft’s documentation about it here.