Moving Windows Recovery Partition Correctly
Recently I needed to expand a disk on a Windows 10 VM and a Windows Server 2022 VM, but I couldn’t because the Recovery Partition was in the way.
When searching for a way to do this I discovered that the internet is full of posts about simply deleting the Windows Recovery Partition. I am not a fan of simply deleting a recovery tool. On numerous occasions the recovery partition has been instrumental in helping me to fix a system.
If you search for how to move the Windows Recovery Partition the internet has many posts of fake ways to do it or ways to do it with third-party tools like GParted. I have nothing against third-party tools or GParted and I don’t doubt some of those methods do work. The issue I have with those methods is that you have to take the system offline in order to do them or the tools cost money.
Now yes you could just delete the Windows Recovery partition, but before you do that make sure you understand that you will lose a bunch of recovery options. You can read more about the recovery options you’ll lose in an earlier post I made about the Windows Recovery Partition.
Here’s how to correctly move the Windows Recovery Partition on a Windows server or a normal Windows system.
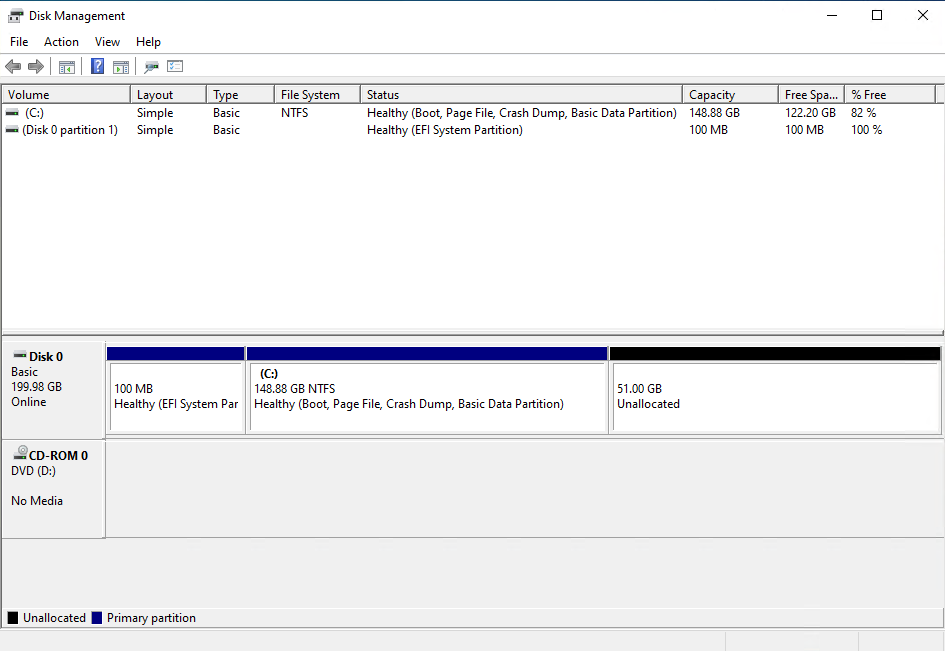
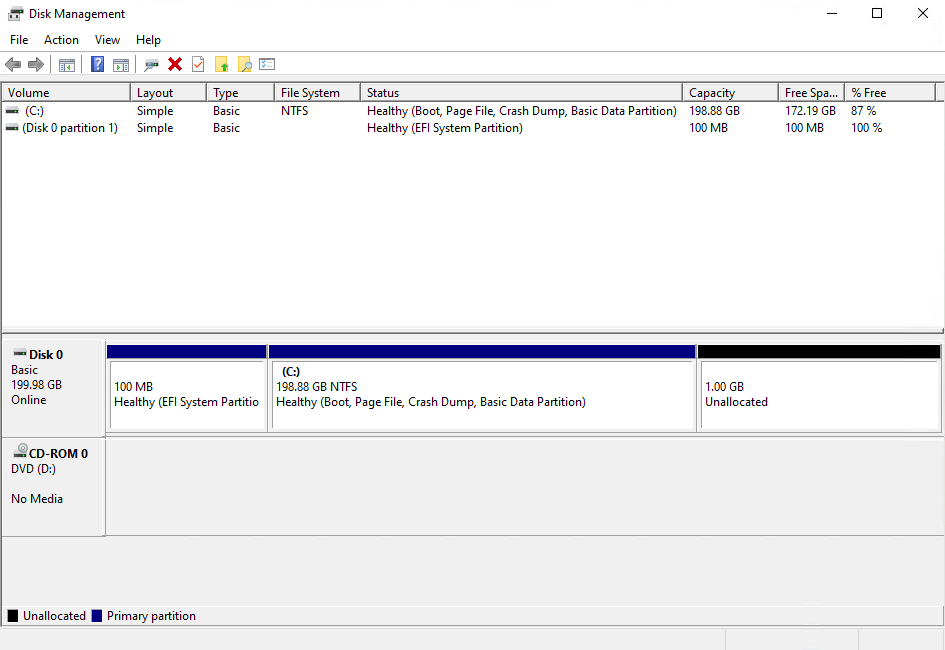
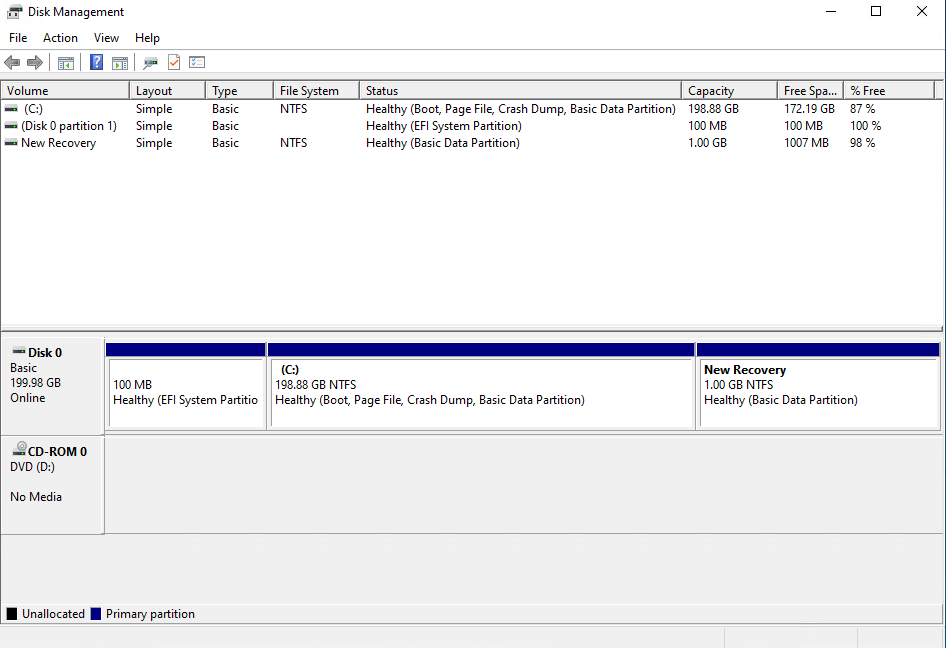
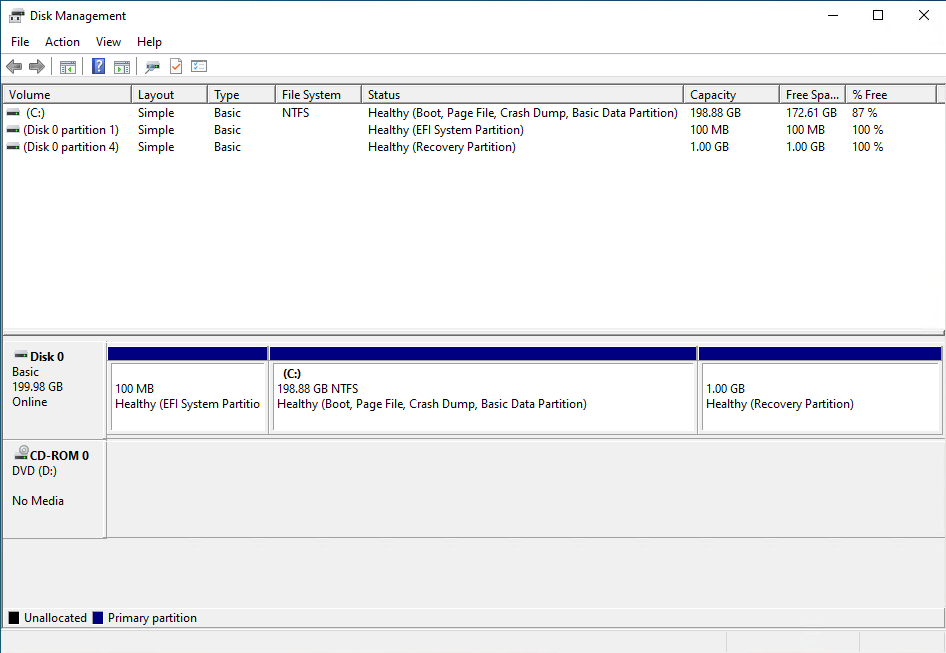
This is what my partitions look like in Disk Management.

We will move the 1 GB recovery partition to the end of the disk allowing us to add the 50 GB of unallocated space to the C drive.
The Process
- Make sure you have a backup of the system you are going to edit the partitions on.
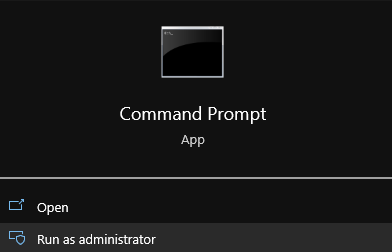
- Open Command Prompt as admin
Disabling The Windows Recovery Partition
- We need to disable the existing Windows Recovery Partition to do that run the command
reagentc /disable

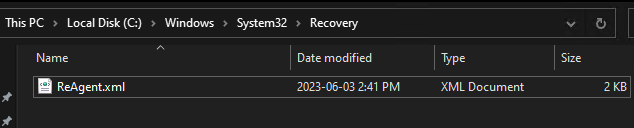
The reagentc /disable command will disable the recovery partition and will move the recovery partition into a file named Winre.wim and will be located in C:\Windows\System32\Recovery (you have to enable showing hidden system files if you want to see it)

DiskPart
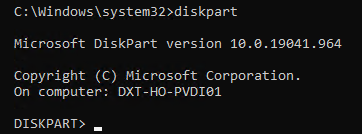
- Run the command
diskpartto launch DiskPart
- List the disks in your system. You can do this by using the command
list disk
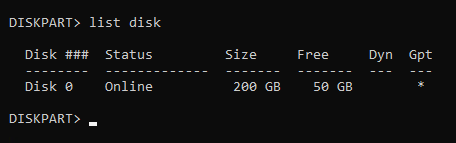
Pro tip from Matt in the comments, if there’s a * in the column for Gpt that means the disk is likely a GPT disk and if there isn’t a * in the Gpt column the disk is likely MBR. Make a note of this as it will be important further down.
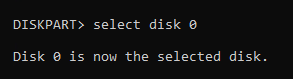
- Select the disk you need to move the recovery partition on. You can do this by using the command
select diskand the disk number. In my setup disk 0 was the correct disk and the command I entered wasselect disk 0.
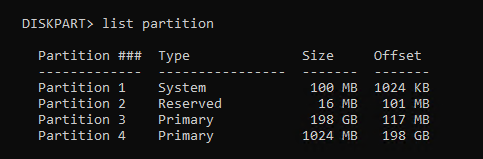
- List the partitions on that disk. You can do this by using the command
list partition
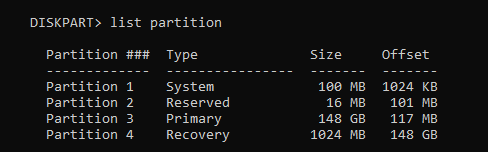
- Select the recovery partition. You can do this by using the command
select partitionand the partition number. In my setup partition 4 is my recovery partition and the command I entered wasselect partition 4

The recovery partition is a protected partition so we need to use a bit more force to delete it.
- Force the deletion of the recovery partition. You can do this by using the command
delete partition override

Disk Management
Now if you look in Disk Management you should no longer have the Recovery Partition and it should show up as unallocated.
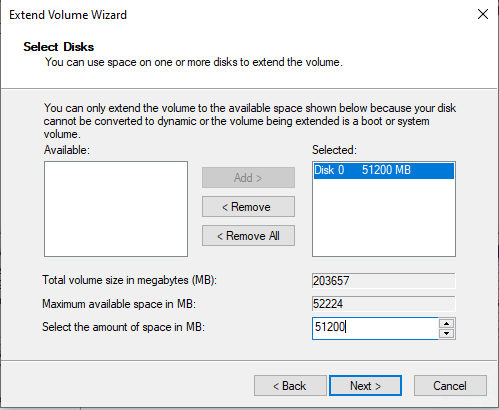
- Expand your disk and leave about 1024 MB off your resized size to leave room for the re-enabling the Recovery Partition.
Disk Management should now look something like this.
Once the disk is expanded we need to rebuild everything that is needed for Windows to know that the extra space that we left unallocated can be used to for the recovery partition.
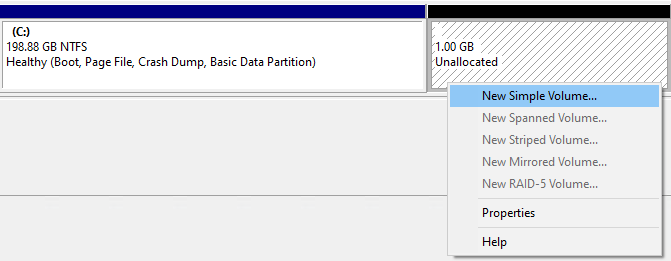
- Create a New Simple Volume with the unallocated space.
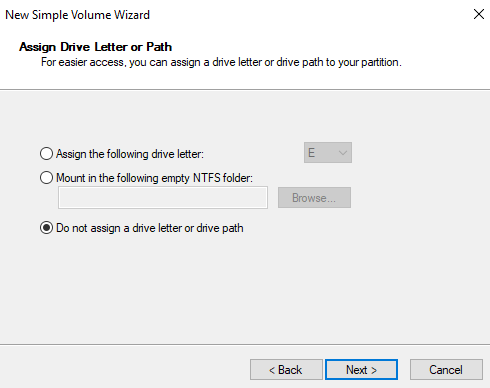
- Don’t give it a drive letter.
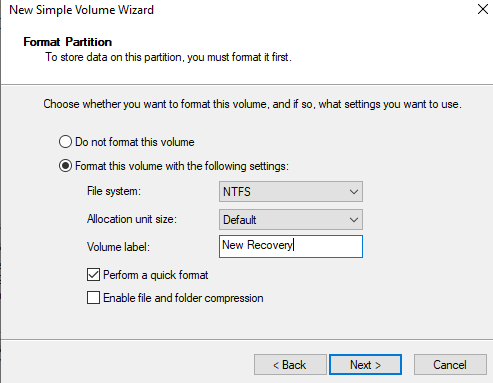
- You can give the new partition a name if you want it does not mater. I’m going to call mine New Recovery.
Disk Management should now look something like this.
Back to DiskPart
- In DiskPart list your partitions again by running the command
list partition
- Select the 1024 MB partition with the command
select partitionand the partition number. In my setup it was partition 4 and the command I ran wasselect partition 4
If you have a GPT disk you need to run some very specific command and if you have an MBR disk you need to run different very specific commands.
GPT disk
On GPT disks we need to change the partition ID to de94bba4-06d1-4d40-a16a-bfd50179d6ac which tells Windows that this is a recovery partition
- Run the following command to set the partition as a recovery partition
set id=de94bba4-06d1-4d40-a16a-bfd50179d6ac

We also need to hide the drive and flag it as a required partition to do that we have to set a GPT attribute to 0x8000000000000001
- Run the following command to set the GPT attribute to hide the drive and flag it as required
gpt attributes=0x8000000000000001

- Now we can exist DiskPart.
MBR disk
On MBR disks we need to change partition ID to 27 which will tell Windows that this is a recovery partition.
- Run the following command to set the partition as a recovery partition
set id=27

- Now we can exist DiskPart.
Enabling The Windows Recovery Partition
- Now we can re-enable the recovery partition by running the command
reagentc /enable

The reagentc /enable command will copy the Winre.wim file from C:\Windows\System32\Recovery into our new recovery partition.
If you look at Disk Management again everything shows up correctly.
That’s all there is to it.
Technically speaking we did just delete the Windows Recovery Partition but we did so in a way to keep our existing recovery partition safely intact and then we rebuild the recovery partition and re-enabled it.
I prefer doing it this way as it leaves your recovery options intact and you can do it all live without any reboots.
If you want to read more about deploying the Windows Recovery Partition you can do so by reading Microsoft’s documentation about it.
If you want to read more about reagentc command you do so by reading Microsoft’s documentation about it.


304 thoughts on “Moving Windows Recovery Partition Correctly”
Thank you, I tried your solution and it worked very well. I like it because it does not need third party software and preserves recovery partition. Your description is very clear and detailed.
That’s awesome! I’m glad it worked out.
Agreed. This saved me a couple of hundred bucks!
Nice!!
So will this work, for whatever reason my recovery partition is at the beginning of my disk, and Im trying to allocate space to it, but it wont let me, since the C drive is where i’d steal from, and thats at the end of the disk. So if I delete my recovery partition in your example, will it pop back up at the beginning regardless?
Hi Larry,
As long as you disable the recovery partition before you delete it you should be good to go. I’d backup the system just to be extra safe.
When you enable the recovery partition it will go to which ever partition you have set with the recovery attributes (the section called Back to DiskPart) if the partition with the recovery attributes is at the front of the disk or the end of the disk it doesn’t seem to matter it will just go to whichever one has the attributes. I don’t know what happens if two partitions both have the recovery attributes set.
Thank you very much. I did it without need any third party soft.
No Problem!
Just what I needed for my Windows 10 VM.
The instructions are thoroughly explained and the accompanying visuals are quite useful.
Most importantly, it worked without any problems.
Awesome!
Agreed with Dzery – fantastic post, very easy to follow, doesn’t require third party software or rebooting, made upgrading my wife’s laptop very easy. I’d been struggling with thinking that Disk Management could move the partition, and had moved on to using gparted but wasn’t sure how to make that work. This was really easy and I think it took longer to read through it than to do it. Thanks, much appreciated!
I didn’t know if the PC’s setup was GPT or MBR. I Googled it, and it’s actually in your screenshot under the “list disk” command – in the “GPT” column, an asterisk indicates that the disk is setup as GPT; if that asterisk is not there, then it’s MBR.
oh Nice! I think it’s a lot more common to see GPT disks than MBR now. I almost didn’t add the MBR part.
Thanks again for the tip about how to tell if the disk is MBR or GPT easily. I’ve updated the post to add a comment about it.
Thank you so much, your solution worked. It was easy and clear.
Yay!
Worked well for me on Windows Server VM and my disk was also MBR
Yay!!
Hi, my recovery partition rebuilt itself on the 100MB EFI partition so I just have a 100MB recovery, data drive and 1GB data drive unused?
That shouldn’t be possible as if it does replace the EFI the system might not be able to boot up.
Can you open CMD as admin and run reagentc /info if it says Windows RE status Disabled you might have missed enabling it again or if some of the steps were missed it will enable it but put it in a folder on the computer instead of the recovery partition.
Can you post what the results of reagentc /info are as that will help.
Thanks, Daniel.
you are very welcome!
This process worked great for me. I was working with a VM in Azure, so third party tools were not really an option for me. Oddly enough my disk was an MBR disk. Many thanks to Matt for this comment: “I didn’t know if the PC’s setup was GPT or MBR. I Googled it, and it’s actually in your screenshot under the “list disk” command – in the “GPT” column, an asterisk indicates that the disk is setup as GPT; if that asterisk is not there, then it’s MBR.”
This really helped me!
I’m glad it all worked out for you.
Oh wow I hadn’t considered this would be an issue in Azure, I figured they would have some other tricks around it. I also never thought that an Azure VM disk wouldn’t be GPT. I’ve updated the post to add a note about Matt’s comment for detecting if the disk is GPT or MBR now.
Not all heroes wear capes.
Thank you!
You are very welcome. I’m glad it worked out for you.
Helped me a lot, thanks!
I’m happy I could help.
Spot on documentation! came in handy
Thank you!
Oddly I never saw the Winre.wim file in my folder – I had ‘show hidden’ selected.
Other than that everything was flawless!
Thank you for an excellent writeup 🙂
It might not have shown up because its a hidden system file and show hidden files doesn’t show hidden system files. There’s another option to enable that in the Folder View Options called Hide protected operating system files.
Thank you. I’m glad it worked.
Does this works on Windows 11 too?
Yup
Very informative and well written, thank you!
In my case I had three existing partitions on MBR disk:
1. Small System Reserved
2. OS, which I needed to expand
3. Recovery
4. Unallocated, which I wanted to be another logical drive.
I preferred deleting Recovery, then expanding the partition I wanted, and then putting back Recovery as a third partition, so it still would be a Primary one. Since the fourth (and the last for MBR due its limitations) partition would be an Extended one with a logical volume, I thought it won’t be a good idea putting the Recovery partition on it. I hope it makes sense,
Thanks!
Yes technically we are deleting it, as long as you disable the recovery partition first with the reagentc command you can delete the leftover recovery partition without issue and when you create a new recovery partition with the needed parameters then when you enable it again it will go to the new place you defined be it the middle of the disk or the end of the disk.
Looks like this will be my guide for resizing VMs going forward. Thank you for the excellent write up.
I’m honored thank you!
Awesome – probably the most useful guide I’ve read in a while
Thank you!
When you delete a partition, you should wind up with an unallocated space ( volume ) on disk… Can you explain this and how your Recovery Partition was number 4 at the beginning of your procedure?
When you run the reagentc /disable command it takes the recovery image file off of the recovery partition and places it in C:\Windows\system32\recovery because of this you can safely delete the recovery partition effectively deleting partition 4.
In the case of the example I used, I had an already existing recovery partition which was partition 4 but I wanted to add more space to my C drive. The recovery partition was in the way so I turned off the recovery partition to keep it safe then I deleted the left over unused partition 4 turning partition 4 into unallocated space again.
Then I was able to expand my C drive but I left 1gb free at the end of the disk and I recreated a recovery partition by setting the GPT id (or MBR id) . Once a recovery partition is created correctly when you run reagentc /enable the recovery file from C:\Windows\system32\recovery goes back on to the recovery partition as if nothing changed.
Your Recovery Partition was on the very left on the first screenshot and it should appear as unallocated in the exact same location after deleting it. And how did you move (C:) to the left using no third-party tool?
I replied to your other comment with more details but effectively I deleted the recovery partition then expanded my C drive but I left 1gb free when I expanded my drive so that I could turn the leftover unallocated space into a new recovery partition. The only tools used are the built in Windows tools included on all Windows systems.
Your procedure is for the most part very useful but I repeat, your pagetop screenshot shows a Recovery Partition located on the very left of disk and, since mine is located there too, I will have to use a third-pary tool move my EFI and hidden 16 MB partitions afterwards. That said, thanks a lot for your generosity. 🙂
The screenshot at the very top of this post was EFI, C drive 148gb, recovery partition 1gb, unallocated space 50gb.
I wouldn’t recommend moving your EFI partition away from the beginning of the disk that could have unintended side effects.
The end result I wanted was EFI, C drive 148gb, unallocated space 50gb, recovery partition 1gb.
To achieve this result yes you could use a third-party tool but you don’t have to.
You just need to disable the recovery partition and then delete it. This will make the disk layout be the following EFI, C drive 148gb, unallocated space 51gb
Now if you expand the C drive to eat up 50gb of that unallocated space but leave 1gb your layout will be EFI, C drive 198gb, 1gb unallocated space
Now you take that 1gb unallocated space and make it a partition. which makes the disk layout
EFI, C drive 198gb, new 1gb partition.
then if you use diskpart you can make the new 1gb partition become a recovery partition.
then when you re-enable the recovery partition the disk layout becomes EFI, C drive 198gb, recovery partition 1gb.
But yes you can use a third party program to do the same thing. I just didn’t want to. Either method you choose I wish you the best of luck with it. Please make sure you have a backup first.
Oh! EFI will not move from beginning of the disk if I decide to move my Recovery ( which comes before EFI with Retail versions of Windows ), move and resize my Recovery Partition as a fix for the KB 5034441 update that woluld not insrall normally because of insufficient size of this partition, only the Recovery one wll move. Now, I repeat again, my Recovery Partition is at the very beginning of the disk, as with any Retail version of Windows.
ohhh ok. We are same page now. Quick tip about KB5034441 I still ran into the error when my recovery was 1gb I tested it on another system and it worked by making it a total of 1.5gb.
By the way, the pagetop image of this post, I now got it, is ( involuntarily ) deceiving since EFI and OS partitions do not appear on it. But whatever, you seem to be great at IT and your post will help many so I want to says thanks again. 🙂
No problem! Thank you!
I have been lucky, it worked for me at 1 GB. Now I have a 530 MB partition at the beginning of my disk: since the 16 MB partition is not movable ( and for so it would have been be useless to move EFI even closer to the beginning of the disk ), I could not resize (C:) on the left so I created a new volume ( with no letter for the moment ), I might use it some time in the future. But anyway, my disk being 1 TB, I don’t mind much. Everything works fine on my main PC, it boots normally, I only have the living room one left to modify. Thanks again, my friend. 🙂
Nice! no problem.
Great article just what I needed!
Thanks!
THANKS!!!!!
No problem!
Unbelievably helpful. Thanks Daniel!
No problem! Happy to help.
Very good.
I did it in half a dozen PCs in my company, some UEFI, some legacy BIOS, some disks GPT some MBR, all went well.
Nice!!!!!!!!
Fantastic, thank you
Happy to help!
Excellent! Thank you so much!!!!!!
No problem!
Thanks for writing this article. I’ve just followed it but hitting problems during enabling. Looking at the logs it appears it finds issues in the REAgent.xml. I did delete the existing recovery partition and created a new (slightly larger) one near the end of the HDD
C:\Windows\System32>ReAgentc /Enable /logpath C:\Temp\Reagent.log
REAGENTC.EXE: Operation failed: b7
REAGENTC.EXE: An error has occurred.
2024-02-09 19:13:37, Info [ReAgentc.exe] Get ReAgent config
2024-02-09 19:13:37, Info [ReAgentc.exe] GetReAgentConfig Config file path: C:\WINDOWS\system32\Recovery\ReAgent.xml
2024-02-09 19:13:37, Info [ReAgentc.exe] CheckRegKey test hook (SystemSetupInProgress) present and disabled
2024-02-09 19:13:37, Info [ReAgentc.exe] Update enhanced config info is enabled.
2024-02-09 19:13:37, Warning [ReAgentc.exe] Failed to get recovery entries: 0xc0000225
2024-02-09 19:13:37, Info [ReAgentc.exe] winreGetWinReGuid returning 0X490
2024-02-09 19:13:37, Info [ReAgentc.exe] ReAgentConfig::ReadBcdAndUpdateEnhancedConfigInfo WinRE disabled, WinRE Guid could not be determined (0x490)
2024-02-09 19:13:37, Info [ReAgentc.exe] FindWinReSourceImageAndPartition No source winre.wim was specified. Checking for a staged winre.wim.
2024-02-09 19:13:37, Info [ReAgentc.exe] FindWinReSourceImageAndPartition using winre.wim from \\?\GLOBALROOT\device\harddisk0\partition3\Windows\System32\Recovery
2024-02-09 19:13:37, Info [ReAgentc.exe] –Install on target OS step 2: detect and fix if there is any issue for winre settings
2024-02-09 19:13:37, Info [ReAgentc.exe] DetectAndFixWinReIssues nothing to do because winre is not enabled.
2024-02-09 19:13:37, Info [ReAgentc.exe] –Install on target OS step 3: check if we can keep winre.wim in the same partition if it is staged.
2024-02-09 19:13:37, Info [ReAgentc.exe] CanKeepWinReOnSamePartitionIfStaged WinRE is staged. Checking that the staged partition is valid for WinRE.
2024-02-09 19:13:37, Info [ReAgentc.exe] MeetPartitionRequirements Partition details: {Offset: 344981504, Free space: 107434786816, Total space: 268935622656}
2024-02-09 19:13:37, Info [ReAgentc.exe] MeetPartitionRequirements WinRE WIM size: 1002867364
2024-02-09 19:13:37, Info [ReAgentc.exe] MeetPartitionRequirements Required free space: 356515840
2024-02-09 19:13:37, Info [ReAgentc.exe] NOTE: Find target partition: source partition will used
2024-02-09 19:13:37, Info [ReAgentc.exe] –Install on target OS step 5: set WinRE settings and restore system to a good state when hitting any errors
2024-02-09 19:13:37, Info [ReAgentc.exe] Enter SetWinRESettings
2024-02-09 19:13:37, Info [ReAgentc.exe] RegLoadKey $OFFLINE$SYSTEM failed. Error: 0x522.
2024-02-09 19:13:37, Info [ReAgentc.exe] Copying WinRE from \\?\GLOBALROOT\device\harddisk0\partition3\Windows\System32\Recovery to staging location on \\?\GLOBALROOT\device\harddisk0\partition3
2024-02-09 19:13:37, Warning [ReAgentc.exe] winreOpenOrCreateDir failed to create directory (0xb7) in file base\diagnosis\srt\reagent2\reagent\util.cpp line 1169
2024-02-09 19:13:37, Error [ReAgentc.exe] winreOpenOrCreateDir failed: 0xb7
2024-02-09 19:13:37, Warning [ReAgentc.exe] winreCopyWIM failed to create \Recovery root directory (0xb7) in file base\diagnosis\srt\reagent2\reagent\install.cpp line 1540
2024-02-09 19:13:37, Error [ReAgentc.exe] winreCopyWIM failed: 0xb7
2024-02-09 19:13:37, Warning [ReAgentc.exe] SetWinRESettings winreCopyWIM failed (0xb7) in file base\diagnosis\srt\reagent2\reagent\installex.cpp line 652
2024-02-09 19:13:37, Info [ReAgentc.exe] SetWinRESettings return with error code 0xb7
2024-02-09 19:13:37, Error [ReAgentc.exe] failed to set WinRE settings, error:0xb7
2024-02-09 19:13:37, Info [ReAgentc.exe] Exit WinReInstall return value: 0, last error: 0xb7
2024-02-09 19:13:37, Error [ReAgentc.exe] failed to install winre: : 0xb7
before you deleted the existing recovery partition did you run ReAgentc /disable ?
I had this problem
Turns out that b7 indicates “files already exist”
DanTheFryingPan at
https://learn.microsoft.com/en-us/answers/questions/1607174/cant-enable-recovery-partition-after-conversion-to
sorted it with the following which also worked for me..
After hearing and finding the same generic “solutions” on the internet I finally found it myself. (Thanks Microsoft for making a weird ass unreadable error code, ‘b7’ like wtf does that even mean?)
No enabling disabling doesn’t work, it was already disabled and enabling would throw an error.
No setting path doesn’t work either because it just eats the Winre.wim file and fixes nothing.
No, I already had a specially made 1Gb recovery partition with all the appropriate markers applied (which is literally written in my post btw).
Turns out that I had to delete (on my main partition) C:\Windows\System32\Recovery files like “Reagent.xml” and “Reagent_merged.xml”, after which the reagenc /enable command would write a new .xml file and work just fine.
Interesting. That’s an odd one, I haven’t ran into it yet. Thanks for sharing what ended up working!
One of the best Windows tutorials I have ever seen! Well documented and easy to execute.
Thank you!!
May the sun shine warm upon your face. Thank you for this, saved me lots of time.
Thank you for the nice good will. Happy to help!
Outstanding tutorial! When I transferred my win11 image to new NVMe drive, I ended up with 3 Recovery partitions between unallocated space. Now have one at the end and only one data drive! Thanks a bunch!
Thank you. I’m glad it helped.
Bang-on. Clearly understandable, no fluff, no muss. EXACTLY what I needed, and now I’ve even learned a bit about the structure of partitions. (May want to swap order of the “do not assign a drive letter” and the configuration of the volume, as that’s the order they’ll happen in the real world.)
Thanks for a great tutorial!
Thank you, Happy to help!
Hello, great tutorial, and i followed it to the T, however when i finally re-enable recovery after setting the partition type to 27, REAGENTC moves the winre.wim file back to C: drive (C:\Recovery\WindowsRE folder), and not to the partition I identiified as the recovery partition. I double checked the partition type with DISKPART, and it shows 27. However if i look at the partion properties via EASEUS Partition Manager, I still see 7 as the partition type!. I rebooted the PC but still having the same results. I am really buffled with this discrepancy between DISKPART and EASEUS.
If the partition type is still 7 as indicated by EASEUS, that explains why the winre.wim is not moved there, but why is that DISKPART showing it as type 27? Any ideas what might be wrong here. Thanks
Hi Ray,
I’m not sure, I haven’t seen that before. What I would try is disabling the recovery again then redo all the steps.
I have seen recovery fail to reenable when bitlocker is on but you should get a message about that issue.
Amazing!
Thank you.
No problem.
Brazil loves you. Thank you!
Lol thank you.
You are a real life saver man. I’ve been stuck with this since yesterday and nothing worked but yr method. I’ll trash all the 3rd party progs I was forced to install in vain. Salute.
Glad I was able to help!
I had an old partition with linux on it that wasn’t working anymore. I kept trying to merge it into my main windows partition but couldn’t figure out how to do it with the recovery partition in the way. My windows partition was 2 GB away from running out of storage. I had deleted all the things I didn’t need and tried other things to save space, but it was just kicking the can further down the road. I was on the verge of buying a new laptop until I stumbled upon your post through which I was able to recovered 40 GB from the linux partition. You saved me a lot of money and hassle. Truly, thank you!
PS: Well written too! Very clear and easy to follow
oh wow! I’m glad this help save you time and money
Worked. Super helpful. The pictures were the best part. makes it easy to follow. Worked on a 2022 Server. Raid Structure.
Oh Awesome!
Hi Daniel.
I used your method successfully on a few Win 10 environments, and even on one Server 2022 environment. I will admit I missed taking notice of the step where upon running reagentc /disable, you showed the presence of the winre.wim file in the C:\Windows\System32\Recovery directory. Now, I have encountered an error with the method on another Server 2022. This time when I run the command reagentc /enable I get “REAGENTC.EXE: The Windows RE image was not found.”. In troubleshooting, I noticed the Winre.wim file was not created in the above directory. I went back to a server 2022 where I had went through the process successfully, re-ran the reagentc /disable command, and it too did not create that file. Yet, the reagentc /enable command still works just fine on it.
Could the file be saved in an alternate location? (that I can’t seem to find).
Is there any way I could extract the recovery partition (Winre.wim?) from an existing server 2022 (that was created from the same image as the one I’m having troubles with) and use it for this server I’m working on?
My current partition information:
DISKPART> list part
Partition ### Type Size Offset
————- —————- ——- ——-
Partition 1 Primary 129 MB 1024 KB
Partition 2 Primary 49 GB 666 MB
Partition 3 Primary 48 GB 49 GB
Partition 0 Extended 1537 MB 98 GB
Partition 4 Recovery 1024 MB 98 GB
Thanks ahead of time for any assistance you can provide.
Hi Serge,
Yes it should be possible to use another systems recovery image to rebuild a recovery partition you should make sure they are on the same build number (I’ve heard that maters but not sure how much it maters). I haven’t done it by copying the Winre.wim file directly from another system but in theory that should also work. Make sure you also have a backup.
Hi Daniel
This worked a treat on my virtual 2022 server, need more space on C drive.
Nice and easy to follow.
Thanks.
Mark C.
Hi Mark,
Awesome! Glad it worked.
Excellent writeup. Thanks much!
No problem! and thank you!
Gold! Pure gold! Thanks so much Daniel. Saved our @$$ on an old Server 2012 R2 VM that needed more space.
That’s awesome!! Happy to help.
Thank you so much for this – worked like a charm.
Of course, Microsoft could add this functionality into Disk Manager, but that would be helpful.
No problem. Happy to hear that.
Yeah that would be awesome if they did.
Your the Best, awesome GUIDE!
Happy to help!
Hi Daniel,
WinRe is disabled on my system and I don’t have a *.wim file in the system32 directory. (yes, files are not hidden). What do I do?
Hello,
Just enabling show hidden files is not enough you have to disable “Hide protected operating system files” in Folder Options too.
If you’ve done that already run reagentc /info and see what it says.
Thank you so much, after almost an hour searching for a solution without success, this one worked perfectly.
No problem! I’m glad it was helpful.
Thank you Daniel for a well written solution to a well known problem. Used this technique to expand a limited C: drive with no problems whatsoever. I will happily refer others to this solution.
You are very welcome. Thank you for letting others know!
Absolutely fantastic. Well written and works perfectly thank you.
Thank you! Happy it worked for you!
I am happy I have found your tutorial – it worked perfectly!
I mixed it with GParted to move a few Linux partitions too (I have both Windows and Linux on my computer).
Now, my partitions are optimally organized 🙂
Thanks a lot!!!
Awesome! Glad it worked out for you.
This was the best concise and definitive method that I found to expand a volume on a Windows server VM without having to bring the server offline and without third-party tools. Worked perfectly and you get to keep the RE partition as well. Well done for posting this.
Awesome! Happy to help!
Hi Daniel. I`ve followed all the steps but I had the same problem like
Martin Whitfield June 11, 2024 at 5:48 am
when I tried to enable reagent
C:\Windows\System32>reagentc /enable
REAGENTC.EXE: Windows RE cannot be enabled on a volume with BitLocker Drive Encryption enabled.
Hi Alex,
For the BitLocker Drive Encryption enabled I’ve only ran into it once and my solution was to turn off BitLocker fully then re enable the recovery partition and turn BitLocker back on. I’m not sure if there’s a better solution.
Worked.
Thank you
Awesome! No problem!
This helps! Thank you so much!
You are very welcome. Glad it helped.
Thank you for this, Daniel. Helped me extend my boot drive!
You are very welcome!
Thank you for the tutorial! For people that are running into the BitLocker encryption error when trying to re-enable the recovery partition, here’s how I solved it. There’s no need to disable BitLocker for the whole drive.
1. On the step where you format the partition, assign a drive letter (it can be any letter, I’ll choose L: here.)
2. Open up PowerShell, and run the following command:
Disable-BitLocker -MountPoint “L:”
It may give you an error like “BitLocker Drive Encryption is not enabled on this drive. Turn on BitLocker. (Exception from HRESULT: 0x80310008)”. This is okay.
Run `Get-BitLockerVolume` and confirm the output looks something like the following (the recovery partition of mount point L: should have the `VolumeStatus` `FullyDecrypted`:
VolumeType Mount CapacityGB VolumeStatus Encryption KeyProtector AutoUnlock Protection
Point Percentage Enabled Status
———- —– ———- ———— ———- ———— ———- ———-
OperatingSystem C: 1,862.15 FullyEncrypted 100 {Tpm, RecoveryPassword} On
Data L: 0.75 FullyDecrypted 0 {} Off
You can now remove the drive letter and proceed with the rest of the steps.
Thank you for this!
Have done this on a domain controller and a couple of file servers and it has worked a treat. Good job!
I’m glad it all worked out for you.
Are there any drawbacks to moving the recovery partition to its own seperate disk using this method?
I am unsure of what happens if you move the recovery partition to it’s own disk. I’ve always left it on the same disk.
Worked for me, thanks!
That’s awesome! No problem.
Works great, thank you very much. You’ve made my day.
Awesome! Glad I could help!
Thank you, that worked like a charm!!!!!!!!
YAY!!
Fantastic tutorial. I wish I had had something half as good for moving my EFI partition which I was finally able to do. I keep my OS C:\ partition small to make backups faster and smaller, but I made it too small on one of my PC’s (parts of which might date back to Win 7) and needed to enlargen it, but EFI and Recovery were in the way of the remaining 1.5+ TB’s.
I thought I was gonna be in trouble when right off the bat it said “Windows RE is already disabled,” and later when I could not find winre.wim in recovery and sfc /scannow didn’t find a violation – (I had show hidden files, folders and drives set to view, but not also system files but showing them revealed it. I got an “unable to update Boot Configuration Data” error. So I cut and pasted out reagent.xml and reagent_merged.xml from the System23\recovery folder and tried again to enable it and all ended well (although I have not yet had to try it to see if it works).
THANKS SO MUCH!
Thank you!
You are very brave! I’ve always been to scared to mess with EFI partition. That’s awesome that it worked.
Works great, thank you very much.
Happy to help!
Perfect guide. Exactly what I needed. It’s so nice that information like this still exists online in an age of endless AI-generated garbage, sponsored posts, and paywalls. Thank you Daniel!
Thank you that means a lot. I’m glad it worked for you.
Just a quick question – I have a recovery partition at the start of my disk (529MB) as well as after the C: partition (779MB). I’ll assume this is because I’ve upgraded to W11 and at some point the recovery function outgrew the first partition. Will this method still work when there are two?
In my case, partition 1 and partition 5 are both recovery partitions.
Thanks!
I don’t think I’ve ever seen two recovery partitions before. I’m not sure what will happen.
If you run the command
reagentc /infothe output should tell you which partition is actually being used for the recovery partition.Thanks work perfect
Awesome!
Thanks for the awesome discription. Seems to have worked perfectly. I saw in the comments that you almost didn’t list the MBR method… I’m glad you did, since apparently that is what mine needed.
Had just one question. After I finally got things moved around and set up the partition that would be come the recovery, then formatted it, I ended up with what appears to be the same partition expressed as both and ‘EXTENDED’ drive and a ‘LOGICAL’ drive. When choosing in diskpart which to make the recovery partition, I chose the ‘LOGICAL’ drive.
So now when I list partition I see:
Partition 1 Primary 100MB 1024
Partition 2 Primary 450GB 101MB
Partition 3 Primary 480GB 450GB
Partition 0 Extended 1025MB 930 GB
Partition 4 Recovery 1024MB 930GB
Does all of that seem correct?
Thanks again!!!!
Chris
You are welcome!
As for the extended and logical drive that’s very strange I have no seen that before. Maybe partition 0 is the boot partition I’m not sure. What does disk management show?
Merci beaucoup pour ce tuto, tout a marché à la lettre !
De rien. Je suis content que ça a fonctionné pour vous.
Thank you so, so much. I hate using the command prompt as I don’t feel anywhere near qualified enough to do it, but your perfect step by step instructions mean I no longer have a pointlessly partitioned hard drive (supplied that way) and I have more than 3.2GB free on my C drive! Thank you again.
No problem! the more you use command prompt the better you get. Glad it all worked out!
Great instruction. For anyone having an issue performing this successfully while getting error 4c7 when attempting to reenable the recovery environment, be aware that for whatever reason, enabling the recovery environment when Windows is in Audit mode will not work. You will need to exit audit mode to successfully enable the recovery environment.
Thanks! Oh that’s good to know thank you!
Hi Daniel,
Everything worked except at the end it said “The Windows RE image was not found.”
I guess I need to figure out how crerate a new recovery image?
Thanks!
Sal
Hi Sal,
Did it give you any errors when you disable the recovery partition with reagentc command?
I have run across this multiple times in my IT career. Just curious, but is the cause due to cloning from another OS with a smaller drive?
This is an awesome article, worked perfectly. Thank you for the detailed steps!
Thank you! I’m glad it worked.
The cause can be a few things. On physical systems it might be due to cloning. However, I usually run into this with virtual machines when the C drive was provisioned a bit too small and you need to add more space to the VM.
Why not just move the partition to the front of C drive and then your set for life anytime you have to expand it
I think that’s easier said then done.
Thank You man! You save my life! Regards from Brasil!
You are very welcome! Glad I could help.
Great article.
You may find “reagentc /info” is useful before and after the disable step and after the enable step.
Also, “detail part” after selecting an existing recovery partition will output the id and attribute strings so you can copy and paste them.
Thank you.
That’s a good point. Oh cool, I didn’t know about detail par telling you about the id an attribute strings. Thank you for that!
Question – when i try running the set ID command “set id=de94bba4-06d1-4d40-a16a-bfd50179d6ac” in Server 2022, I am getting an error that says:
“The specified type is not in the correct format. For more information on the command type: HELP SET”
However, if you do a help set, the format / syntax on the example looks correct. Maybe the ID is wrong for 2022?
Are you sure your disk is GPT and not MBR? if it’s MBR then it would be set id=27
Hey guys,
I’m trying to use the above steps on a Windows Server 2025 and I’m getting the same result as anon (““The specified type is not in the correct format. For more information on the command type: HELP SET”). I’ve checked, the disk is GPT. The suggested id=27 shows the same result.
Could it be that the ID has changed in server 2025? Can anyone tell me where to get it? “HELP SET” unfortunately only shows the IDs for EFI, Basic data, MSR, LDM and Cluster Metadata. No Recovery Partition.
Any help or hint is appreciated!
Hello,
That is strange. I’ve just tested it on a fully patched Server 2025 and everything worked as expected.
This is where Microsoft has the recovery ID documented https://learn.microsoft.com/en-us/windows-hardware/manufacture/desktop/configure-uefigpt-based-hard-drive-partitions?view=windows-11#recovery-tools-partition
and here https://learn.microsoft.com/en-us/windows-hardware/manufacture/desktop/deploy-windows-re?view=windows-11
I’m not sure why you are running into the error. I can cause a similar error by doing setid instead of set id or by doing set id=27 on a gpt disk.
New day, fresh mind. You are absolutely right, it does work on Windows Server 2025. I just had a typo in the ID.
Thanks a lot for the great post and the additional links in your comment, it helped a lot!
Awesome! I’m glad you got it sorted. Happy to help.
Thank you so much!
You are very welcome!
You’re a gentleman and a scholar. Thank you!
Thanks!
Hey, i just want to say thank you! It worked perfectly. I have a Windows 10 Pro on 64bit, that is running on a VMware Workstation Pro.
I really appreciate!
Have a good day!
That’s awesome!
Thank you very, very much!
This worked perfectly and helped me a lot!
Awesome!! no problem!
Hey there,
I have a laptop with an SSD drive where I’m dual-booting Win 10 and Win 11. I need to enable BitLocker in Windows 11 only so I want to move WinRE from my Windows 11 partition to a dedicated and already prepared Recovery partition that is located at the end of the drive. As I understand, after the Windows 11 drive gets encyrpted by BitLocker, its WinRE environment would be inaccessible in the boot process so I need to move it out.
Here is what the “reagentc /info” command outputs at the moment:
Windows RE location: \\?\GLOBALROOT\device\harddisk1\partition5\Recovery\WindowsRE
So my WinRE is now on partition 5, which is Windows 11, in the usual directory.
The problem is that I don’t know how to move it to this dedicated Recovery partition. This partition was created by Windows 11 initially, I only resized it to a larger size and moved it to the end of the disk. I checked and it has the correct partition type ID (de94bba4-06d1-4d40-a16a-bfd50179d6ac) and GPT attribute (0x8000000000000001).
When I try to disable the WinRE environment with “reagentc /disable” and enable it back with “reagentc /enable”, the WinRE never gets moved to this Recovery partition for some reason.
I noticed that the WinRE environment did not seem to move in your tutorial either because your last screenshot in the Disk Management shows the recovery partition with capacity of 1.00 GB and free space of 1.00 GB, which indicates that the recovery partition is completely empty and WinRE has not moved actually…?
I’d appreciate some help in how to move WinRE from my Windows 11 partition to the Recovery partition.
Thanks in advance!
Hello,
I tweaked the start of the post to indicate better what’s happening in disk management.
The way
reagentc /disableworks is that it takes the WinRE data in the recovery partition and saves it toC:\Windows\System32\Recoveryonce the recovery partition is disabled and saved to that location. You can delete the old recovery partition then you can make a new partition where you want on your disk.Once you have the new partition you set it as a recovery partition by setting the ID and attributes then when you run
reagentc /enablethe WinRE data is moved fromC:\Windows\System32\Recoveryto the recovery partition.Hello,
I understand that is how the process should work, but in your last Disk Management screenshot I see that your recovery partition is completely empty. There is nothing stored in it. Your WinRE environment did not move there.
It did not move in my case either. When I tried disabling (“reagentc /disable”) and enabling WinRE (“reagentc /enable”), WinRE just moved from one folder (I think “C:\Windows\System32\Recovery”) to the other folder (I think “C:\Recovery\WindowsRE”), always staying on Win 11 partition even though I had a recovery partition properly prepared and waiting the whole time.
I could not force WinRE to move to the prepared recovery partition. The only thing that worked for me was to disable WinRE, use BitLocker to encrypt the Win 11 partition and then enable WinRE. It seems that WinRE understood it cannot just move to another folder on Win 11 partition because it is encrypted now so then it actually moved to the recovery partition.
Hello,
Oh I see what you are saying. Disk management always shows as if the recovery partition is empty. You can always confirm where the WinRE is located with reagentc /info. You can even further show that the files are there by using a live CD to view that partition.
Glad that you got it figured out!
absolute life saver. No idea how you figured this out but thank you. idk if it’s been mentioned but I couldn’t complete the process because of bitlocker. Windows enabled it soon as I created the partition (I’m using windows home edition on surface pro).
I used the [manage-bde -off] [volume guid] to turn off bitlocker on both the new partition and my main partition. Ironically I couldn’t turn it back on… Windows says I need to purchase pro for that.
Do you have a buyme a coffee account or something like that?
Glad my post helped.
Ah Bitlocker I did run into that issue once where it was waiting to enable itself and was blocking me from re-enabling the recovery partition and I fixed it the same way you did. I had no idea home couldn’t use Bitlocker.
No I don’t have a buy me a coffee account or anything like that sorry.
Worked great – looked all over for something like this. Had a VM I had to extend the C: drive – this process worked without problem.
Thank you.
Awesome! glad it worked out!
Daniel, very awesome article! I just finished using this on a new server today.
Going in my “How-To’s” bookmark folder 🙂
Thanks again man!
Hi Matt,
Thank you so much! Glad it worked out.
This works but imo the goal should be to move the recovery partition. If the partition is moved, you can increase the disk size at will I don’t want to run through this procedure every single time the disk has to be increased.
True true!
Sincere thanks for this excellent tutorial
No problem!
Thanks a lot for the clear and precise steps
Happy to help!
Dear Daniel,
Thank you very much for this amazing tutorial!
It’s a shame that Google doesn’t highlight your post; I found it through another article on superuser.com (https://superuser.com/questions/1815203/how-to-repartition-the-main-disk-without-disabling-windows-recovery-partition).
I needed to reduce the number of partitions (from 4 to 3), to convert an existing Windows 10 installation from Legacy BIOS to UEFI w/o reinstalling Windows, MBR2GPT doesn’t work if there are more than 3 partitions.
you can check this link: https://answers.microsoft.com/en-us/windows/forum/windows_11/convert-an-existing-windows-10-installation-from/aa8c2de3-460b-4a8c-b30b-641405f800d7 (Microsoft site).
Hi Toan,
No problem!
I was not aware of that limitation with MBR2GPT that’s good to know, thank you for the tip.
I would thank you a thousand times. You help me saved money so that I would not need a 3rd party. Wish you all the best!
Thank you! I’m happy I was able to help.
There are plenty of videos and articles tutorial on how to extend and/or move the recovery partitions. This is one of the best well written procedures. Digging your workmanship. 5 thumbs up!
Thank you so much!
Perfect knowledge article doesn’t exis….
It exists. Thanks a ton
Thank you!!
I see this issue constantly in the VMware desktop hypervisor community. I always recommend your article over those YouTube videos. It’s very well written .
Having a reference document/page is easier to follow than having to scroll through a video and take notes.
Thank you for this!
Thank you for the nice feedback and thank you so much for recommending my article!! I’m happy it’s helping people.
Works like charm!!!, Great work thanks
That’s awesome! thank you!
Good and easy to follow
Thank you for the positive feedback
Legend.
Thanks!
Absolutely amazing, thank you very much. Also good to note that you can disable and enable reagentc thru run. I had a problem enabling thru cmd, so figured it was because I disabled thru run and enabled it on there. Thanks again
you are very welcome! I wonder if the issue with CMD was that it wasn’t running as admin.
Thank you, Daniel! This is a well written guide that worked perfectly. Glad I noticed the recovery partition was still on the old SSD after cloning as I was about to blast it.
Thank you! glad it helped save your recovery partition.
Thank you very much.
A really clear and complete documentation. Very helpful.
Easy to follow. Nice.
It worked like a charm.
Amazing.
You are very welcome!
I keep coming back to your absolute brilliant HowTo every time I have to move the Recovery Partition due to disk expansion . Today I printed it as pdf with all the comments since they are helpful as well if you would run into an error.
Thank you so much for this clear, precise How To.
Also all explanations for every step and why it should be done this way and the hint to take note since the information will be needed in later steps to come.
Thank you very much for your kind words!
Thank you very for this tutorial.
I had to disable BitLocker to finish the procedure and then enable it again. Worked like a charm.
Obrigado!
You are very welcome! I’m happy that it worked out.
Hi Daniel,
just wondering – if I make this change, and then turn my Server 2022 VM into a VMWare Template, will all future disk extensions work fine? or would I need to do these steps each time I extend the disk?
Hello,
I’m not 100% sure but I think that yes every time you want to extend the disk you would need to move the recovery partition even if it was from a VMware template. The only way around that would be to have the recovery partition at the start of the disk.
Thank you Sir, this has really saved me.
you are very welcome. Glad I could help
Great, thank you very much.
No problem. Happy to help.
I manage roughly 50 servers on a windows failover cluster and I would normally delete the recovery partition. Thank you for taking the time to put this info together, it is now part of my database of procedures.
You are very welcome. I also used to delete it but the recovery partition has helped me out a few times so I like keeping it around.
Thank you very much. This worked like a dream.
After downloading all the free software’s etc nothing was working as this needed to be done on a Windows server 2019.
Thanks once again
You are very welcome. Glad it worked out for you.
Thank You!
Very clear and straight forward description.
Works nice and no reboot needed.
Dagnar
You are very welcome!
I have a problem. I have a Windows Server 2022 that had the recovery partition, but it was disabled. I followed the whole procedure and brought in a new winre.wim from an ISO with the same version. Everything was created correctly and WinRE was enabled, but after restarting, it got disabled again. Why is that? It’s a VM virtualized on VMware ESXi 8.
That is very strange I have never seen that behavior before. Can you try enabling it then disabling it then enabling it again. I had to do that once to fix something else.
Hi. Wonderful writeup!
I need some help, though.
I’m trying to extend my C drive so I can upgrade from windows 10 to windows 11. I’m told I need 64gb free on C to do that. My C drive is only 75 gb (is a vm, hosted by vmware fusion)
I tried extending the drive in vmware fusion, but that put the unallocated space in the wrong place.
Before doing your technique, my partitions were: C, EFI, RE, E, unallocated
I used your tutorial and now my partitions are: C, EFI, unallocated, E, RE, unallocated
I’m sure I could get rid of E, and do the process again. I expect I will end up with C, EFI, RE, unallocated.
This is not helping me extend C. The EFI is in the way
Any advice for how to move EFI, or else move C after EFI (which is the way I believe it should be — not sure how EFI came after C)?
I do not have bitlocker enabled. My hdd is GPT
Thanks
Thank you so much Daniel, very clear and systematic.
In Windows 11 I did not get a Winre.wim file in recovery. Hidden files were visible but no sign of it. Perhaps it is just created from the XLM schema now? Anyway, worked perfectly.
You are very welcome. You might not see the winre.wim unless you have show system files enabled. I’m glad it worked out either way for you.
Hi. I figured it out 🙂
The trick, which I gleaned from your writeup, is how to add a partition to the right side of unpartitioned space, instead of the left side.
When you add a partition to unpartitioned space in disk management, the new partition is placed on the left side of the space. If you want the new partition to go on the right side, you do a trick: you temporarily add an extra partition (which will show on the left side of the unpartitioned space), leaving enough room for the partition you actually want to create. Then add a second partition (the one you really want) in the remaining space. Then delete the first. Voila, you new partition is on the right side of the previously unpartitioned space.
To move an EFI partition, I followed a process similar to what you did:
— in disk management, add a partition that will become the new EFI partition. Specify FAT32 and give it a drive letter (example F). You can also give it a name, which is helpful
— run this command in an admin command window: bcdboot c:\windows /s F: /f UEFI
— — bcdboot copies the necessary boot files from c:\windows into the new partition on the F drive
— change the ID of the new partition to flag it as an EFI partition (initially it shows as a basic data partition):
— — set id=c12a7328-f81f-11d2-ba4b-00a0c93ec93b
— remove the drive letter from the new EFI partition using disk management
— reboot into bios and adjust things to boot from the new partition
— when you are satisfied the new EFI partition is working, you can delete the old one via diskpart and the command: delete partition override
Enjoy!
— Hank
Thanks for the wonderful writeup!
I added a reply, and then added a reply to the reply and my original reply no longer shows
So I am merging them into this message
My question was how to move an EFI partition
I have now figured that out 🙂
The trick, which I gleaned from your writeup, is how to add a partition to the right side of unpartitioned space, instead of the left side.
When you add a partition to unpartitioned space in disk management, the new partition is placed on the left side of the space. If you want the new partition to go on the right side, you do a trick: you temporarily add an extra partition (which will show on the left side of the unpartitioned space), leaving enough room for the partition you actually want to create. Then add a second partition (the one you really want) in the remaining space. Then delete the first. Voila, you new partition is on the right side of the previously unpartitioned space.
To move an EFI partition, I followed a process similar to what you did:
— in disk management, add a partition that will become the new EFI partition. Specify FAT32 and give it a drive letter (example F). You can also give it a name, which is helpful
— run this command in an admin command window: bcdboot c:\windows /s F: /f UEFI
— — bcdboot copies the necessary boot files from c:\windows into the new partition on the F drive
— change the ID of the new partition to flag it as an EFI partition (initially it shows as a basic data partition):
— — set id=c12a7328-f81f-11d2-ba4b-00a0c93ec93b
— remove the drive letter from the new EFI partition using disk management
— reboot into bios and adjust things to boot from the new partition
— when you are satisfied the new EFI partition is working, you can delete the old one via diskpart and the command: delete partition override
Enjoy!
— Hank
Thank you!
Great walkthrough…
Unfortunately, due to also wanting to reduce my C: drive, increase my D: AND move my recovery partition, I had unallocated space to the left of my D: drive…
This meant that I still had to use a 3rd party tool to resize D: (which completed without requiring a reboot).
With the aid of your walkthrough, I successfully moved my recovery partition to the end of the drive on Win11 V.24H2 26100.4484
Kudos!
Ed/.
thank you for your nice comment. I’m glad it all worked.
Thank you for your comments and the info about EFI.
I have comments on manual approval due to spam. But all of them are now approved 🙂
I actually just had to mess with the EFI partition the other day.
I did the same as you with some variations. I didn’t need to do the set id. I also rebooted once to make sure everything worked. I couldn’t get the old EFI partition to delete so I ended up suspending bitlocker and booting into Windows Recovery CMD to then diskpart and delete the old EFI from there. I didn’t need to make any changes to the BIOS boot order or anything.
My situation was identical to the guide and it worked perfectly! I’m working on a arm based mac running windows through VMWare Fusion and had to add more space to the virtual machine. However, instead of automatically adding the new space to the C drive, it stuck it after the recovery portion!
Thank you so much for this guide. It was invaluable.
Glad my guide was able to help you
Thanks for the article.
I got this error:
reagentc /enable
REAGENTC.EXE: The Windows RE image was not found.
So had to run this:
reagentc /path /setreimage C:\Windows\System32\Recovery\Winre.wim
C:\Windows\System32\Recovery>reagentc /setreimage /path C:\Windows\System32\Recovery
Directory set to: \\?\GLOBALROOT\device\harddisk0\partition3\Windows\System32\Recovery
REAGENTC.EXE: Operation Successful.
Hi Bob,
That is interesting. Glad you found a fix!
This is fantastic! Thank you for posting this. It was a real life saver.
You are very welcome!
Hello Daniel.
I followed step by step the process, and it was flawless.
Thank you so much for sharing your experience and knowledge with the community.
Thank you! I’m glad it worked out for you.
Thank you very much, I was looking for such a procedure for a really long time!
I’m glad you found it!
Hi! Thank you, this is what i’ve been looking for!
I encountered a problem though… can you help me?
After entering “reagentc /enable” it says that it’s impossible to find the Windows RE image. I saw that Bob had the same error on July 19th, so i tried doing what he did but that didn’t work for me.
Seems that he set the image path to the Recovery directory, where he still had the winre.wim file. That’s not my case. In C:\Windows\System32\Recovery i appear to have only two files, named: ReAgent.xml and ReAgent_Merged.xml1. Maybe these are RE images but which should i pick?
Let me know if you can help me!
Thanks in advantage.
Hi Niccolo,
I would try ReAgent.xml
Another successful comment. Worked perfectly on my VM so I was able to expand my drive.
Thanks so much!
Glad it worked!
Thanks very much! Great walkthrough, it worked flawless.
You are very welcome! Glad it all worked.
These step-by-step instructions made a somewhat baffling conundrum trivially easy to solve when no third-party tools were available (nor needed, obviously).
Thank you very much for taking the time to document the process so clearly!
You are very welcome
This article was so well written, that I even took the time to write a comment. Clear, strait to the point, no fluff, easy to understand, helpful with the commands easy to copy.
Thank you dear Human, who wrote it. Worked as advertised.
Thank you. Glad it was helpful to you.
Many thank’s !
Thank you, for detailed description!
You are very welcome
Hi. thanks. Did as you mentionned. question though, after reagentc /enable, it seems nothing is written in the disk. same as on your screenshot, mine says 100% free
If you run reagentc /info what is the output?
Thank you!!! Great post!
you are very welcome!
I just wanted to thank you as your guide was spot on and helped with resolving updating a vm we have to Win11. Have a great day. Where can I donate you some money for a coffee sir?
You are very welcome! Thank you. I don’t have a donate spot or anything but I appreciate your gratitude.
In my case partitions are in the middle:
EFI partition – C: partition – recovery partition – reserved partition 16MB – Unallocated space.
Do you know if I can just move those two partitions (partition master free f.e.) to the end and expand the C: partition using that unallocated remaining space?
Thanks.
Hello,
You can for sure move the recovery partition however you’ll need to figure out what the reserved partition is first as that may be needed.
Extended my Server 2025 boot disk with this method. So easy! Thanks!
Nice!! You are very welcome.
Thank you Daniel, this instruction is truly gold and never get olds, seeing comments thread started 2023, well, it works for me./ and even more complex because there are 2 partitions blocking the C drive and the free pace in my physical drive, (Recovery partition and Drive D).
You are very welcome! Glad it all worked out for you.
I am an amateur when it comes to Windows but your well written post solved my problem for a virtual machine running on VWware perfectly. Before I found your post I wasted my time installing tools that even didn’t start as my Windows 11 is on ARM. Thanks again for your post which is a gem in a world full of AI generated garbage.
You are very welcome, I’m glad I was able to help out!
Truly appreciate this. Our RDS server wasn’t sized properly and we got more new users. I didn’t want to simply delete the recovery partition, so I followed your directions (after making a full backup, of course) and added 100gb.
Easy, peasy, although I confess I’ve not actually tested the recovery partition.
Somehow the search engines landed me on your page, so thanks for posting quality content and keeping it alive.
I’m glad it worked for you. You are very welcome!
Hi Dan,
This unfortunatly doest work for me, I get this message
S C:\Users\administrator.LAB>
PS C:\Users\administrator.LAB> reagentc /disable
REAGENTC.EXE: Operation Successful.
PS C:\Users\administrator.LAB> diskpart
Microsoft DiskPart version 10.0.20348.1
Copyright (C) Microsoft Corporation.
On computer: LAB-SRV01
DISKPART> list disk
Disk ### Status Size Free Dyn Gpt
——– ————- ——- ——- — —
Disk 0 Online 100 GB 0 B * *
DISKPART> sel disk 0
Disk 0 is now the selected disk.
DISKPART> list part
Partition ### Type Size Offset
————- —————- ——- ——-
Partition 1 System 100 MB 1024 KB
Partition 2 Dynamic Reserved 1024 KB 101 MB
Partition 3 Reserved 15 MB 102 MB
Partition 4 Dynamic Data 59 GB 117 MB
Partition 5 Recovery 524 MB 59 GB
DISKPART> sel par 5
Partition 5 is now the selected partition.
DISKPART> delete partition override
The specified command or parameters are not supported on this system.
DISKPART>
Hello,
That is very strange. A few things to try. Reboot the system and try again. Run a check disk and then give it another try.
Congratulations. You actually explained WHAT reagentc /disable ACTUALLY DOES! No other website explanation conveys that nuance.
Thank you!
Daniel, You are a Legend. Thank You so much!
Thank you! you are very welcome!
Thank you very much. That saved me a lot of work and it worked without any problems.
You are very welcome! Glad it helped you.
I have to congratulate you on a superb guide that is really well written and easy to follow which I used successfully on Server 2022. Please get a job re-writing all the Microsoft learn guides so they are actually understandable . 🙂
Thank you!!
I have a very similar problem, where it’s the EFI partition that’s “in the way” and preventing me from extending,
DISKPART> list part
Partition ### Type Size Offset
————- —————- ——- ——-
Partition 1 Recovery 549 MB 1024 KB
Partition 2 Primary 79 GB 550 MB
Partition 3 System 100 MB 79 GB
Is there a way to move it using a similar approach?
There is a similar method I’m working on a post about how to do it.
Hola Daniel,
Estuve varios dias buscando alternativas para realizar este procedimiento, incluyendo terceros que algunos casos traian “bichos”, obviamente peligroso para un server
Me queda agradecerte profundamente por el material expuesto y detallado pocas veces se encuentra de esta manera.
Un abrazo y saludos.
You are very welcome!
Seriously.. Are you GOD?
Awesome!!!
lol no. But thanks!
Very good guide. Worked flawlessly. I like that it used standard Windows utilities only.
Thank you! Glad that it worked.
3 years old but still rocks! Thanks to you I was able to extend my C drive without any issue. A very cool guide. 🙂
Thank you! I find myself using it on a regular basis lol.
Many THANKS for the tutorial o7 :>
You are very welcome!
Hallo Daniel,
du bist mein Held. Die Anleitung ist super verständlich, ausführlich und auch für Laien geeignet.
Alles hat super geklappt!
Vielen herzlichen Dank für Deine Lebenszeit! Du hast mir damit mehr selbstbestimmte Lebenszeit verschafft 😉
Thank you! Glad everything was clear and it worked.
Hi Daniel
Thanks for this excellent guide.
I did have an ‘oh no’ moment when the winre.wim file didn’t appear after ‘reagentc /disable’.
It was not even showing using CMD-as-admin dir command.
Fortunately I found your note to CKL 20May2024 to show ‘hidden items’ and , critically, view ‘protected O/S system files’.
All good now.
Kudos!
You are very welcome. Glad you figured it out!
This has been incredibly helpful. Flawless.
Helped me move EFI and Recovery partition before C drive.
Thank you Daniel
Glad everything worked out for you. You are very welcome!