CyberChef
CyberChef is a web application with an abundance of tools, including decoding and encoding to and from various formats such as Base64, ROT13, XOR, and Hex. It is often referred to as the Cyber Swiss Army Knife, and I can see why. There are over 400 tools.
I’ve personally used CyberChef on many occasions, most commonly to decode Base64 or PEM certificates. To this day, I am still discovering new tools within CyberChef. Most recently, I’ve found a tool called Magic that helps you decode items with multiple layers of encoding.
A really cool thing about CyberChef is that it is developed and maintained by the GCHQ (Government Communications Headquarters) in the UK, which is the UK’s cyber, security, and intelligence agency.
In this post, I will show you how to use CyberChef and how to host it yourself with Docker and a Cloudflare tunnel.
Using CyberChef
Accessing CyberChef
If you search for CyberChef, there are a few versions online, but the only official version is hosted on the GCHQ GitHub, which can be accessed at https://gchq.github.io/CyberChef/
CyberChef Layout
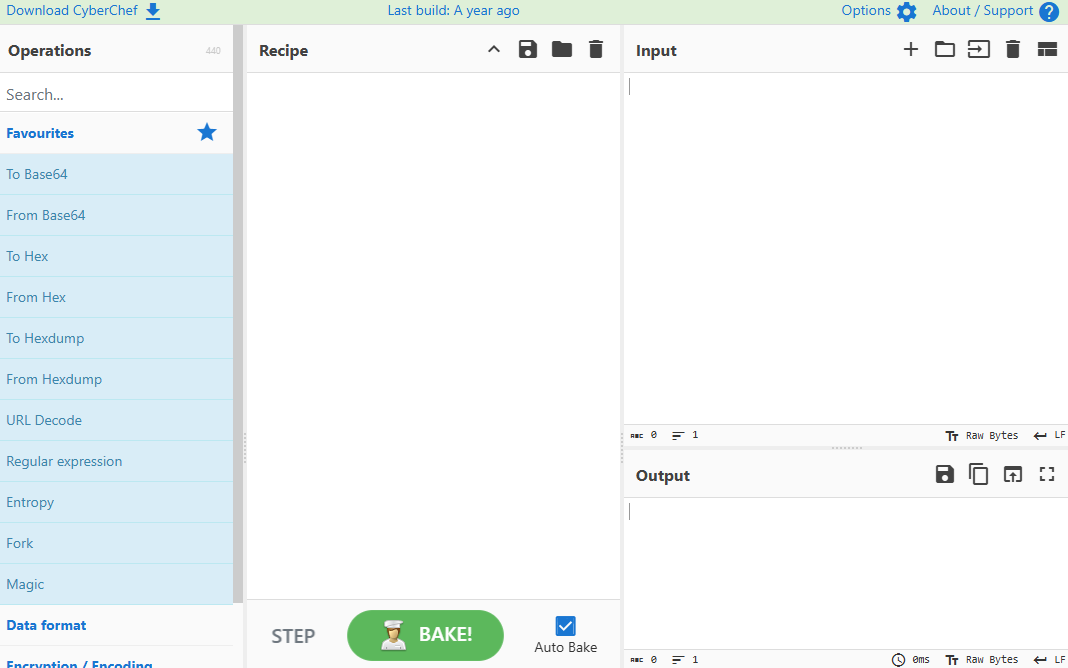
Once you have accessed CyberChef, you will see four main panels.
The first panel is the tools, also known as operations. The next panel is the recipe. The next two panels are the input and the output.
Baking
To use CyberChef, you need to bake it. Baking consists of using operations to make a recipe.
To make a recipe, you need to drag an operation onto the recipe panel.
For example, if I wanted to decode the following Base64 string VGhpcyBpcyBCYXNlNjQgaW4gQ3liZXJDaGVm.
I would drag the From Base64 operation over to the recipe panel.
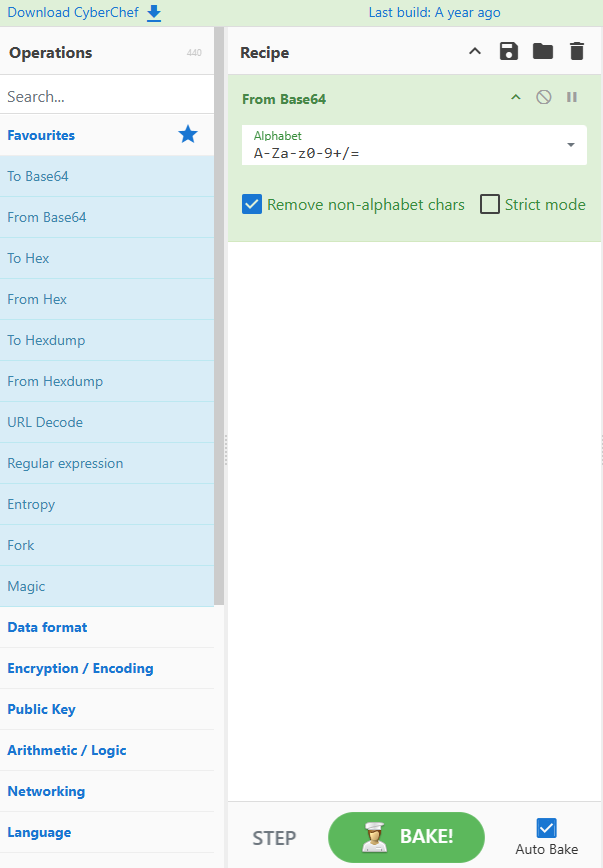
Then I enter the Base64 string into the input. CyberChef then bakes the recipe, and the output is the decoded string.
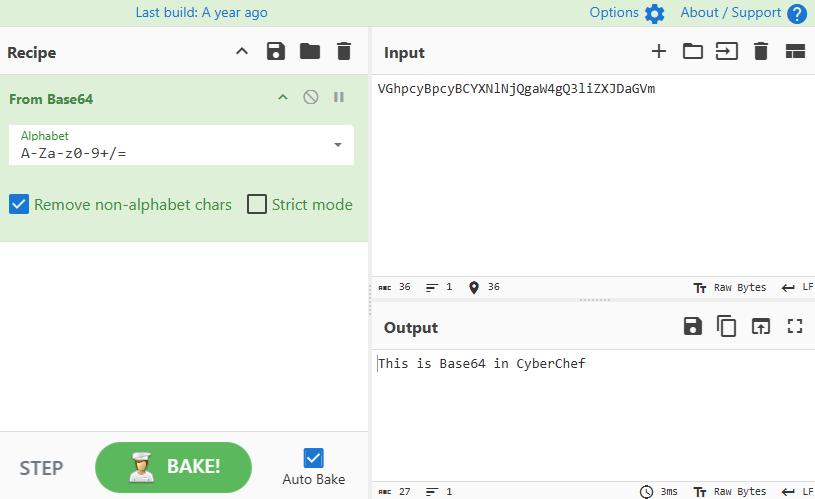
Usually, Auto Bake is enabled. If it’s not, then you need to click on Bake.

Within a recipe, you can stack multiple operations.
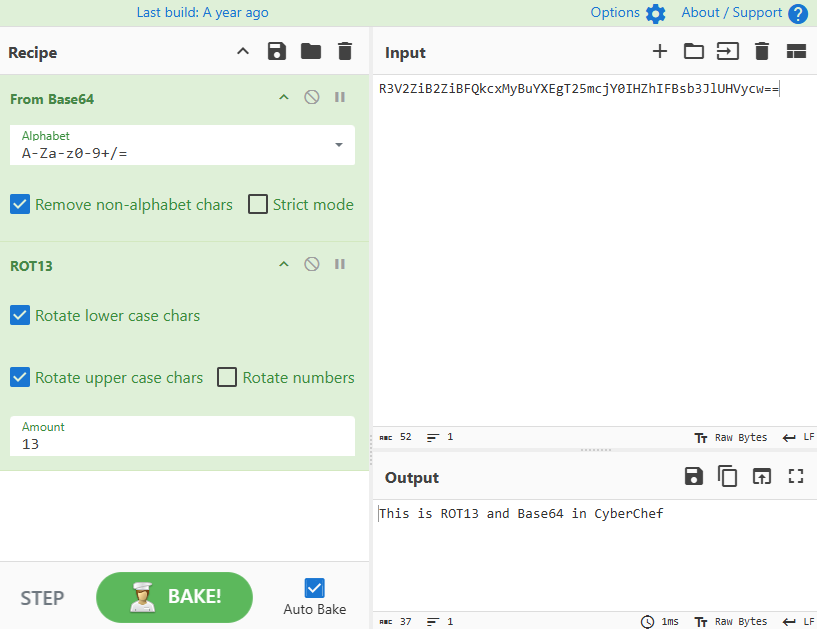
For example, if I wanted to decode the following double encoded ROT13 and Base64 string R3V2ZiB2ZiBFQkcxMyBuYXEgT25mcjY0IHZhIFBsb3JlUHVycw==.
I need to add the ROT13 and the From Base64 operation to the recipe.
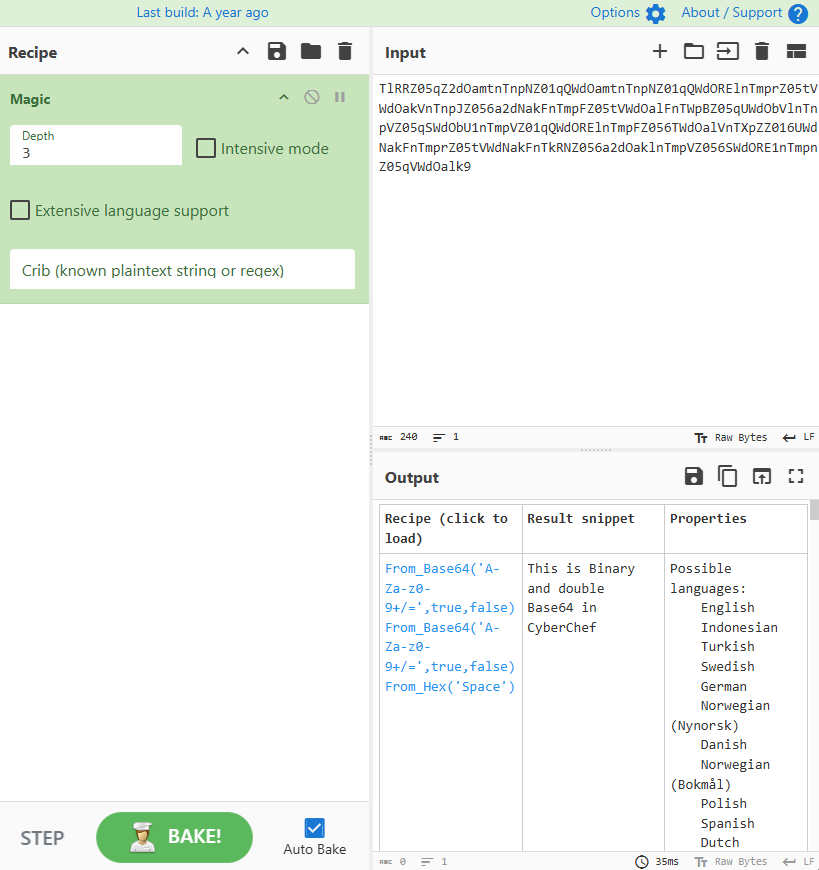
Another powerful tool in CyberChef is the Magic operation. For example, if I had the following unknown string.
TlRRZ05qZ2dOamtnTnpNZ01qQWdOamtnTnpNZ01qQWdORElnTmprZ05tVWdOakVnTnpJZ056a2dNakFnTmpFZ05tVWdOalFnTWpBZ05qUWdObVlnTnpVZ05qSWdObU1nTmpVZ01qQWdORElnTmpFZ056TWdOalVnTXpZZ016UWdNakFnTmprZ05tVWdNakFnTkRNZ056a2dOaklnTmpVZ056SWdORE1nTmpnZ05qVWdOalk9Code language: plaintext (plaintext)I could use the Magic operation to figure out that it is Hex and double Base64.
Docker
There’s even an option to self-host CyberChef with Docker. There is nothing wrong with using the official GitHub-hosted version of CyberChef. It’s just really cool to have the option to self-host it.
You don’t need to provide the Docker container with any persistent storage, as all the settings you set in CyberChef are stored in your web browser, nothing is stored outside your browser.
The Process
- Create a folder on your Docker host to store CyberChef’s configuration files.
I’ll call mine CyberChef.
- Download the
docker-compose-no-cf.ymland thesample.envfiles from my GitHub https://github.com/thedxt/CyberChef-Docker and place them in the folder. - Copy the
docker-compose-no-cf.ymlfile as a newdocker-compose.ymlfile. - Copy the
sample.envfile as a new.envfile. - You will need to define the variables in the
.envfile. - The variables are the following:
CONTAINER_NAME, the name of your CyberChef stack.- The container with
_appappended to it is the CyberChef application image.
- The container with
APP_PORTis the port on which the CyberChef application will run locally.
For my example, I will name the container DXT-CyberChef and put it on port 1337.
Here is an example of what my .env file looks like.
CONTAINER_NAME=DXT-CyberChef
APP_PORT=1337
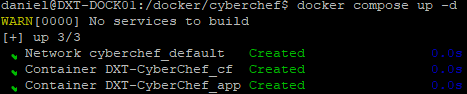
- Run
docker compose up -dto start the CyberChef container.

If you go to the IP address of the Docker host on the port you specified, you can access your self-hosted CyberChef.
Docker with Cloudflare Tunnel
Now, if you wanted to expose your self-hosted version of CyberChef to the internet without opening any ports, you can do so with a Cloudflare tunnel.
To learn more about Cloudflare tunnels, my blog post, Cloudflare Tunnel with Docker, goes into more detail.
The Process
- Create a folder on your Docker host to store CyberChef’s configuration files.
I’ll call mine CyberChef.
- Download the
docker-compose-cf.ymland thesample.envfiles from my GitHub https://github.com/thedxt/CyberChef-Docker and place them in the folder. - Copy the
docker-compose-cf.ymlfile as a newdocker-compose.ymlfile. - Copy the
sample.envfile as a new.envfile. - You will need to define the variables in the
.envfile. - The variables are the following:
CONTAINER_NAMEthe name of your CyberChef stack.- The one with
_appappended to it is the CyberChef application image. - The one with
_cfappended to it is the Cloudflare tunnel application image.
- The one with
APP_PORTis the port on which the CyberChef application will run locally.CF_TUNNELis the Base64 of your Cloudflare tunnel for CyberChef.
In my example, I will name the container DXT-CyberChef and put it on port 1337.
Here is an example of what my .env file looks like.
CONTAINER_NAME=DXT-CyberChef
APP_PORT=1337
CF_TUNNEL=
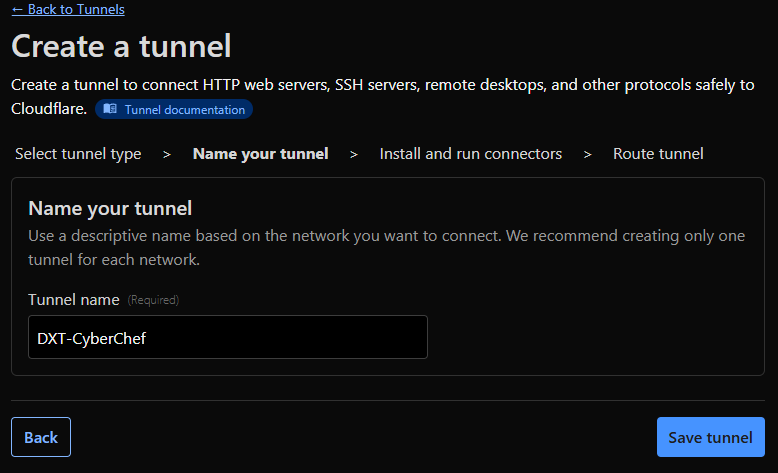
- Login to Cloudflare and create a tunnel.
- Select Cloudflared.
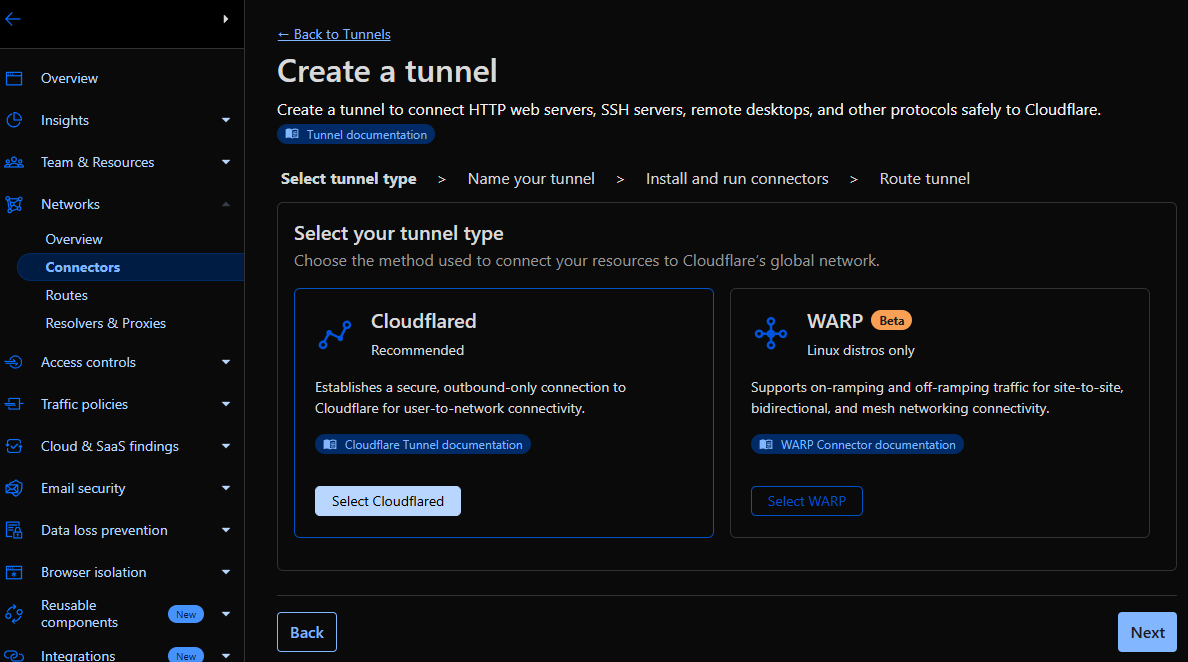
- Give the tunnel a name, then click Save tunnel.
I will use the name DXT-CyberChef.
- Copy the Base64 from the install command and click Next.

Here’s an example of the Cloudflare tunnel Base64
eyJhIjoiTXlBY2NvdW50VGFnMTIzIiwidCI6Ik15VHVubmVsSUQxMjMiLCJzIjoiTXlUdW5uZWxTZWNyZXQxMjMifQCode language: plaintext (plaintext)- Save the Cloudflare tunnel Base64 as the variable
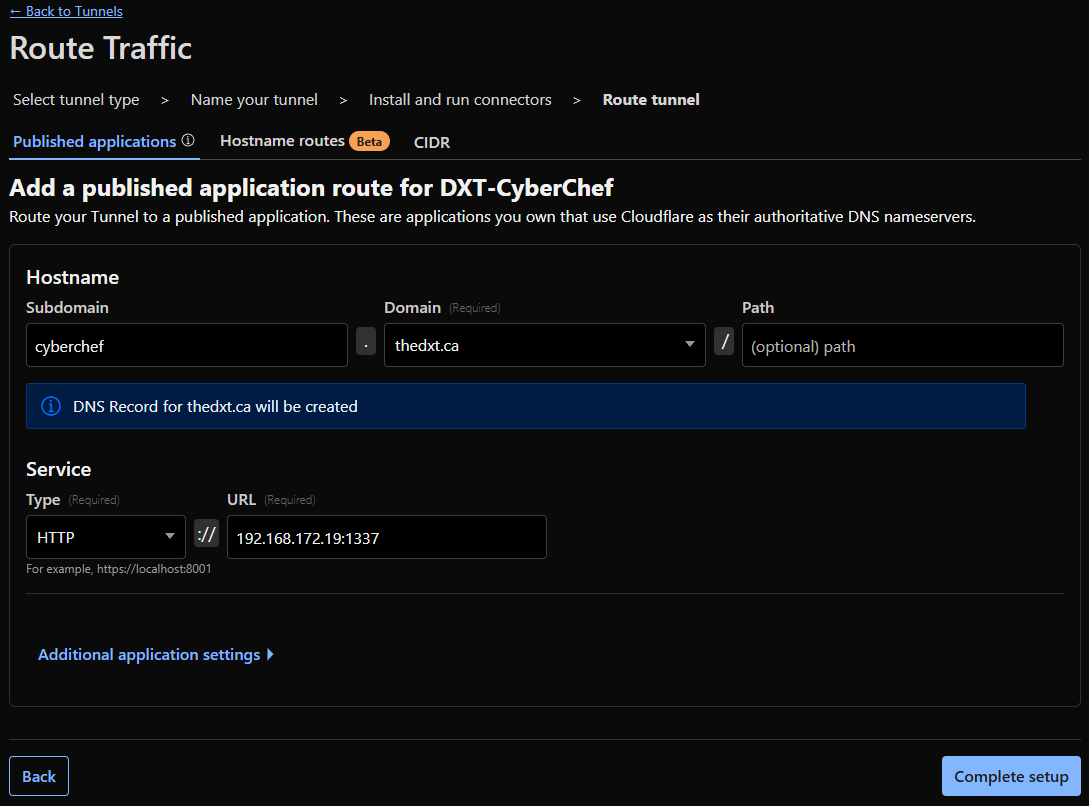
CF_TUNNELin the.envfile. - Select the domain you want to use for CyberChef and enter a subdomain if needed.
I will be using the subdomain cyberchef.thedxt.ca.
- For service, select HTTP, and for the URL, enter the IP address of your Docker host, including the
APP_PORTvariable from your.envfile.
In my example, I will enter 192.168.172.19 and port 1337.
With the Cloudflare tunnel configured, your .env file should look similar to this.
CONTAINER_NAME=DXT-CyberChef
APP_PORT=1337
CF_TUNNEL=eyJhIjoiTXlBY2NvdW50VGFnMTIzIiwidCI6Ik15VHVubmVsSUQxMjMiLCJzIjoiTXlUdW5uZWxTZWNyZXQxMjMifQCode language: plaintext (plaintext)- Run
docker compose up -dto start CyberChef and the Cloudflare tunnel.
- Wait for the tunnel to show as healthy in Cloudflare.
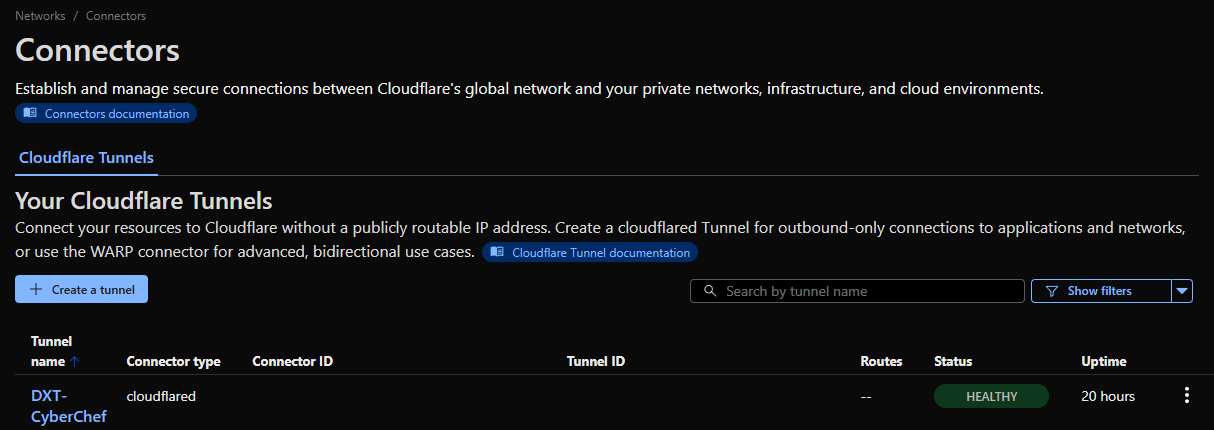
Now, if you go to the domain you set up with the Cloudflare tunnel, you can access your CyberChef Docker container externally, and it will even have an SSL/TLS certificate.
Summary
CyberChef is a very handy tool, and I am very happy it exists. I’m still blown away by how everything runs in the web browser, how many tools it has, and that you can self-host it or just run the official GitHub-hosted version.
If you want to use CyberChef using the official GitHub-hosted version, you can find that here https://gchq.github.io/CyberChef/
If you want to learn more about CyberChef, here is the official CyberChef documentation.