Deploying the Omnissa UAG (Unified Access Gateway) on VMware vCenter can be a daunting task if you’ve never done it before.
In this post, I will show you step-by-step how to deploy the Omnissa Horizon UAG on VMware vCenter.
The Process
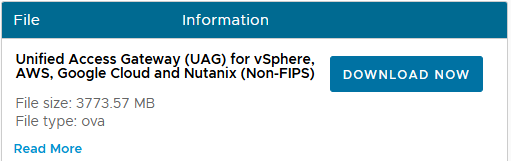
- Download the UAG OVA from Omnissa.
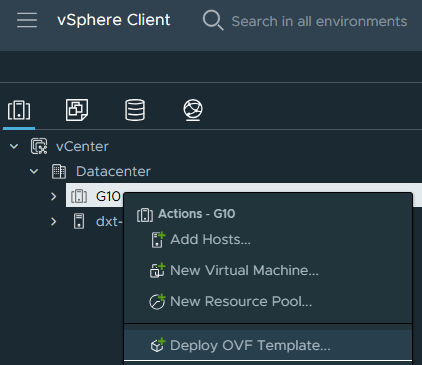
- Right-click in VMware vCenter on the cluster or host you want to deploy the UAG to, and click on Deploy OVF Template.
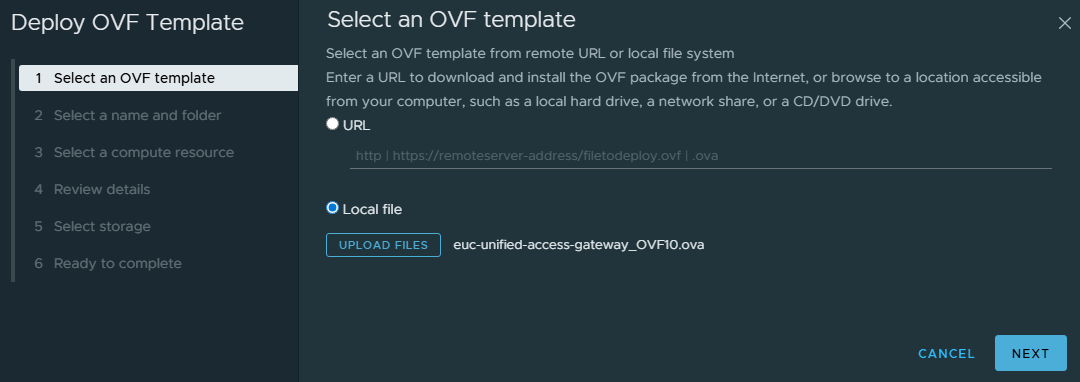
- Select Local file, click Upload Files, select the UAG OVA you downloaded, then click Next.
- Give the VM name that will be displayed in vCenter, select where you want the UAG VM deployed in your vCenter, and click Next.
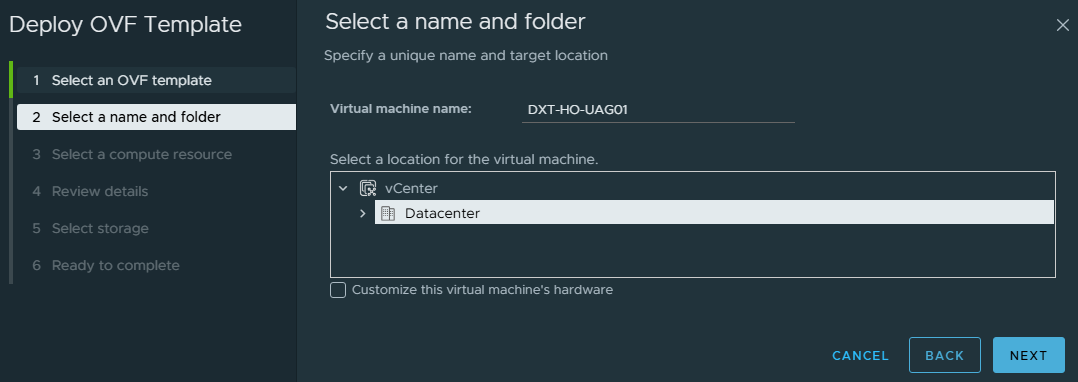
In my example, I will name it DXT-HO-UAG01 and select the location named Datacenter.
- Select the cluster or host where you want to run the UAG VM, then click Next.
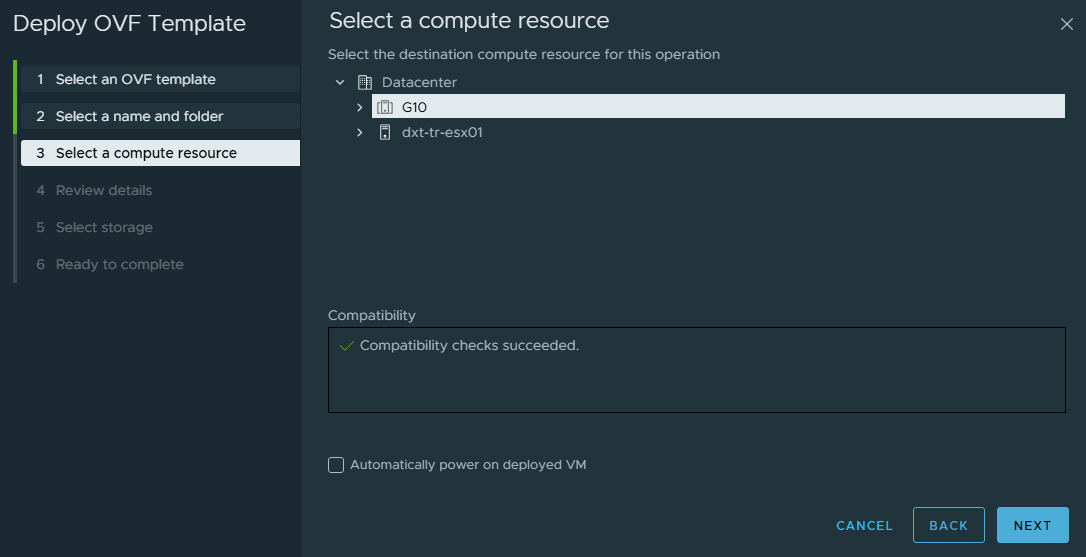
In my example, I will select my G10 cluster.
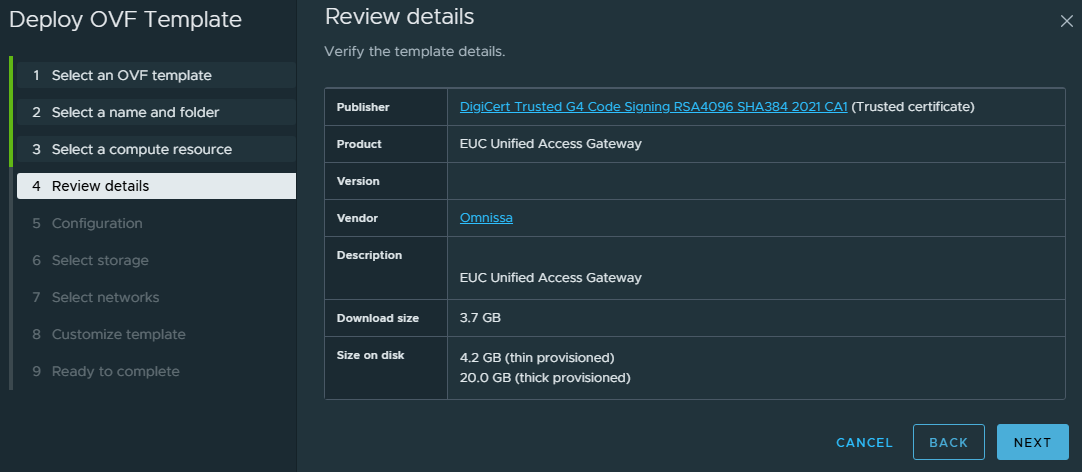
- Review the details and click Next.
You may get a certificate not trusted warning message. You can click ignore, or resolve this warning message by following the steps in my blog post, VMware vCenter OVA Certificate Trust.
- Select the deployment configuration for your environment and click Next.

The most common deployment option is Single NIC.
In my example, I will use a Single NIC deployment.
- Select the location to store the UAG VM configuration and disk files, then click Next.
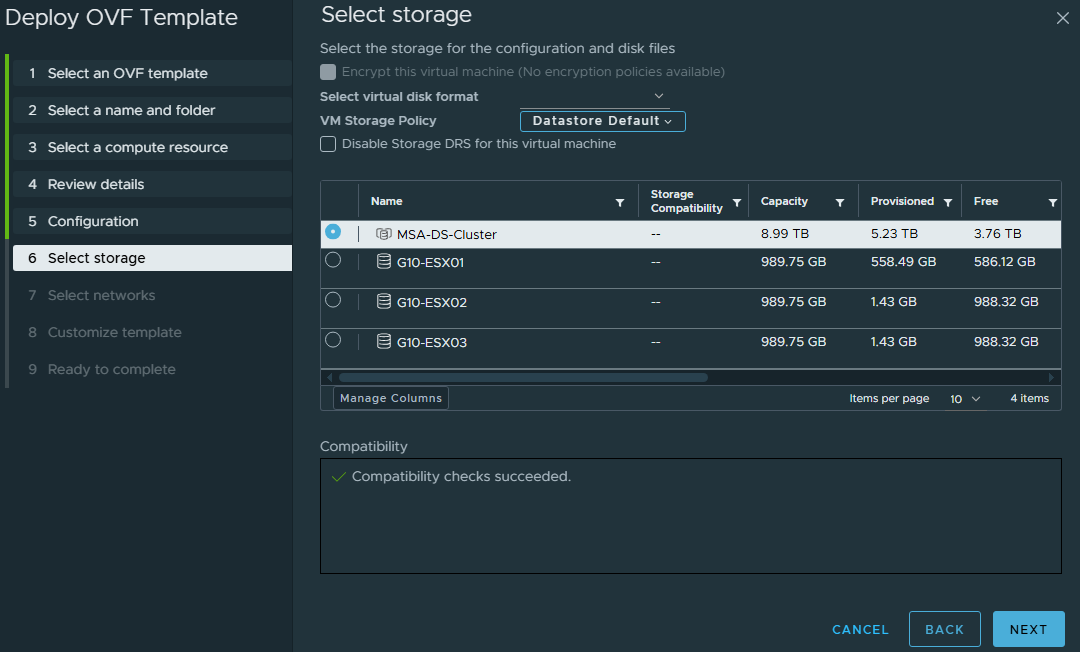
In my example, I will select the storage as MSA-DS-Cluster.
- Select the destination networks you want to use for the Internet, Management Network, and Backend Network, then click Next.
Even if you select a single or dual NIC configuration, you still need to choose each destination network.
In a two NIC deployment, the first NIC is for the internet, and the second NIC is for management and backend networks. In a three NIC deployment, the first NIC is for the internet, the second NIC is for the management network, and the third NIC is for the backend network.
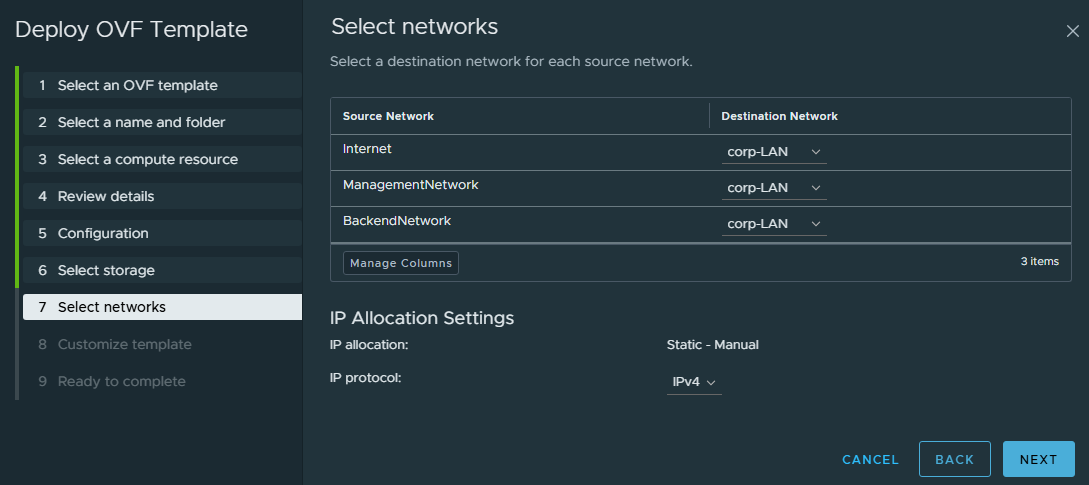
In my example, I selected a single NIC deployment and set the network to corp-LAN for the Internet, Management Network, and Backend Network.
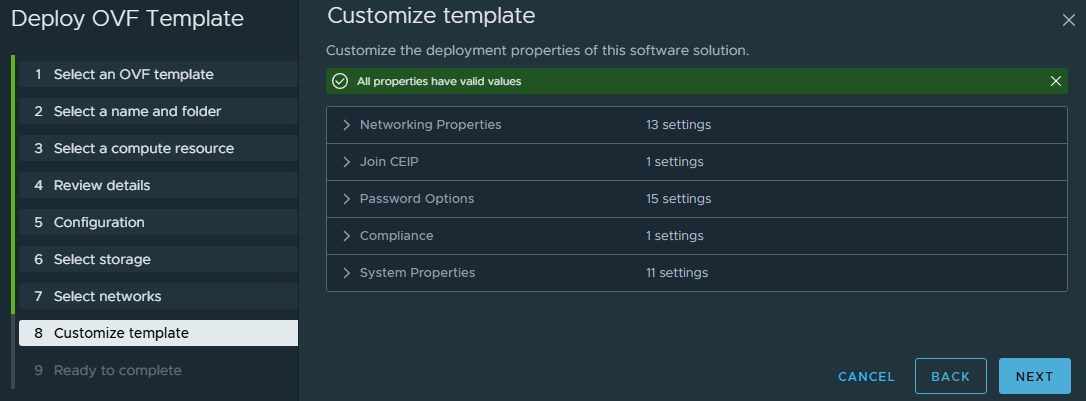
- Next, we need to configure the UAG settings.
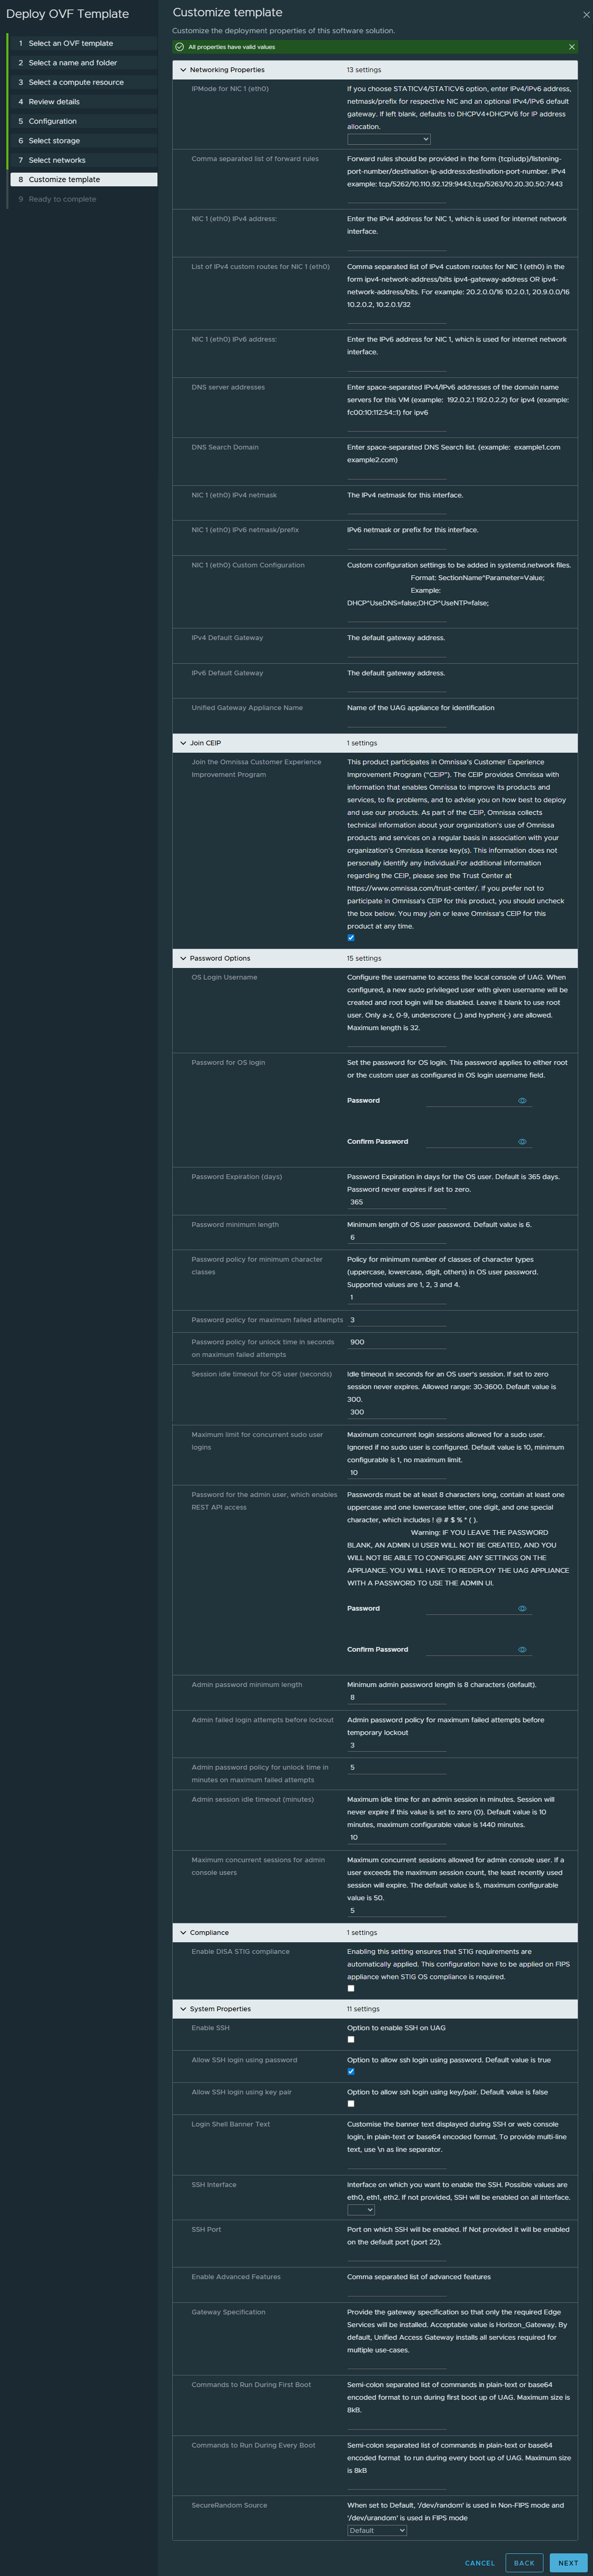
The UAG configuration consists of the following sections
Networking Properties
- For IPMode for NIC 1 (eth0), select whether to use a static IP or DHCP. The default is DHCP.
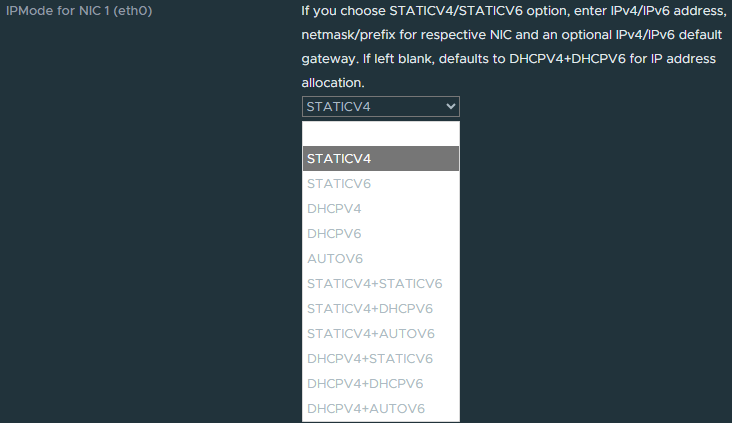
In my example, I will select STATICV4 as I want to use a static IPv4 address.
- For Comma separated list of forward rules, enter any needed forward rules.

Typically, this is left blank.
- For NIC 1 (eth0) IPv4 address, enter the IPv4 address if you are using a static IP.

In my example, I am using a static IP. I will enter 192.168.172.53.
- For List of IPv4 custom routes for NIC 1 (eth0), enter any custom routes needed for NIC 1.

This is typically left blank.
- For NIC 1 (eth0) IPv6 address, enter the IPv6 address for NIC 1.

In my example, I am only using IPv4. I will leave this blank.
- For DNS server addresses, enter the addresses for your DNS servers.
If you have more than one, separate them with a space.

In my example, I will enter 192.168.172.14 and 192.168.172.15.
- For DNS Search Domain, enter the local domain you want to use.

In my example, I will enter dxt.local.
- For NIC 1 (eth0) IPv4 netmask, enter the IPv4 subnet mask.

In my example, I am using a /24 network. I will enter the subnet mask of 255.255.255.0.
- For NIC 1 (eth0) IPv6 netmask/prefix, enter the IPv6 netmask or prefix.

In my example, I am only using IPv4. I will leave this blank.
- For NIC 1 (eth0) Custom Configuration, enter any custom configurations as needed.

Typically, this is left blank.
- For IPv4 Default Gateway, enter the IPv4 default gateway.

In my example, I will enter 192.168.172.1.
- for IPv6 Default Gateway, enter the IPv6 default gateway.

In my example, I am only using IPv4. I will leave this blank.
- For Unified Gateway Appliance Name, enter the hostname you would like for the UAG.

In my example, I will enter DXT-HO-UAG01.
Join CEIP
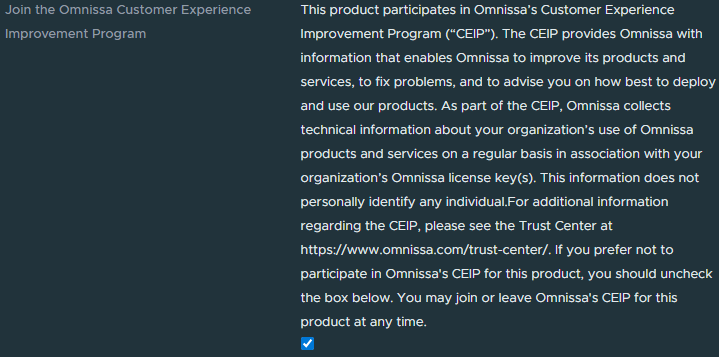
- For Join the Omnissa Customer Experience Improvement Program, select whether you want to join the Omnissa CEIP. The default is yes.
Password Options
- For OS Login Username, enter the console username you would like the UAG to use.
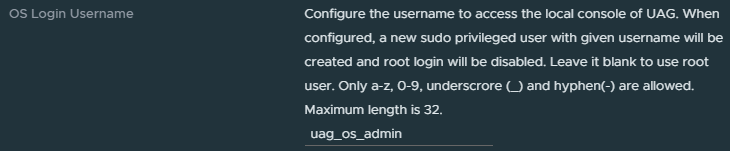
In my example, I will enter the username uag_os_admin.
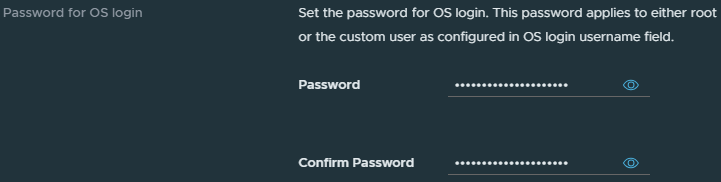
- For Password for OS login, enter the password you want to use for the OS login username you defined in the previous step.
You can only use the following special characters ! @ # $ % * ( ) _ + for more information about the password requirement, here is the Omnissa documentation.
- For Password Expiration (days), enter the number of days until the OS login password expires. The default is 365 days.

In my example, I will leave it as the default of 365 days.
- For Password minimum length, enter the minimum length you would like the OS password to be. The default is 6.

In my example, I will use the default of 6 characters.
- For Password policy for minimum character classes, enter how many character classes you would like to require. The default is 1. You can set this to 1, 2, 3, or 4. The classes are uppercase, lowercase, digit, and others.

The default is saying that the password only requires 1 of the following character classes: uppercase, lowercase, digit, or other. The following passwords would work: password or PASSWORD or 123456789.
If you set it to 2, it means the password must contain 2 of the following character classes: uppercase, lowercase, digit, or other. The following passwords would work: Password or password! or PASSWORD1.
If you set it to 3, it means the password must contain 3 of the following character classes: uppercase, lowercase, digit, or other. The following passwords would work: password1! or PASSWORD1! or Password1.
If you set it to 4, it means the password will require all 4 character classes: uppercase, lowercase, digit, and other. The following passwords would work: Password1! or PASSword1!.
In my example, I will leave this as the default.
- For Password policy for maximum failed attempts, specify how many incorrect login attempts until an account lock is triggered. The default is 3.

In my example, I will leave it as the default.
- For Password policy for unlock time in seconds on maximum failed attempts, set this to how long you want the account locked for. The default is 900 seconds, which is 15 minutes.

In my example, I will leave it as the default.
- For Session idle timeout for OS user (seconds), enter the number of seconds until an idle session is logged out. The default is 300 seconds, which is 5 minutes.

In my example, I will leave it as the default.
- For Maximum limit for concurrent sudo user logins, enter how many sudo sessions can be active at the same time. The default is 10.

In my example, I will leave it as the default.
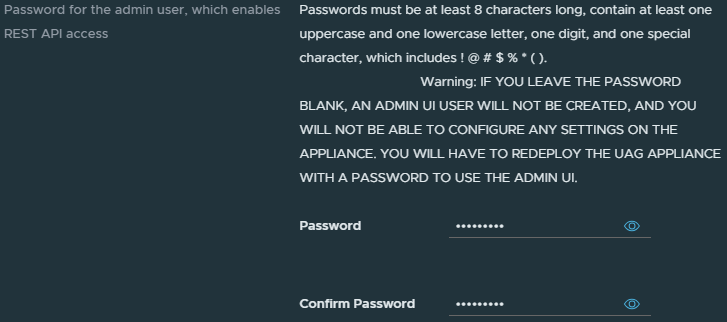
- For Password for the admin user, which enables REST API access, this configures the password for the admin account that configures the UAG.
You can only use the following special characters ! @ # $ % * ^ & ( ) for more information about the password requirement, here is the Omnissa documentation.
- For Admin password minimum length, set the minimum password length. The default is 8.

In my example, I will leave it as the default.
- For Admin failed login attempts before lockout, set how many failed logins will trigger a lockout of the admin account. The default is 3.

In my example, I will leave it as the default.
- For Admin password policy for unlock time in minutes on maximum failed attempts, set this to how long until the admin account is unlocked. The default is 5 minutes.

In my example, I will leave it as the default.
- For Admin session idle timeout (minutes), set this to the number of minutes before an idle admin session is logged out. The default is 10 minutes.

In my example, I will leave it as the default.
- For Maximum concurrent sessions for admin console users, enter how many admin sessions can be active on the UAG UI. The default is 5.

In my example, I will leave it as the default.
Compliance
- For Enable DISA STIG compliance, select this if you are required to follow DISA (Defense Information Systems Agency) STIG (Security Technical Implementation Guide) compliance. The default is not selected.

In my example, I will leave it not selected.
System Properties
- For Enable SSH, select whether to enable SSH. The default is disabled.

In my example, I will select Enable SSH to enable SSH access to the UAG.
- For Allow SSH login using password, select whether to use SSH with a password. The default is to allow it.

In my example, I will leave this as the default.
- For Allow SSH login using key pair, select this option to enable SSH login with a key pair. The default is not to allow it.

In my example, I will leave this as the default.
- For Login Shell Banner Text, enter any text you would like as the login banner for SSH or web console logins. The default is blank.

In my example, I will leave this blank.
- For SSH Interface, select which interface you want to enable SSH on. If you leave the option blank, SSH will be enabled on all interfaces.
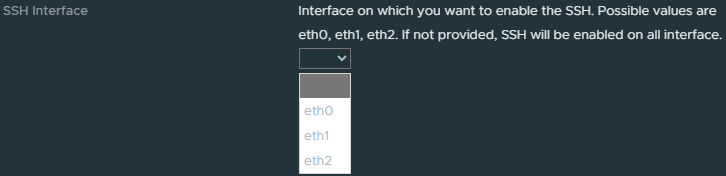
In my example, I am deploying a single NIC configuration. I will leave the option blank.
- For SSH Port, enter which port you want SSH to run on. If you leave it blank, SSH will be enabled on port 22.

In my example, I will leave it blank to enable SSH on port 22.
- For Enable Advanced Features, enter the advanced features you want to enable. The default is blank.

I couldn’t find any documentation on which advanced features can be enabled with this option.
Typically, this is left blank.
- For Gateway Specification, enter if you want the UAG to run only the required services for Horizon. The default is for the UAG to run all services.

Typically, this is left blank.
- For Commands to Run During First Boot, enter the commands you want the UAG to run during the first boot up.

Typically, this is left blank.
- For Commands to Run During Every Boot, enter the commands you want the UAG to run during each boot up.

Typically, this is left blank.
- For SecureRandom Source, select which source of random you would like to use. The default is
/dev/random.
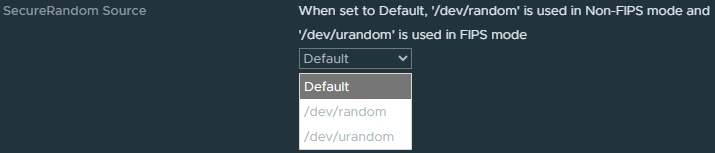
In my example, I will leave this as the default.
- Once you have completed configuring all the options, click Next.
- Review everything you’ve configured and click Finish.
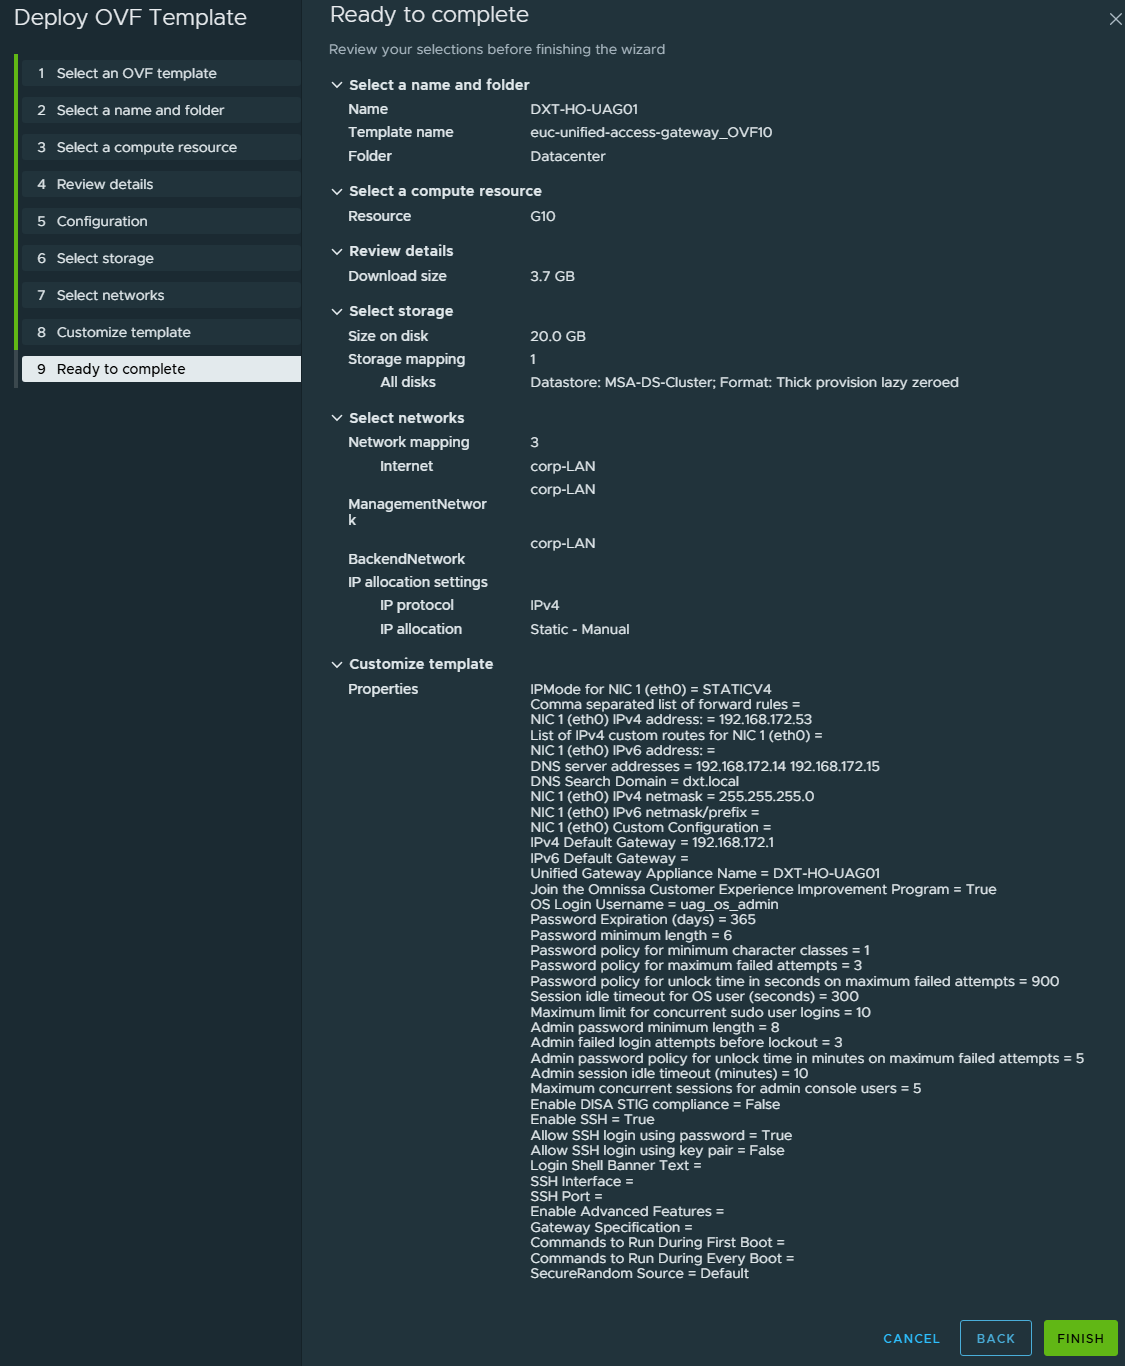
If you are following my example, the only changes we made are below. Everything else we left as the default.
IPMode for NIC 1 (eth0) = STATICV4
NIC 1 (eth0) IPv4 address: = 192.168.172.53
DNS server addresses = 192.168.172.14 192.168.172.15
DNS Search Domain = dxt.local
NIC 1 (eth0) IPv4 netmask = 255.255.255.0
IPv4 Default Gateway = 192.168.172.1
Unified Gateway Appliance Name = DXT-HO-UAG01
OS Login Username = uag_os_admin
Enable SSH = True
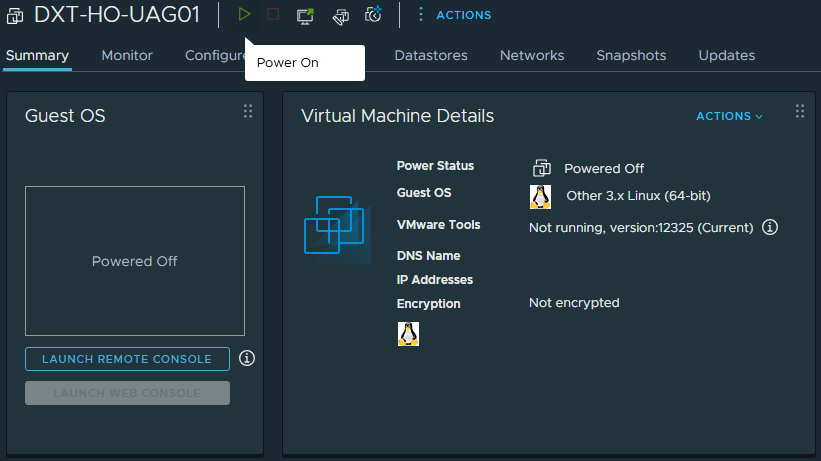
- Wait while vCenter deploys the UAG.

- Once vCenter has completed deploying the UAG, locate the VM in vCenter and Power On the UAG.
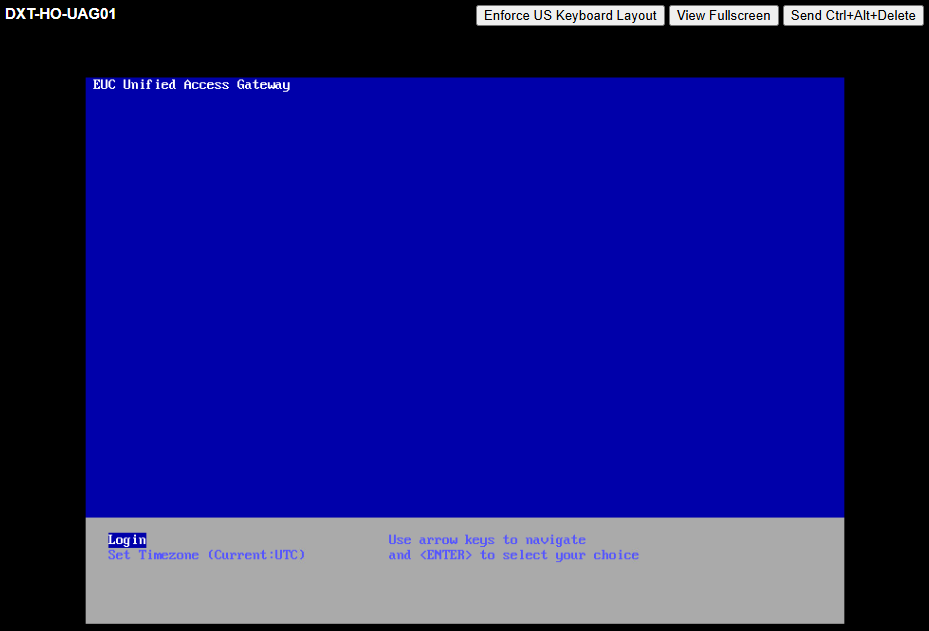
- Once the UAG has booted up, you will see a screen that says EUC Unified Access Gateway, with options to Login or set the timezone.
- If we go to the IP address we entered for the UAG and use port 9443, we can access the UAG’s admin web UI.
In my example, I will go to https://192.168.172.53:9443.
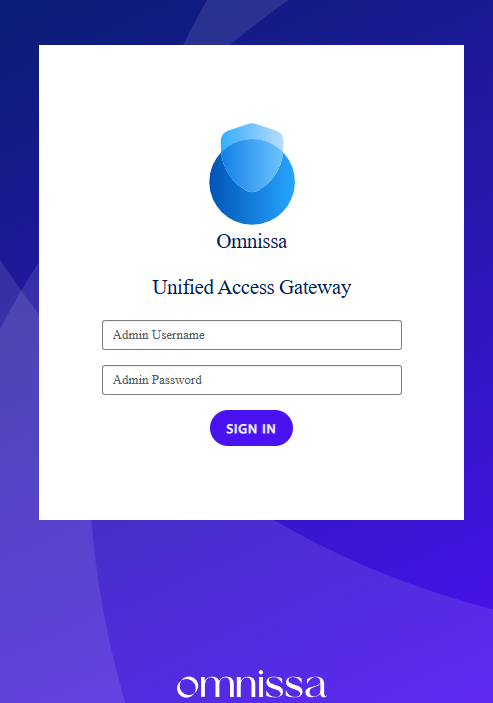
The username to log in will be admin, and the password will be the one you set for the admin user option during the OVA deployment customization.
That’s all it takes to deploy the Omnissa Unified Access Gateway appliance to VMware vCenter. If you want to read more about deploying the UAG to vCenter, here is the Omnissa documentation.