Recently, I acquired a Minisforum MS-A2 system and have been experimenting with it in my home lab. Something that’s been bothering me is the lack of documentation about all the different BIOS menus. I’ve also found myself forgetting which BIOS menu I saw which option. To address my issue, I decided to document all the BIOS options.
The BIOS that the Minisforum MS-A2 runs is AMI (American Megatrends International). My MS-A2 is the AMD Ryzen 9 9955HX version. The BIOS version I am running is 1.02.
You can download BIOS updates from Minisforum here.
In this post, I will share my documentation of each BIOS option I found on the Minisforum MS-A2.
Booting
When the Minisforum boots, you see the Minisforum splash screen.

When the Minisforum is booting, you can press F7 to access the boot menu or press Del to enter the BIOS.
F7 Boot Menu Screen
Delete Menu Screen

When you press Delete, you are presented with an initial menu that allows you to select several options, including Setup, Boot, UEFI Shell, Boot Options, and BBS Menu.
- Setup will take you into the BIOS.
- Boot will boot the system normally
- UEFI Shell tries to load shell.efi from any of the attached devices.
- Boot Options will bring up a menu to select a boot device.

- BBS Menu (BIOS Boot Spec) will also display a menu to select a boot device.

BIOS Setup
The BIOS Setup has the following menus.
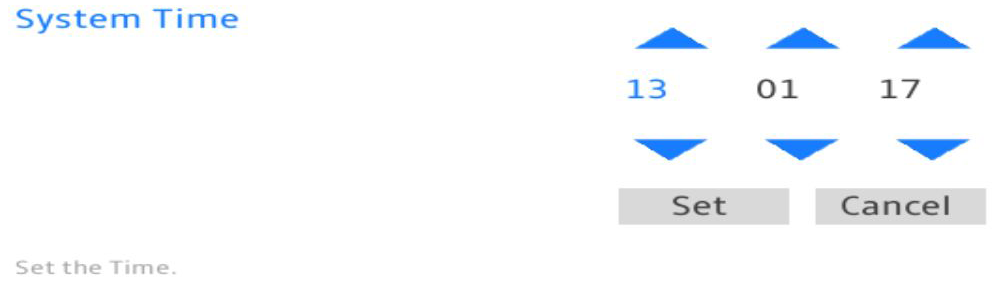
Main
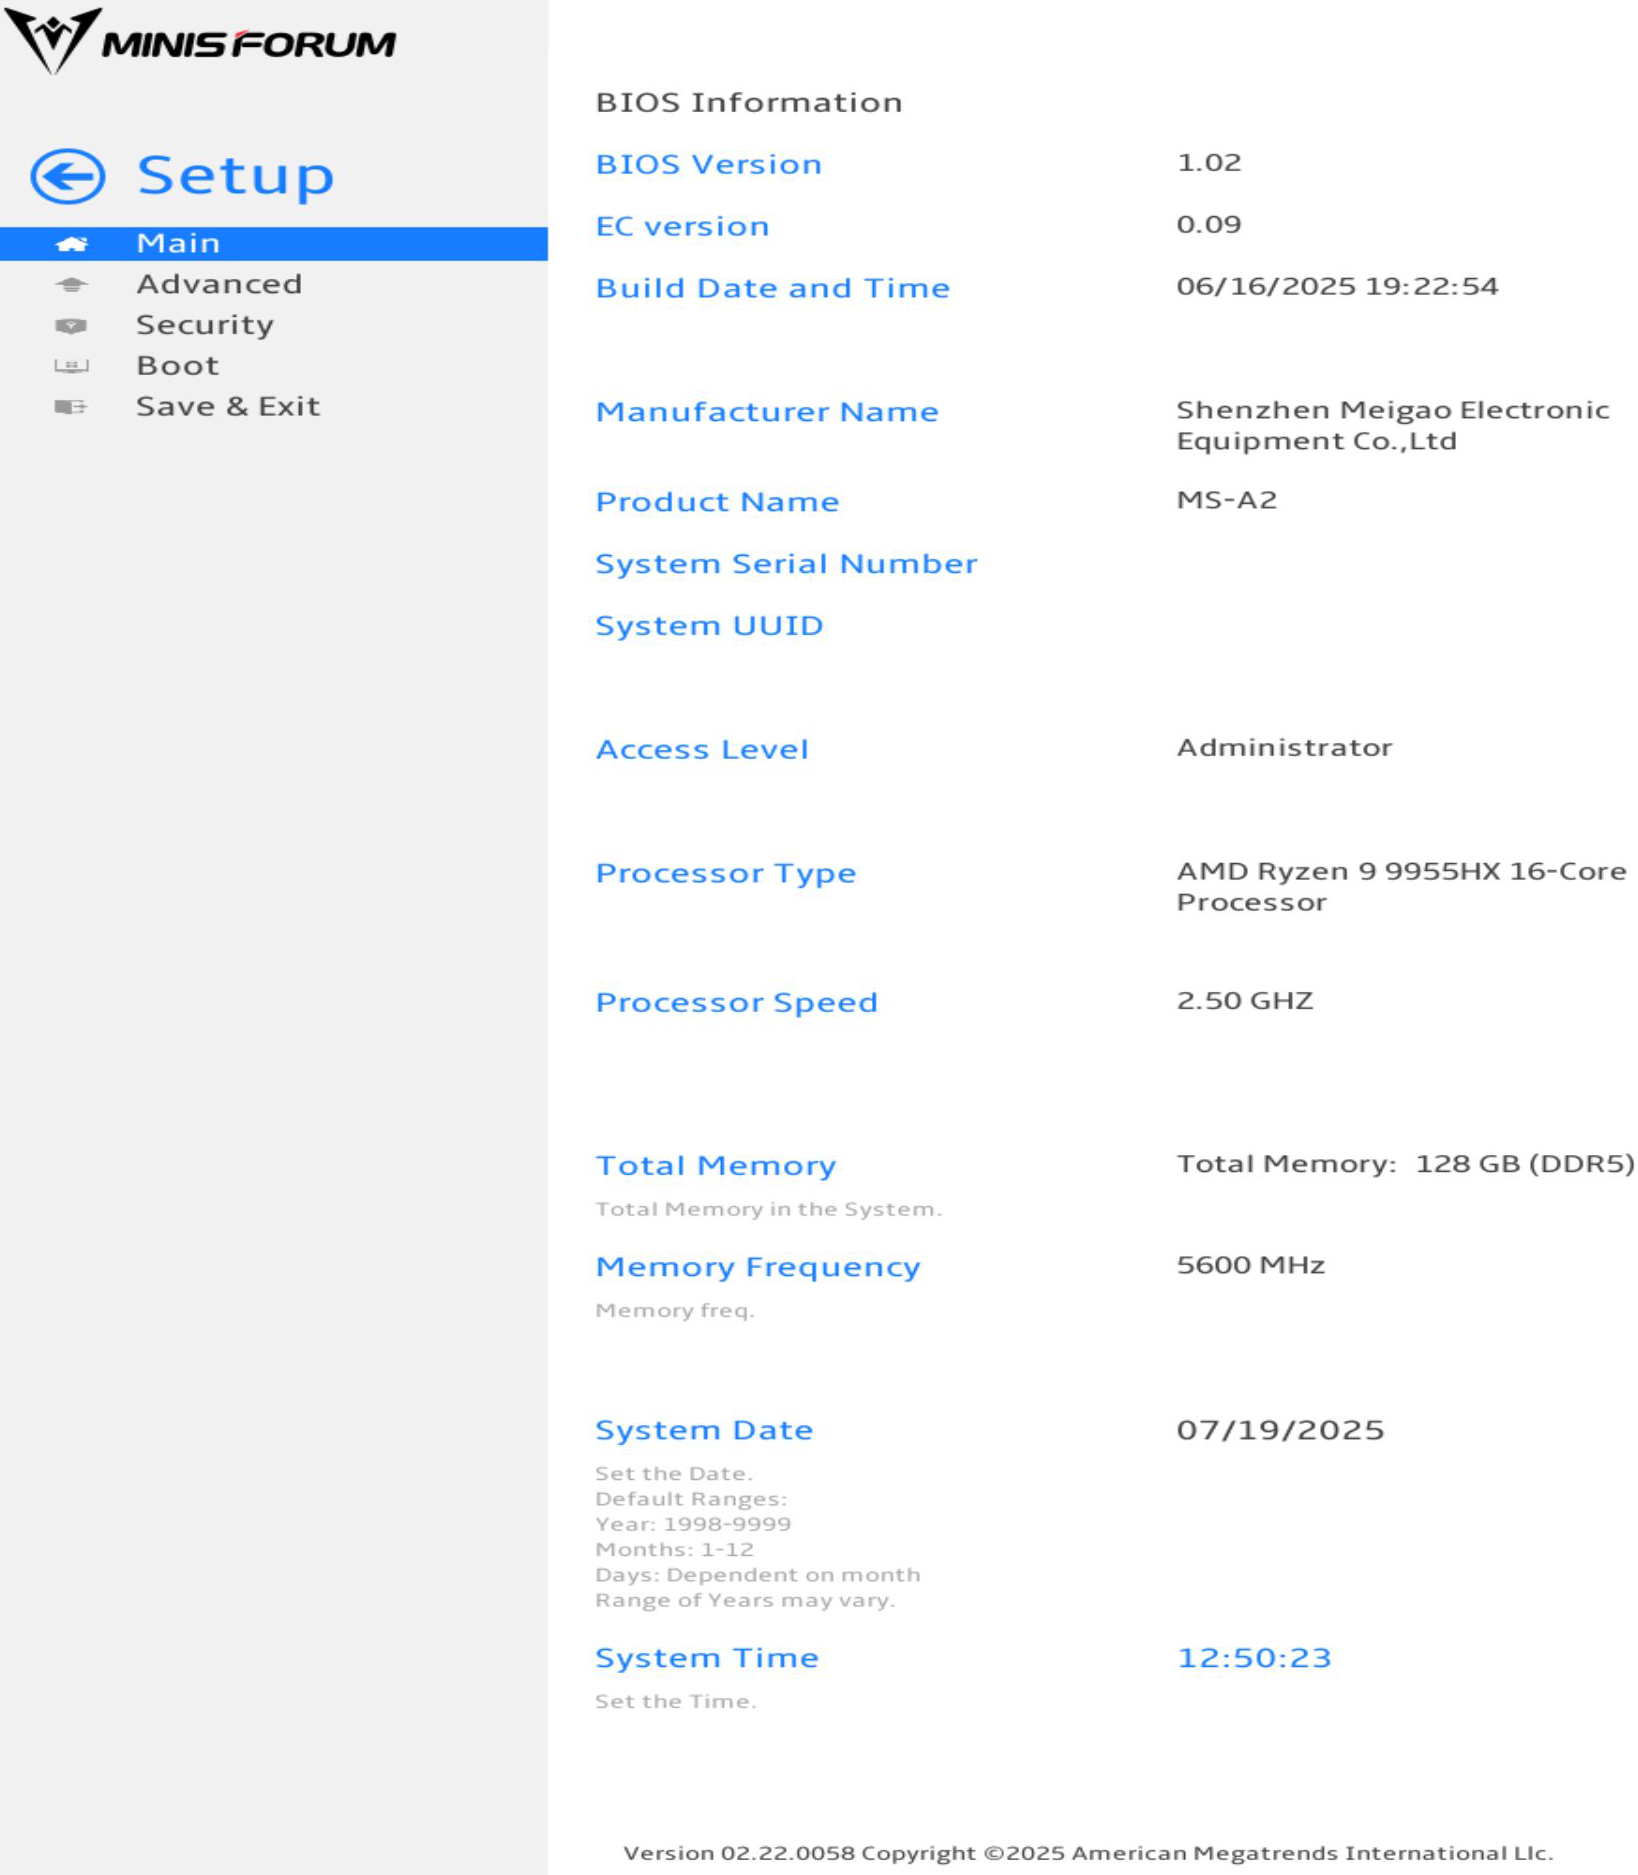
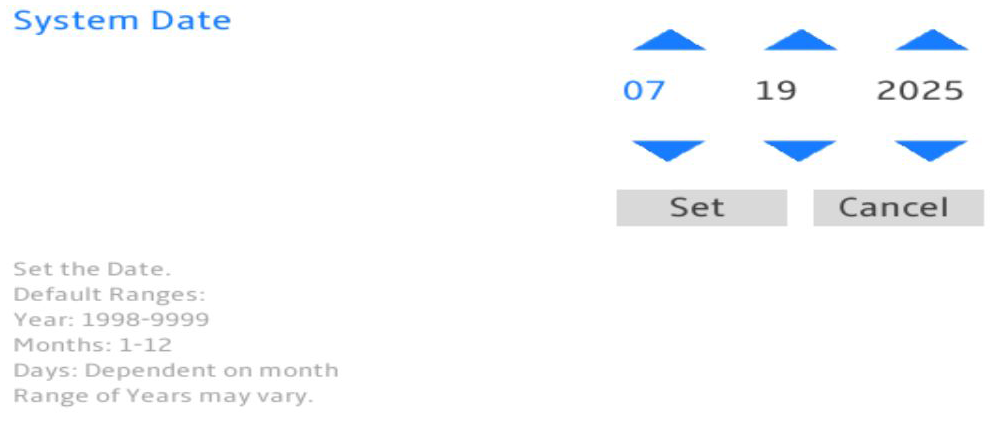
- For System Date, you can enter the date.
- For System Time, you can enter the time in 24-hour format.
Advanced
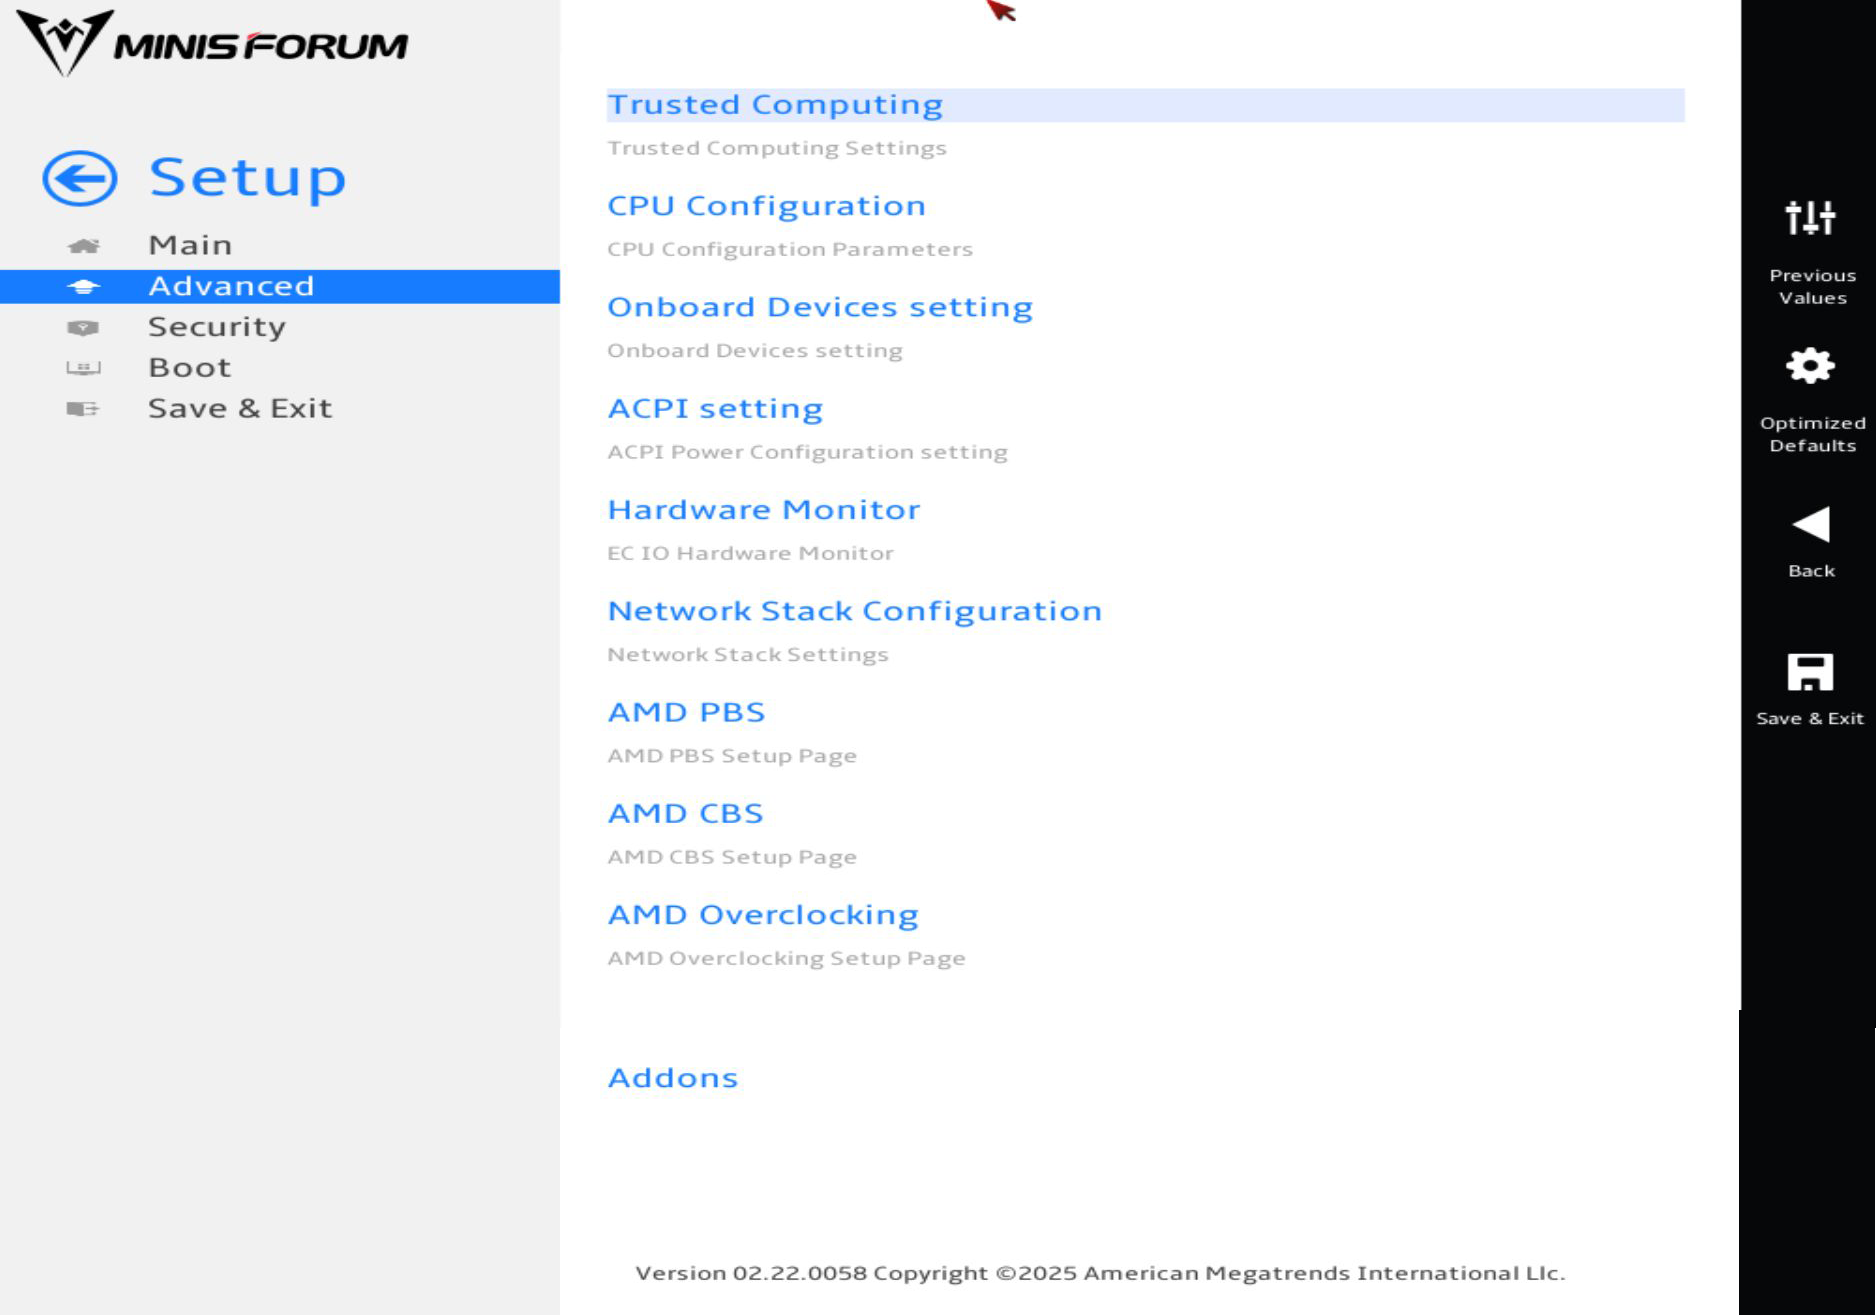
- Trusted Computing is a menu.
- CPU Configuration is a menu.
- Onboard Devices Settings is a menu.
- ACPI setting is a menu.
- Hardware Monitor is a menu.
- Network Stack Configuration is a menu.
- AMD PBS is a menu.
- AMD CBS is a menu.
- AMD Overclocking is a menu.
- Addons is a menu.
Advanced > Trusted Computing
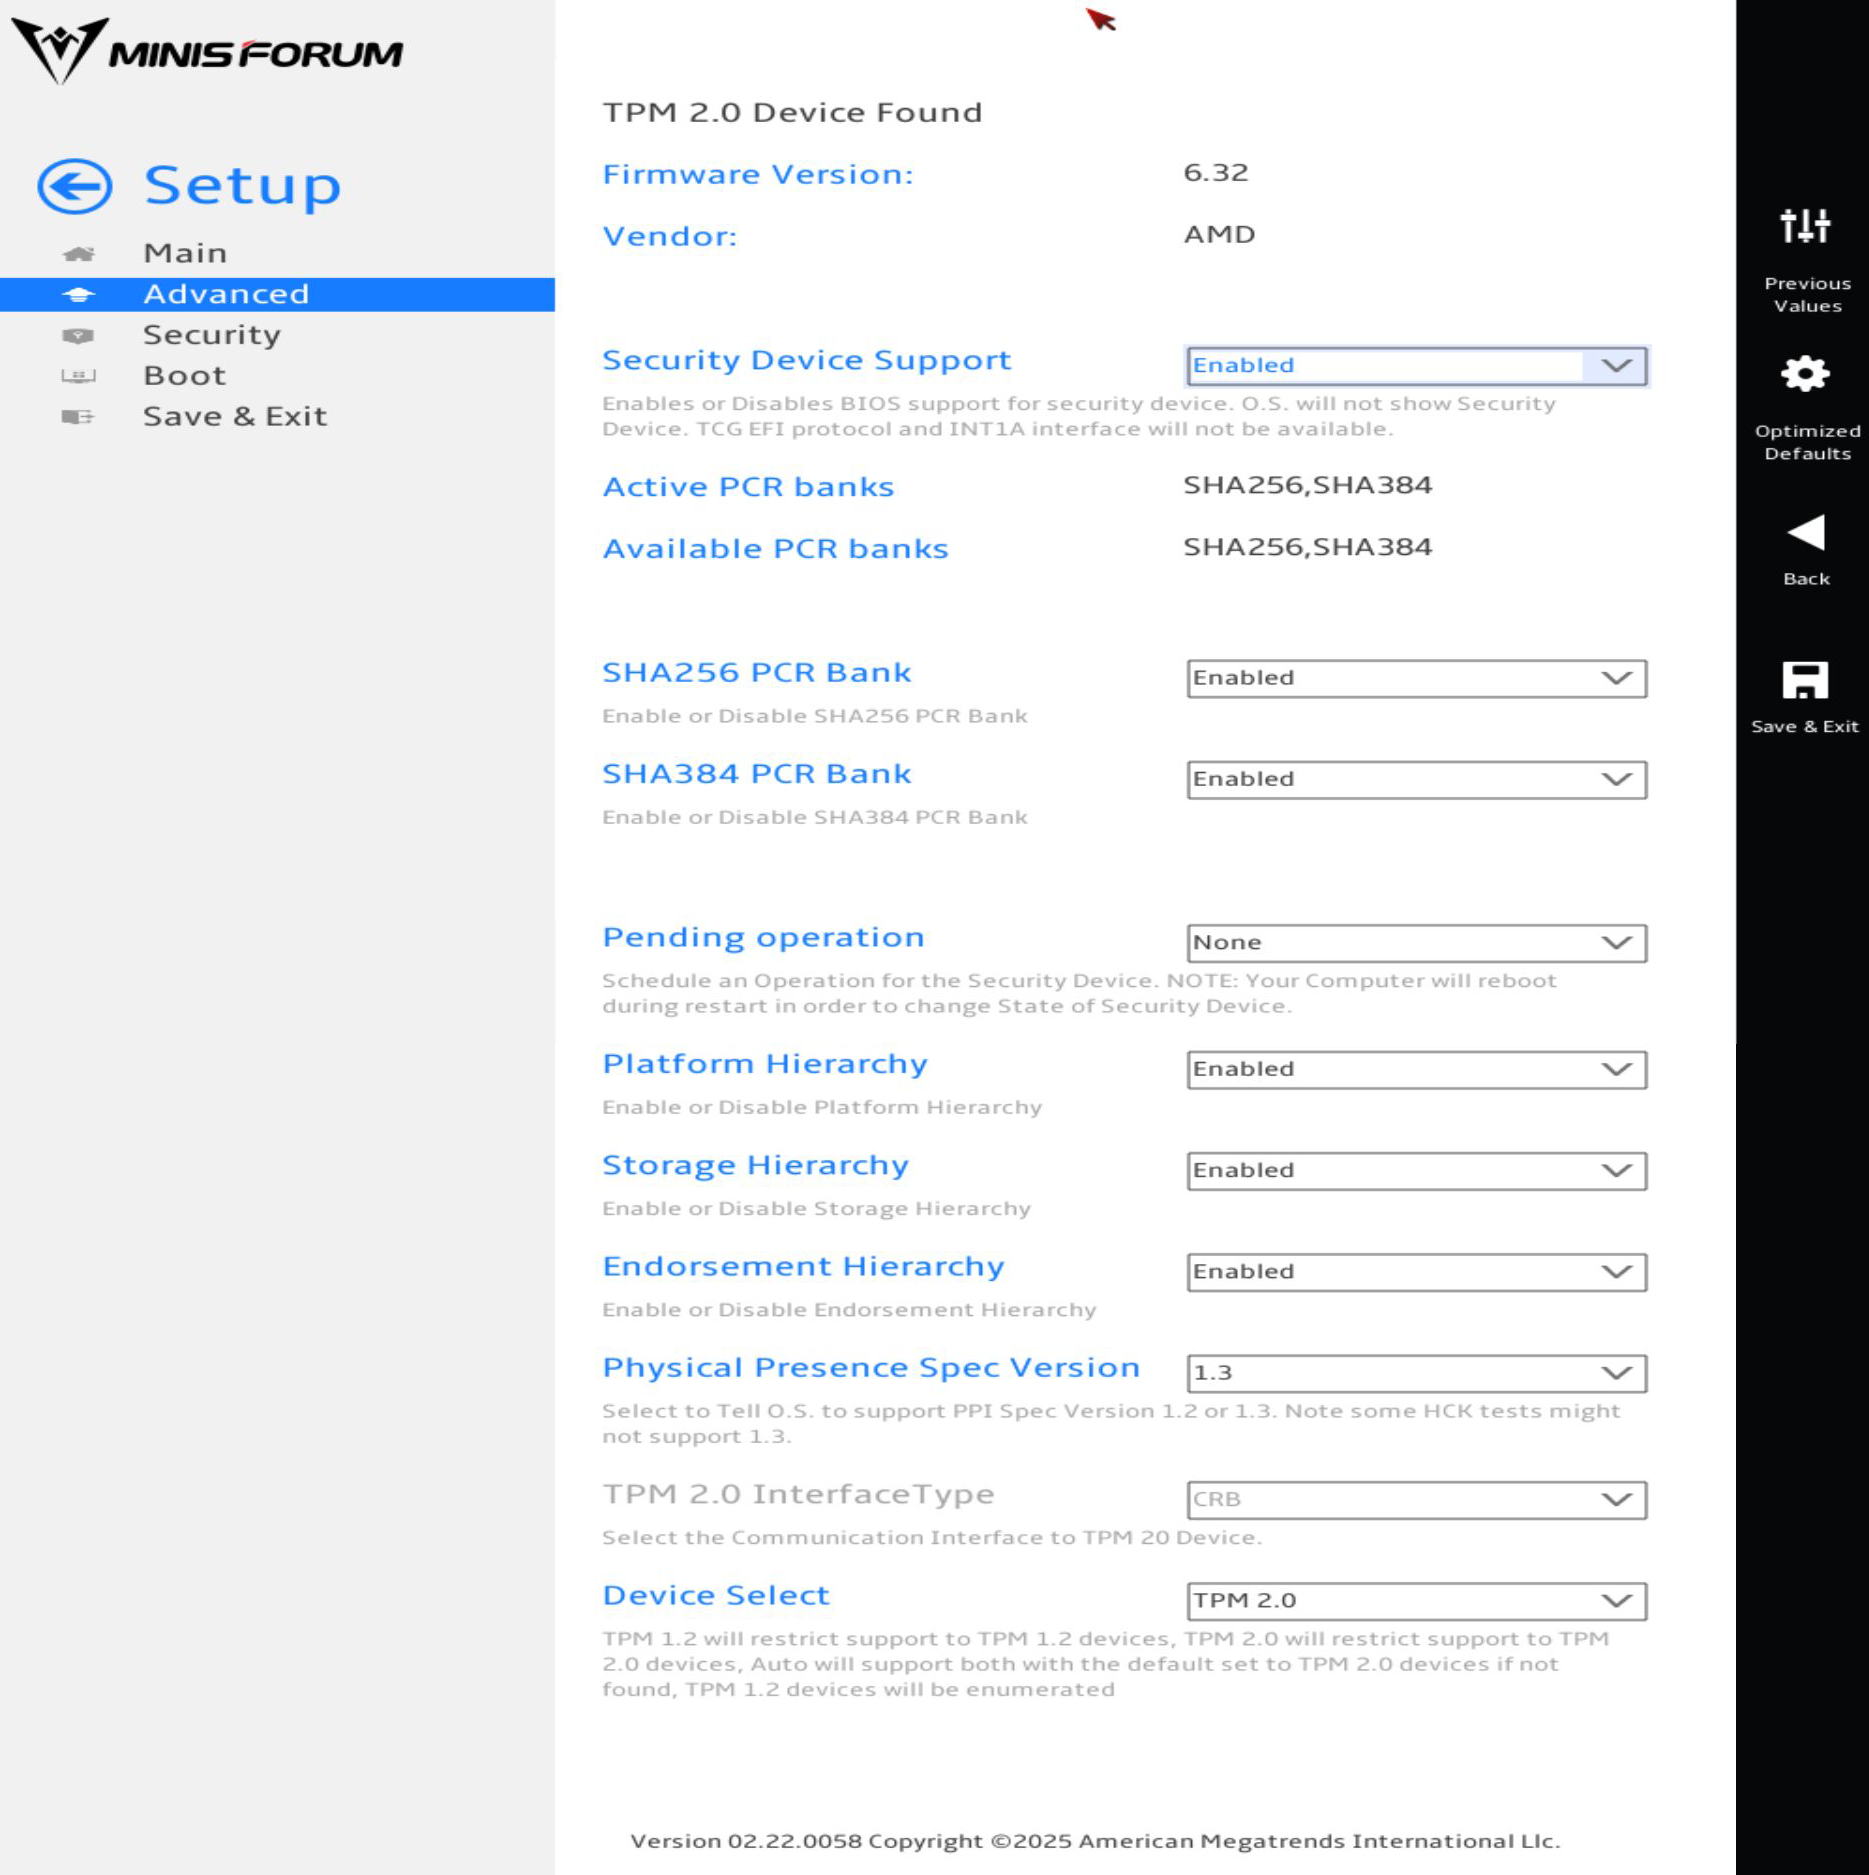
- For Security Device Support, you can Enable or Disable it
- For SHA256 PCR Bank, you can Enable or Disable it.
- For SHA384 PCR Bank, you can Enable or Disable it.
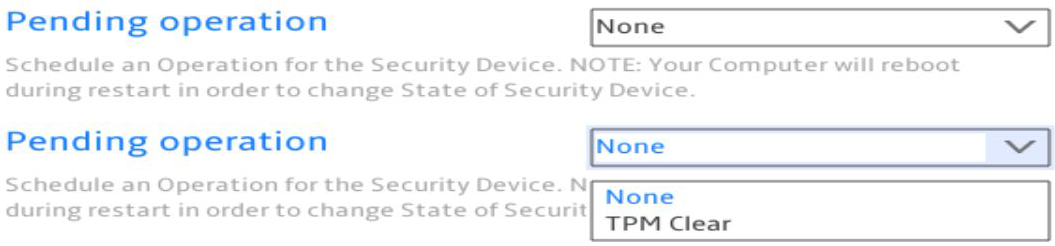
- For Pending operation, you can set the option to TPM Clear.
- For Platform Hierarchy, you can Enable or Disable it.
- For Storage Hierarchy, you can Enable or Disable it.
- For Endorsement Hierarchy, you can Enable or Disable it.
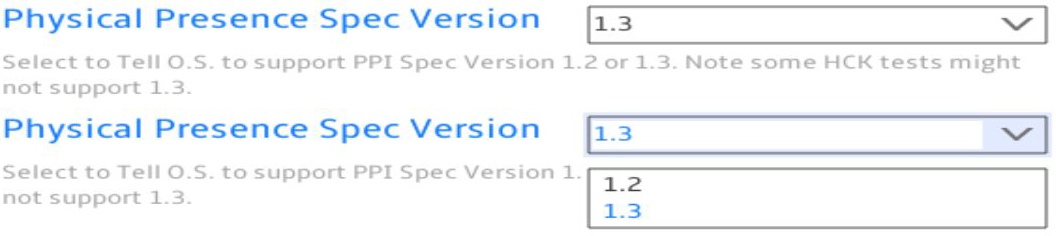
- For Physical Presence Spec Version, you can set it to 1.2 or 1.3.
- For TPM 2.0 Interface Type, I was unable to find a way to change it.

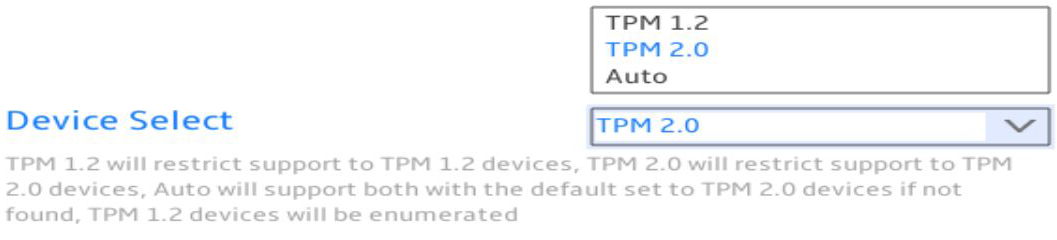
- For Device Select, you can select Auto, TPM 2.0, or TPM 1.2.
Advanced > CPU Configuration
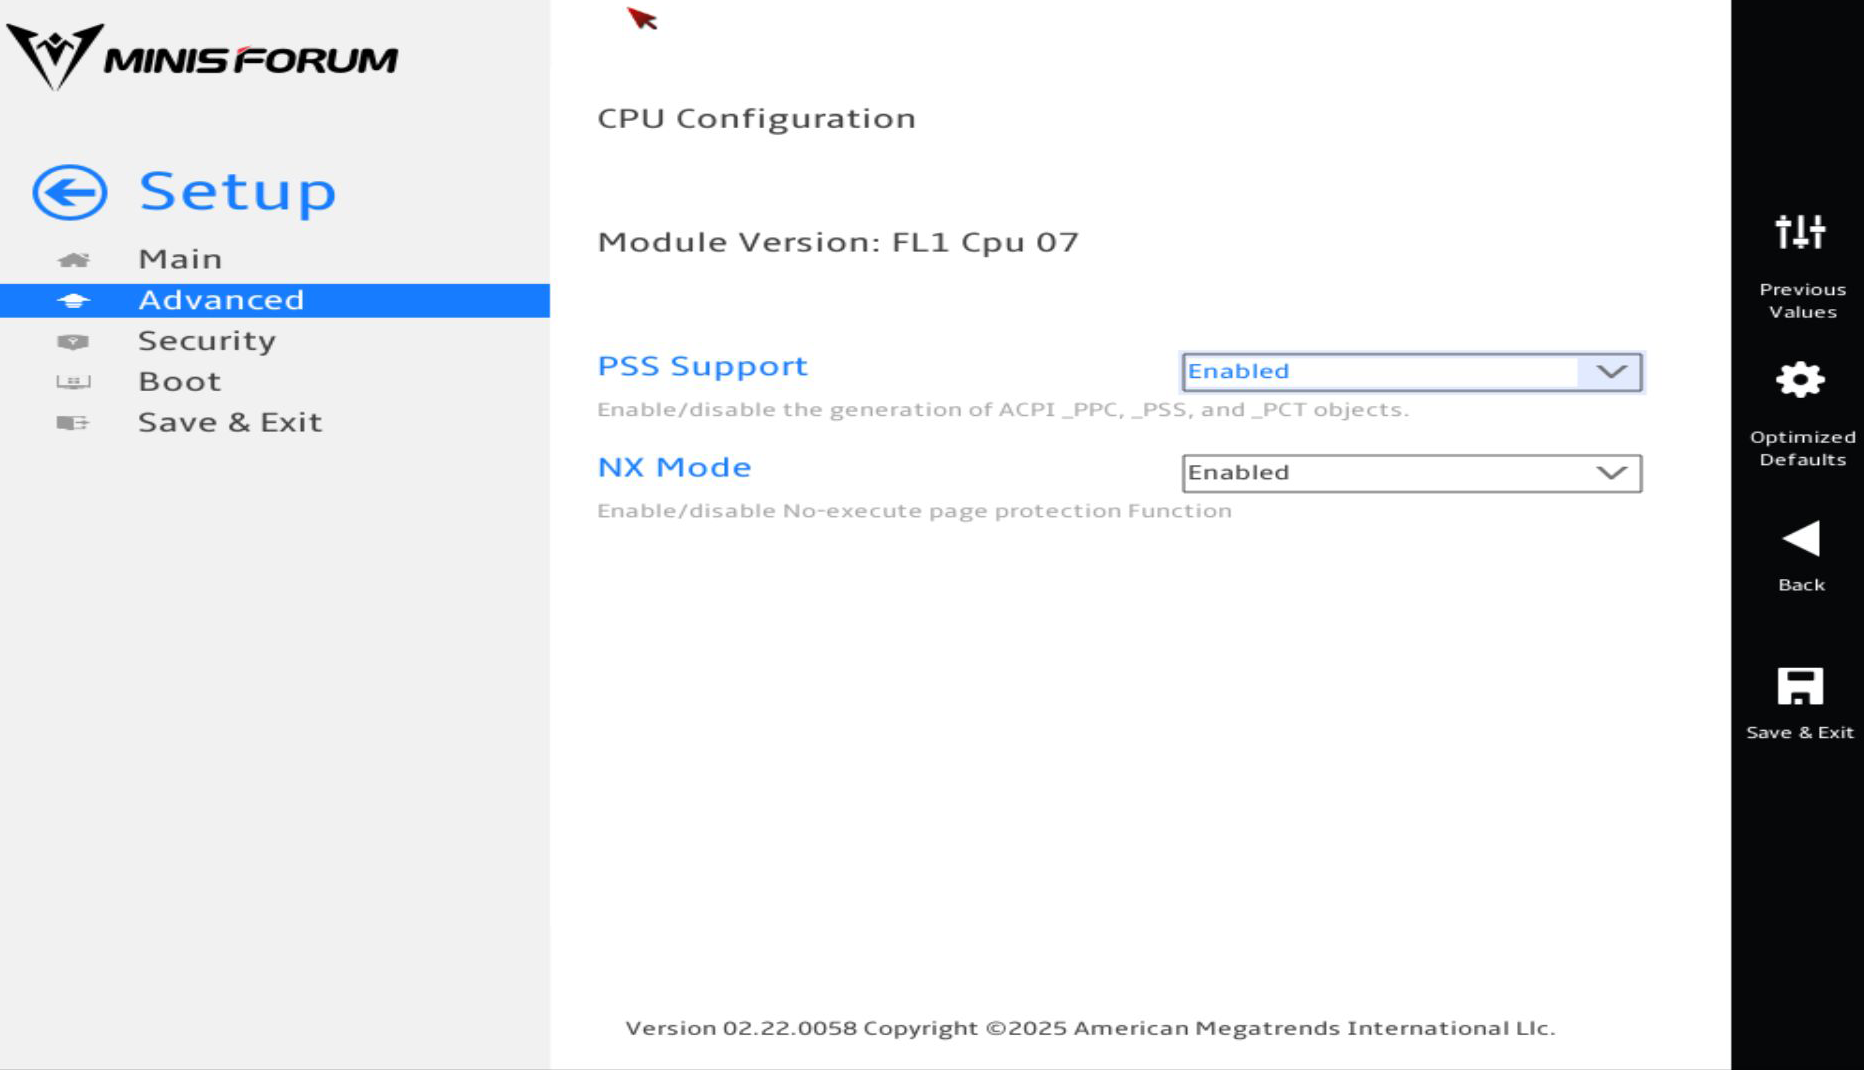
- For PSS Support, you can Enable or Disable it.
- For NX Mode, you can Enable or Disable it.
Advanced > Onboard Devices Settings
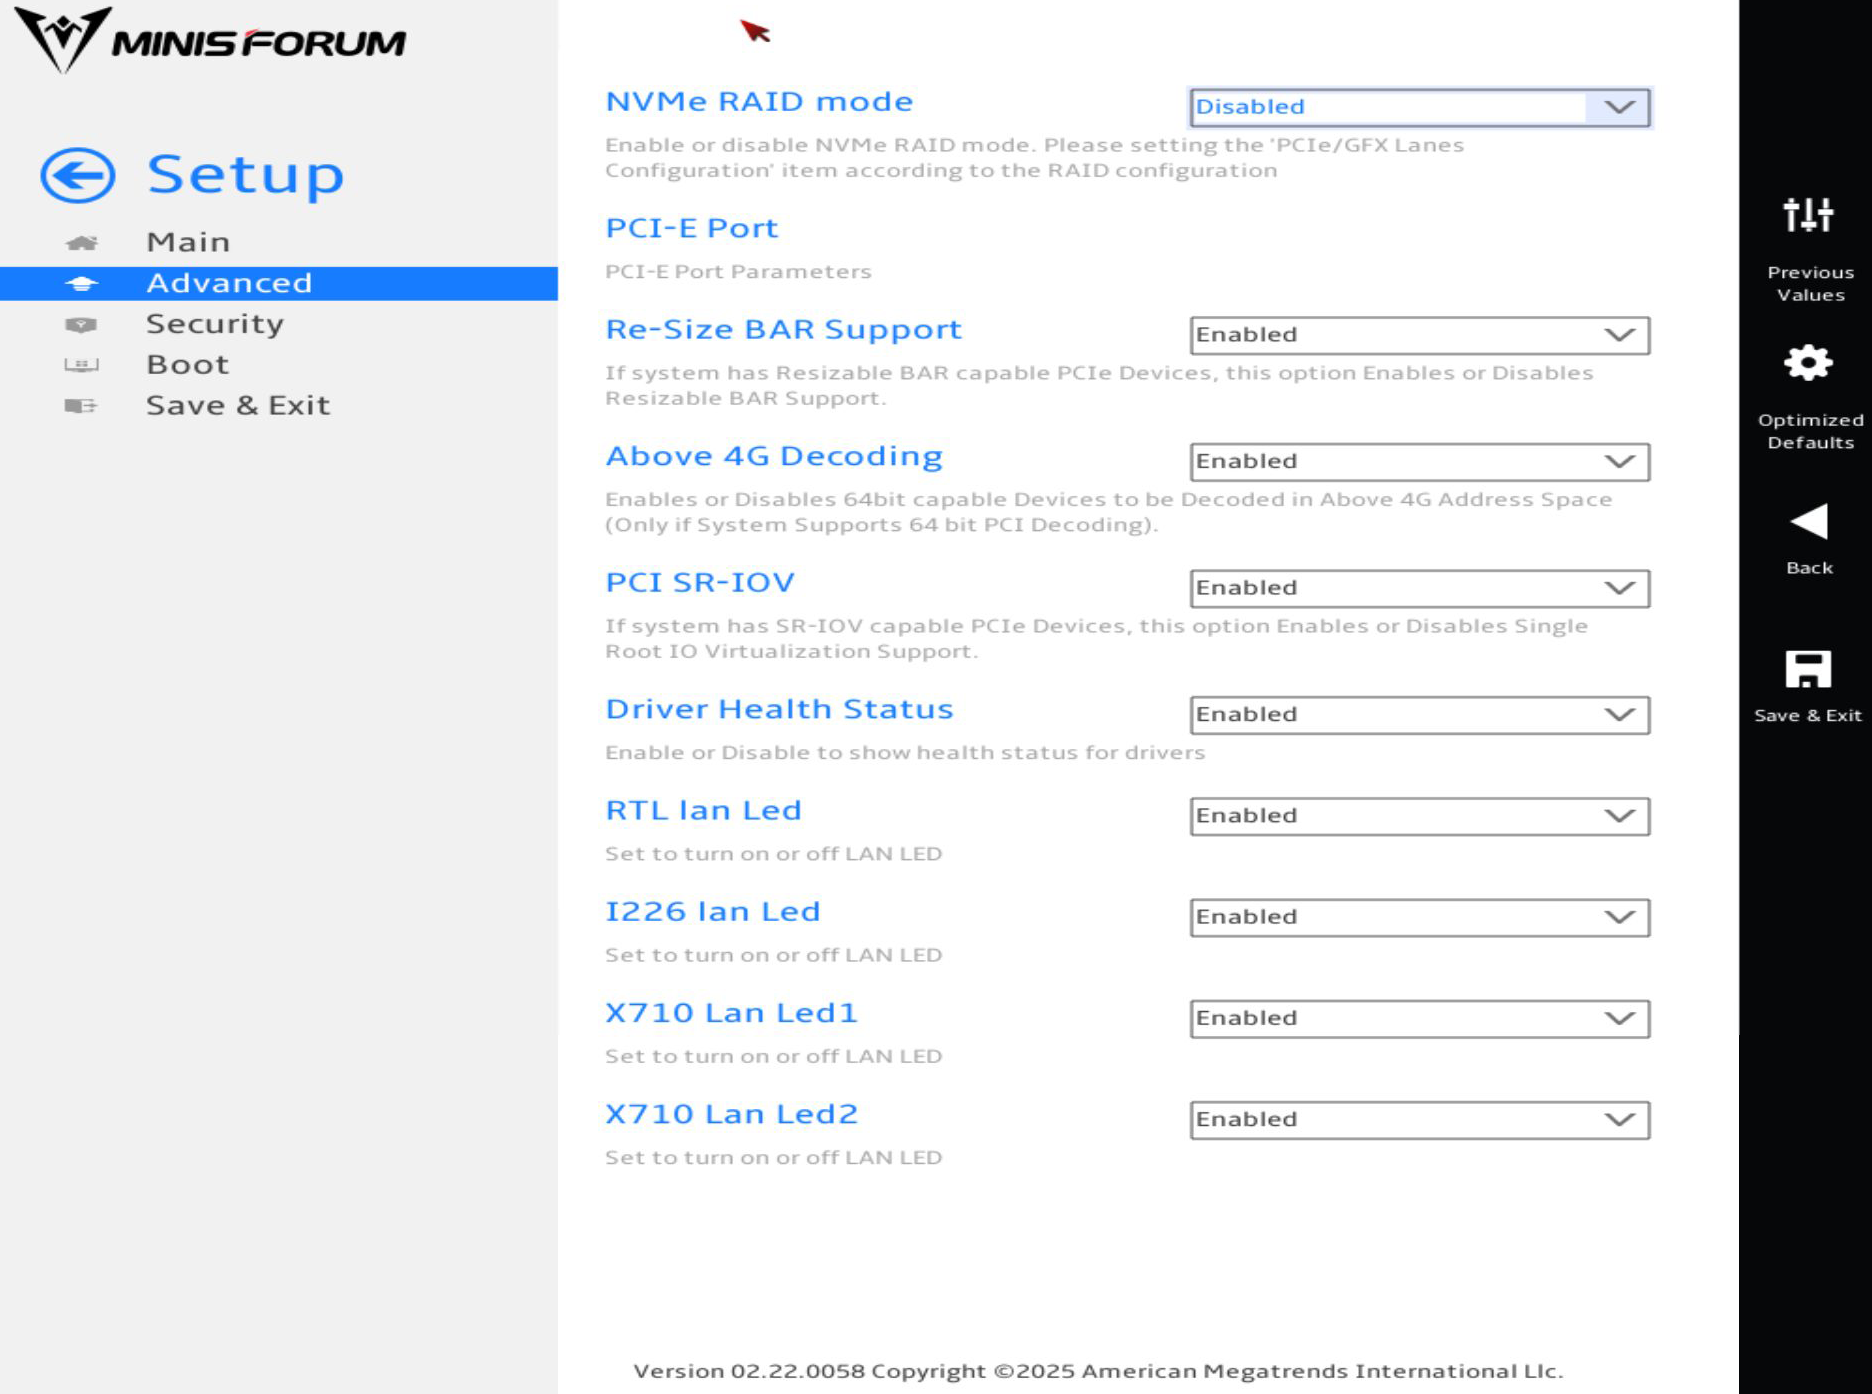
- For NVMe RAID mode, you can Enable or Disable it.
- PCI-E Port is a menu.
- For Re-Size BAR Support, you can Enable or Disable it.
- For Above 4G Decoding, you can Enable or Disable it.
- For PCI SR-IOV, you can Enable or Disable it.
- For Driver Health Status, you can Enable or Disable it.
- For RTL lan Led, you can Enable or Disable it.
- For I226 lan Led, you can Enable or Disable it.
- For X710 Lan Led1, you can Enable or Disable it.
- For X710 Lan Led2, you can Enable or Disable it.
Advanced > Onboard Devices Settings > PCI-E Port

- For SSD2, you can set it to Auto, Enabled, or Disabled.
- For ASPM Mode(Dev#1/Func#4), you can set it to Auto, L0s And L1 Entry, L1 Entry, L0s Entry, or Disabled.

- For X710 LAN, you can set it to Auto, Enabled, or Disabled.
- For ASPM Mode(Dev#2/Func#1), you can set it to Auto, L0s And L1 Entry, L1 Entry, L0s Entry, or Disabled.

- For WIFI, you can set it to Auto, Enabled, or Disabled.
- For ASPM Mode(Dev#2/Func#2), you can set it to Auto, L0s And L1 Entry, L1 Entry, L0s Entry, or Disabled.

- For RTL LAN, you can set it to Auto, Enabled, or Disabled.
- For ASPM Mode(Dev#3/Func#1), you can set it to Auto, L0s And L1 Entry, L1 Entry, L0s Entry, or Disabled.

- For SSD0, you can set it to Auto, Enabled, or Disabled.
- For ASPM Mode(Dev#1/Func#2), you can set it to Auto, L0s And L1 Entry, L1 Entry, L0s Entry, or Disabled.

- For I226 LAN, you can set it to Auto, Enabled, or Disabled.
- For ASPM Mode(Dev#3/Func#2), you can set it to Auto, L0s And L1 Entry, L1 Entry, L0s Entry, or Disabled.

- For SSD1, you can set it to Auto, Enabled, or Disabled.
- For ASPM Mode(Dev#1/Func#3), you can set it to Auto, L0s And L1 Entry, L1 Entry, L0s Entry, or Disabled.

Advanced > ACPI setting

- For Wake Up on Lan, you can Enable or Disable it.
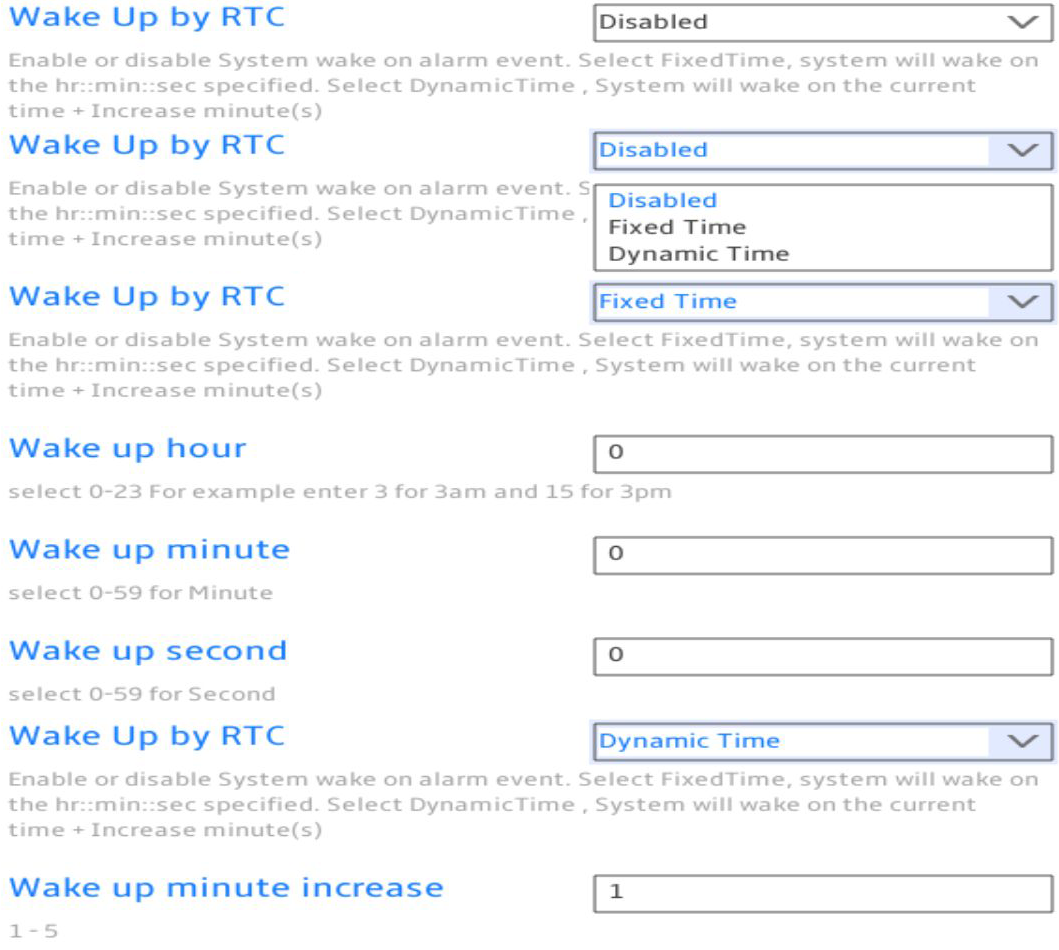
- For Wake Up by RTC, you can set it to Disabled, Dynamic Time, or Fixed Time.
- For PowerLimit Setting, you can set it to Performance Mode, Balance Mode, or Silent Mode.

- For ERP, you can Disable or Enable it.
Advanced > Hardware Monitor
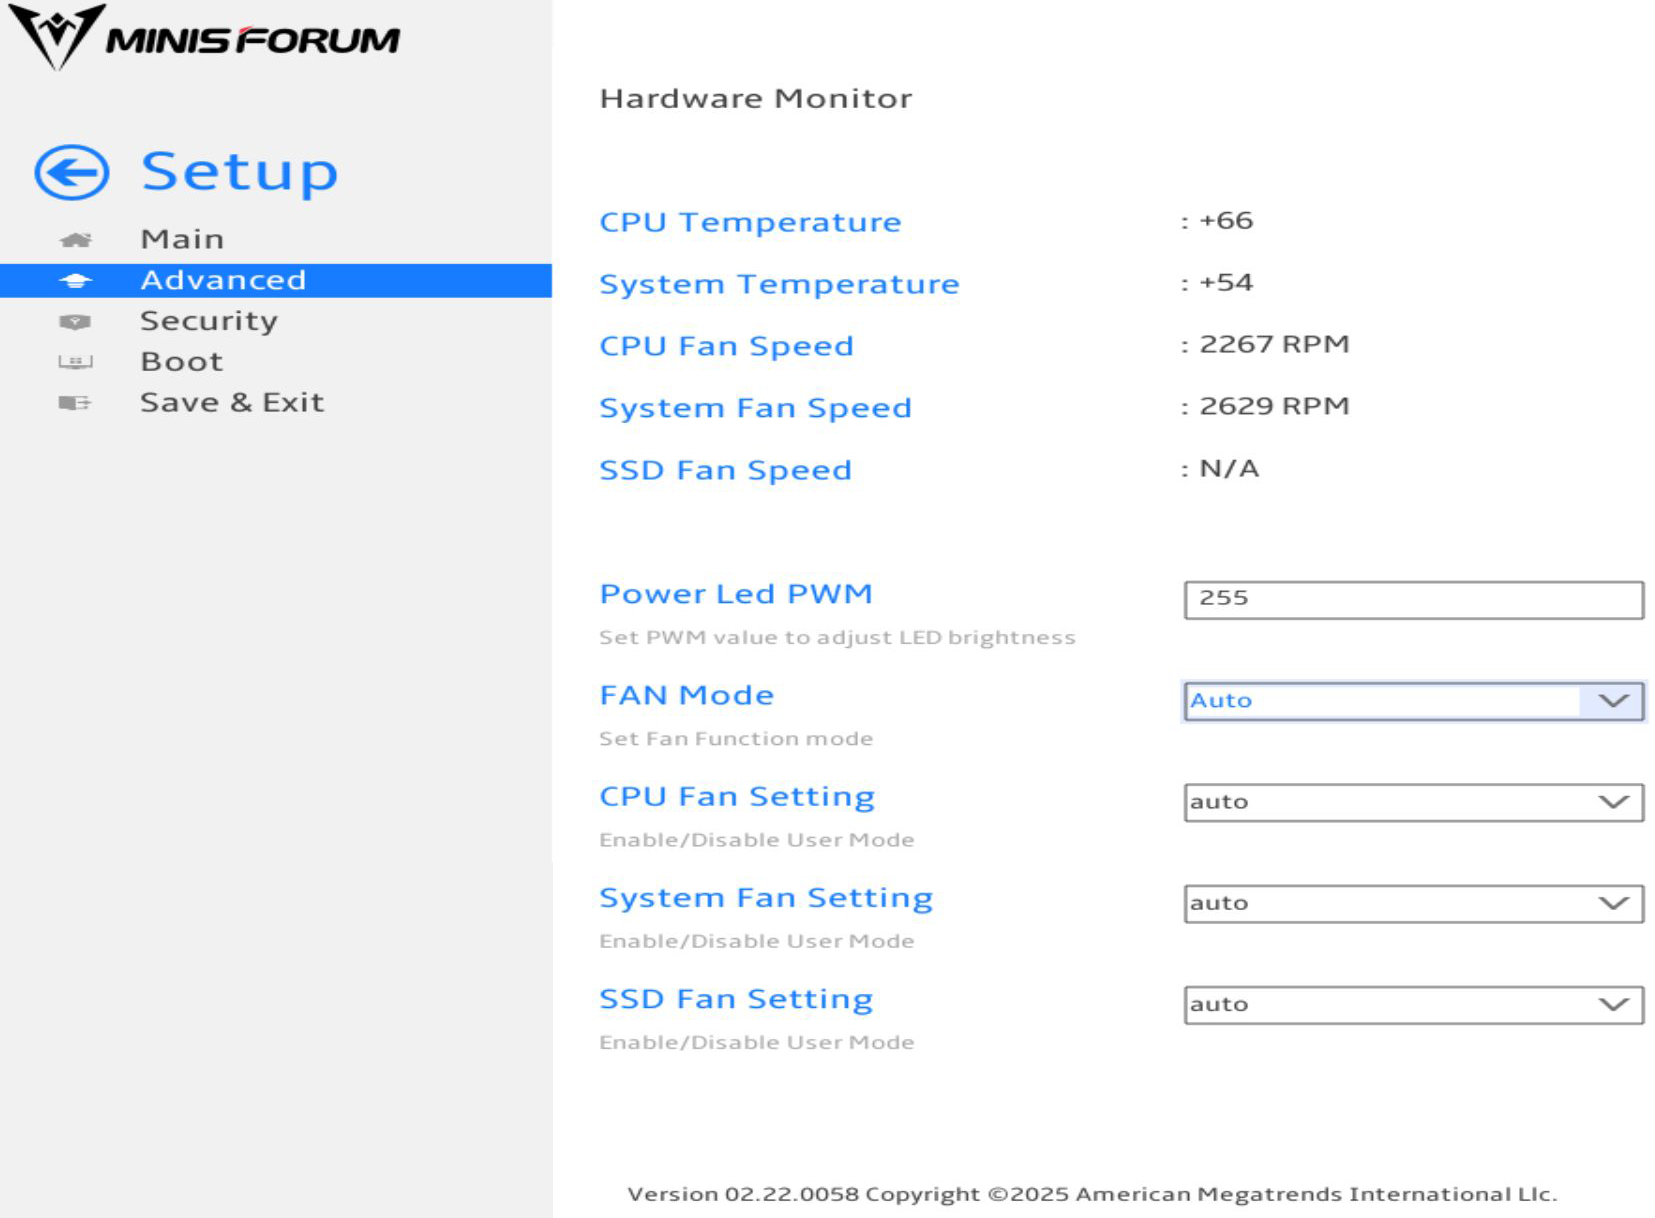
- For Power Led PWN, you can enter a number.
- For FAN Mode, you can set it to Performance, Balance, Quiet, or Auto.

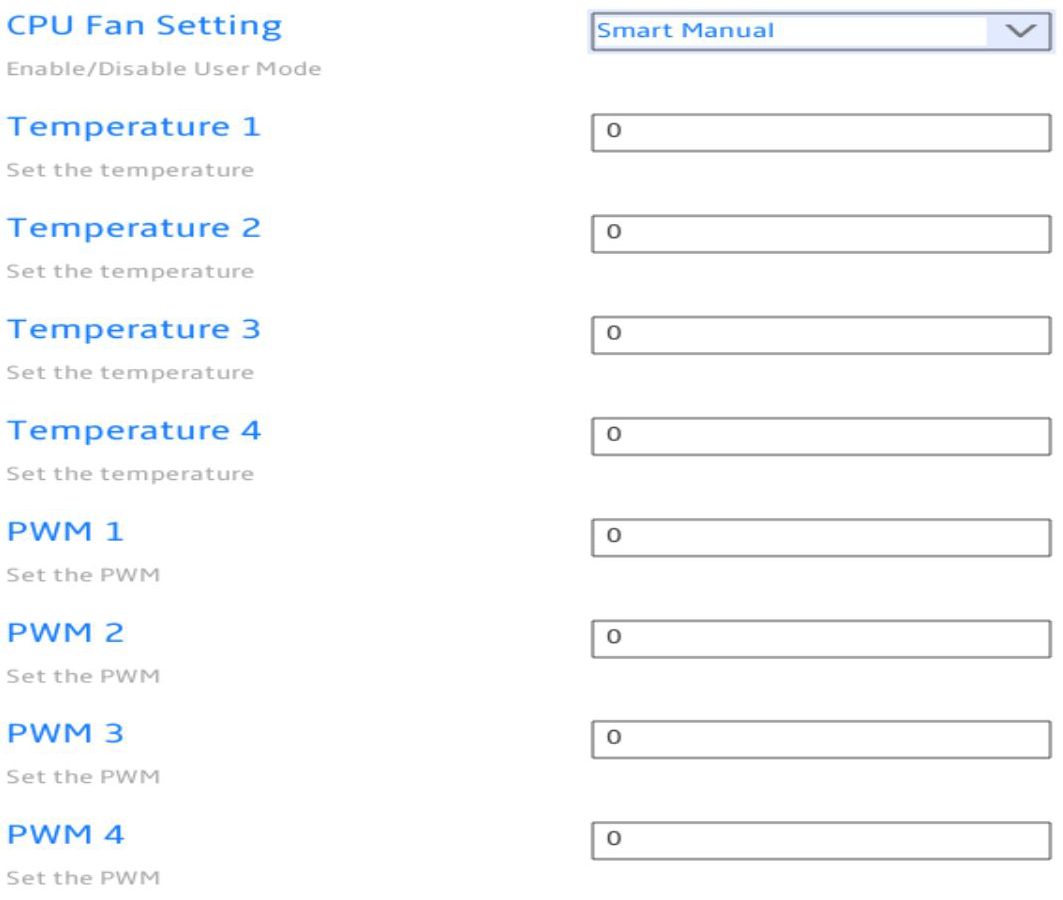
- For CPU Fan Setting, you can set it to auto, Smart Manual, or Fix PWM. If you set it to Smart Manual or Fix PWM, you unlock more options.

- When the CPU Fan Setting is set to Smart Manual, you can enter a number for Temperature 1, Temperature 2, Temperature 3, Temperature 4, PWM 1, PWM 2, PWM 3, and PWM 4.
- When the CPU Fan Setting is set to Fix PWM, you can enter a specific PWM value.

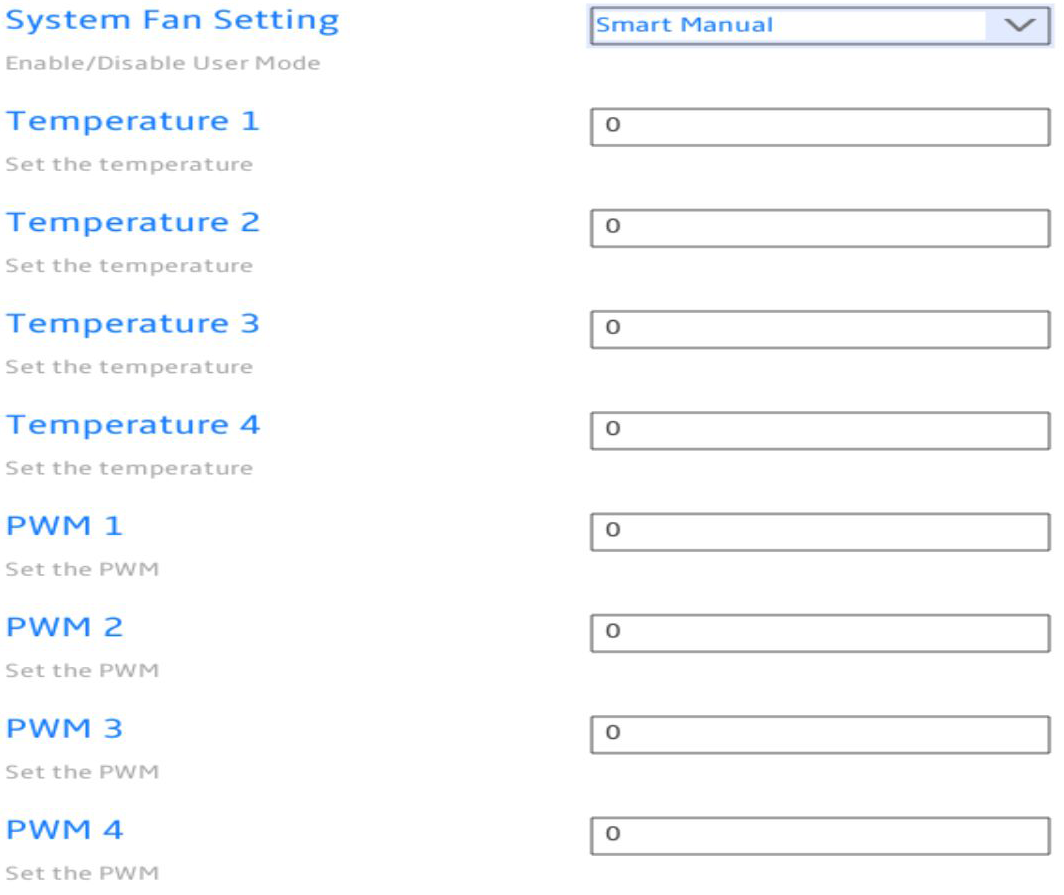
- For System Fan Setting, you can set it to auto, Smart Manual, or Fix PWM. If you set it to Smart Manual or Fix PWM, you unlock more options.

- When the System Fan Setting is set to Smart Manual, you can enter a number for Temperature 1, Temperature 2, Temperature 3, Temperature 4, PWM 1, PWM 2, PWM 3, and PWM 4.
- When the System Fan Setting is set to Fix PWM, you can enter a specific PWM value.

- For SSD Fan Setting, you can set it to auto, Smart Manual, or Fix PWM. If you set it to Smart Manual or Fix PWM, you unlock more options.

- When the SSD Fan Setting is set to Smart Manual, you can enter a number for Temperature 1, Temperature 2, Temperature 3, Temperature 4, PWM 1, PWM 2, PWM 3, and PWM 4.
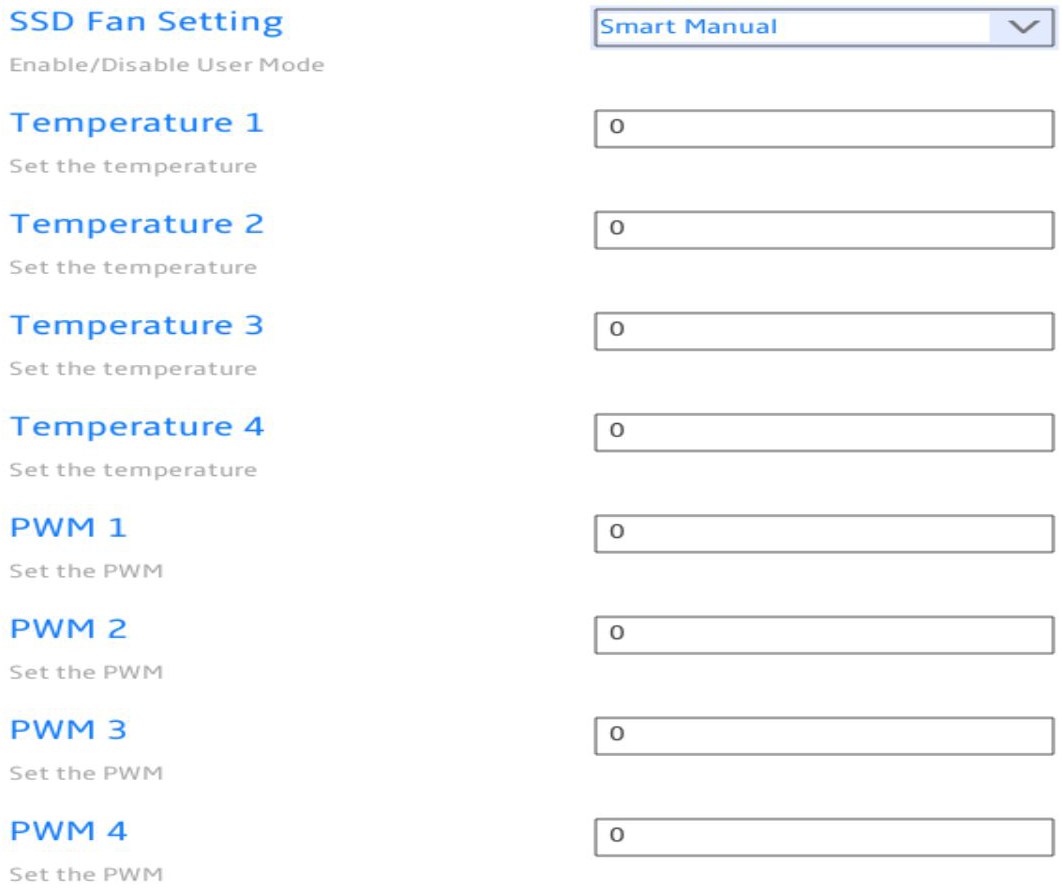
- When the SSD Fan Setting is set to Fix PWM, you can enter a specific PWM value.

Advanced > Network Stack Configuration
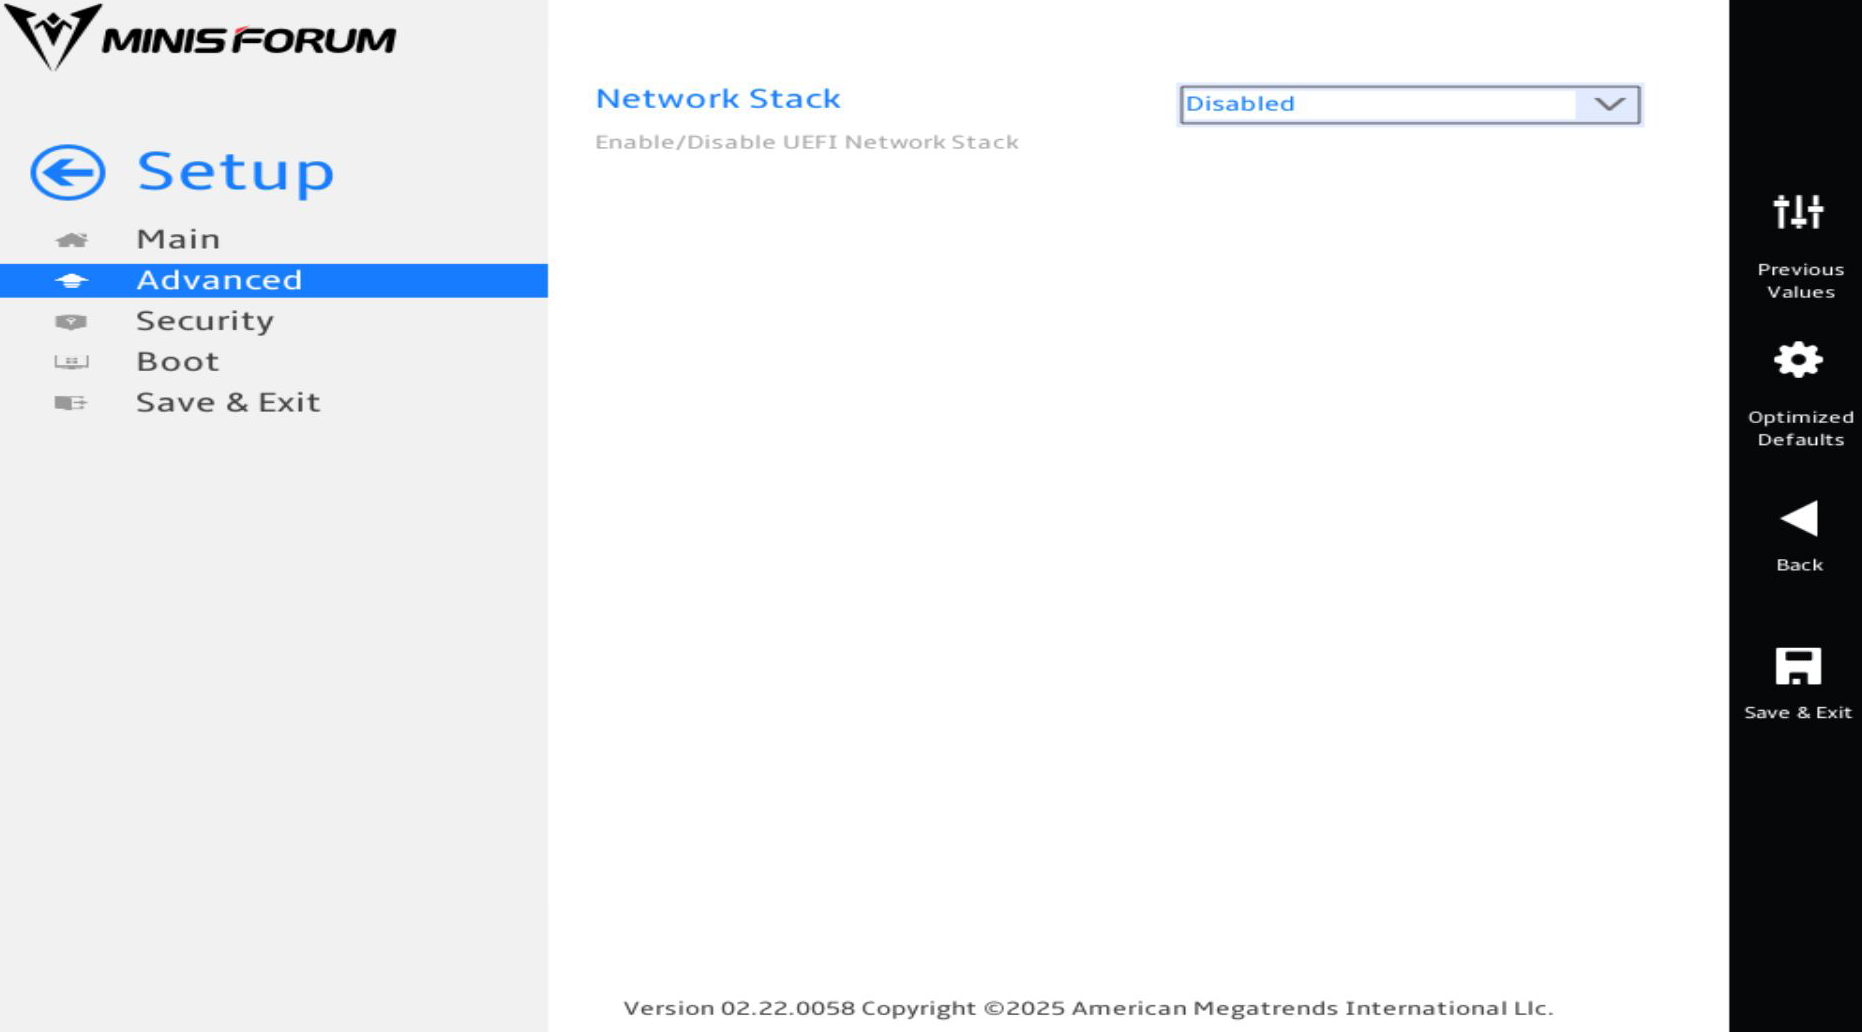
- For Network Stack, you can Enable or Disable it. Enabling it unlocks more options.
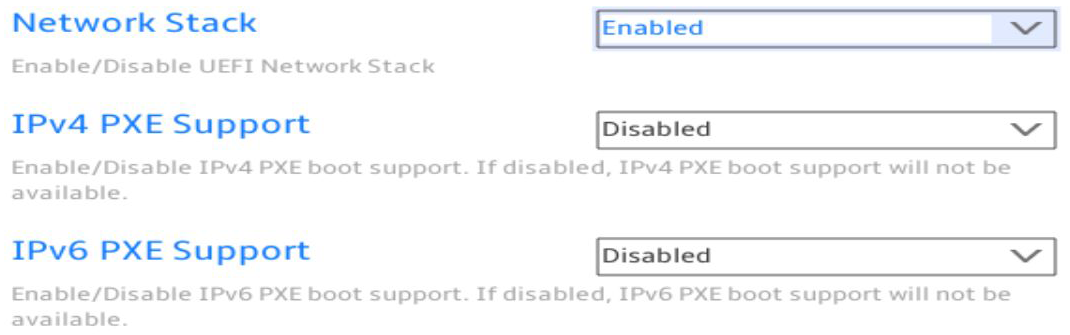
- For IPv4 PXE Support, you can Enable or Disable it.
- For IPv6 PXE Support, you can Enable or Disable it.
Advanced > AMD PBS
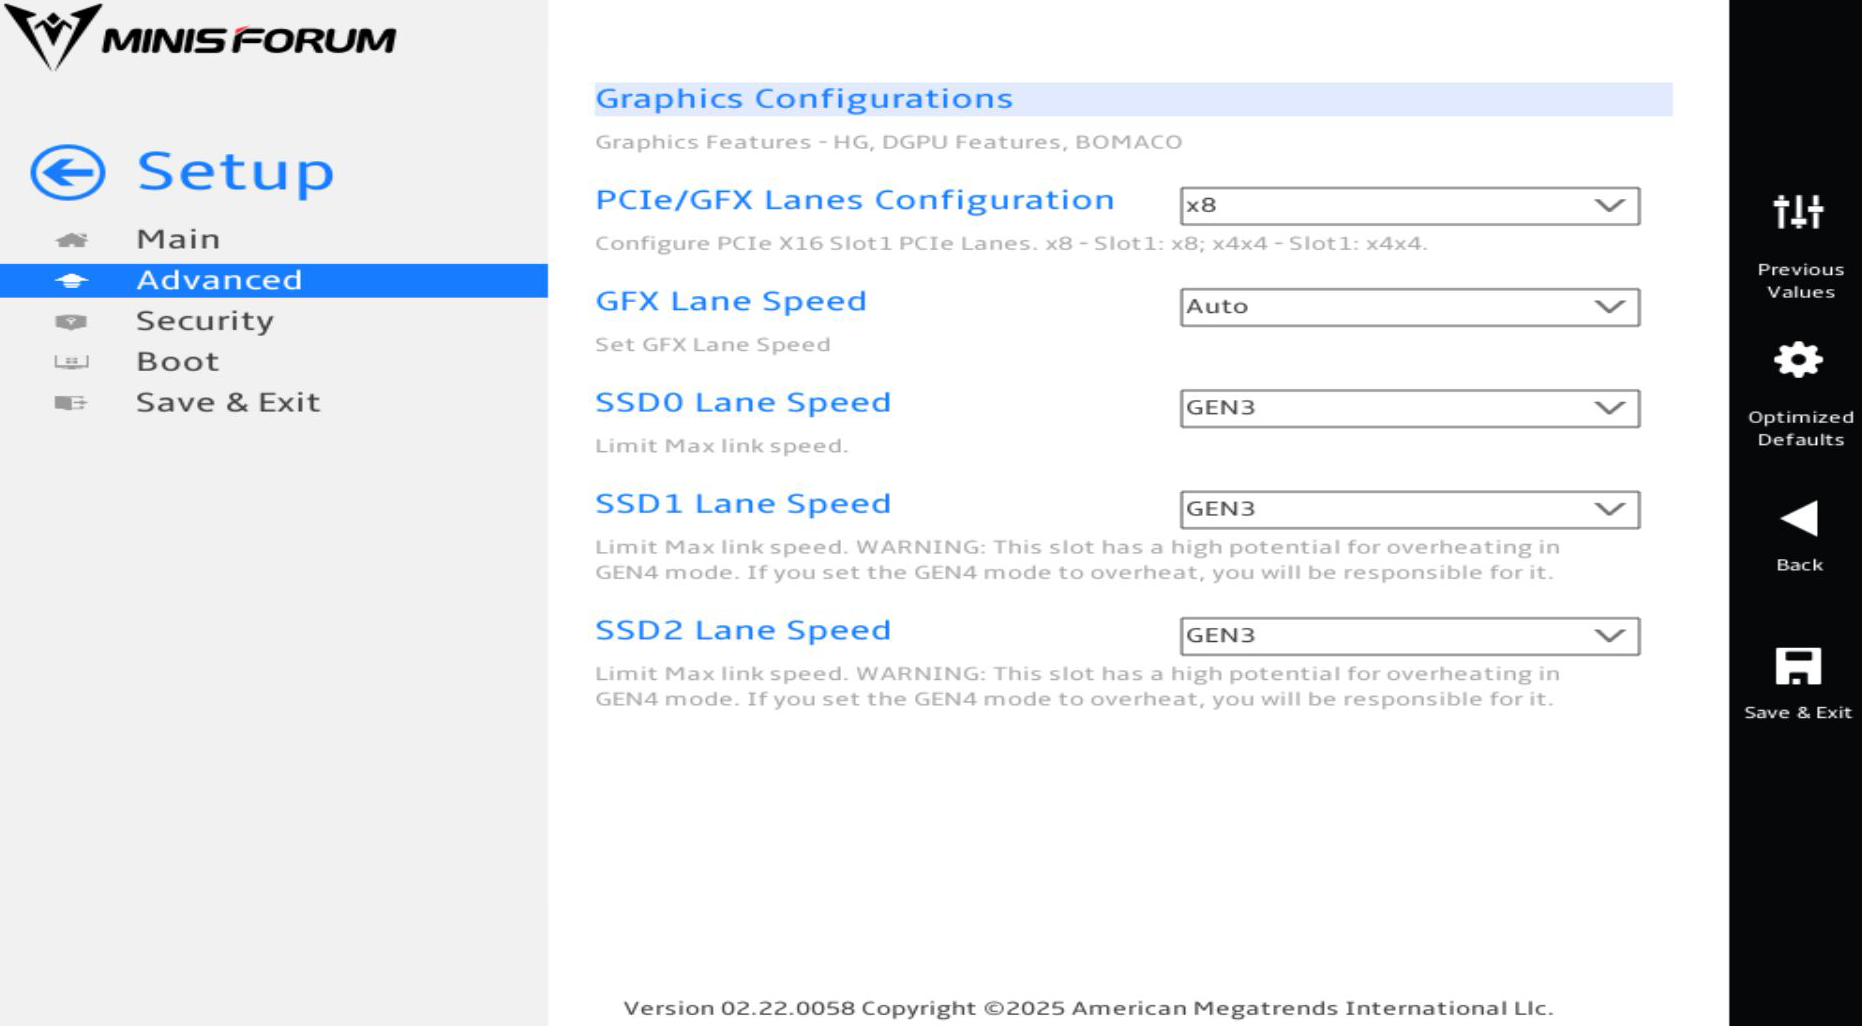
- Graphics Configurations is a menu.
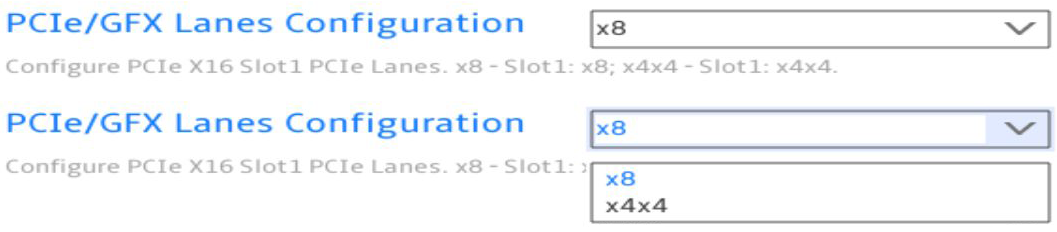
- For PCIe/GFX Lanes Configuration, you can set it to x8 or x4x4.
- For GFX Lane Speed, you can set it to Auto, GEN3, GEN5, or GEN5.

- For SSD0 Lane Speed, you can set it to Auto, GEN1, GEN2, GEN3, or GEN4.

- For SSD1 Lane Speed, you can set it to Auto, GEN1, GEN2, GEN3, or GEN4.

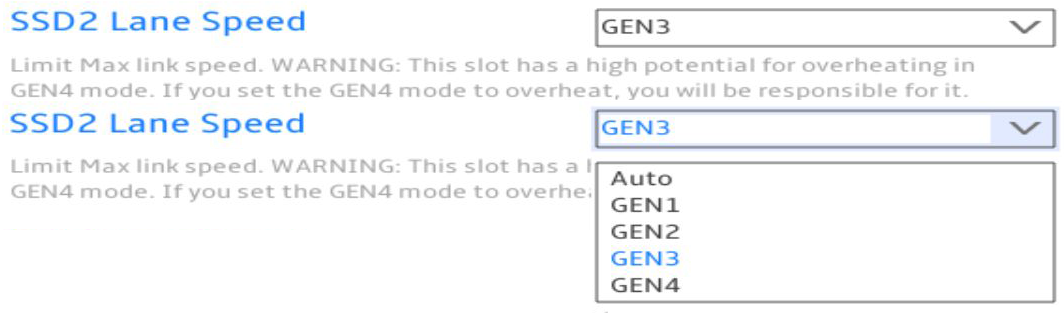
- For SSD2 Lane Speed, you can set it to Auto, GEN1, GEN2, GEN3, or GEN4.
Advanced > AMD PBS > Graphics Configurations
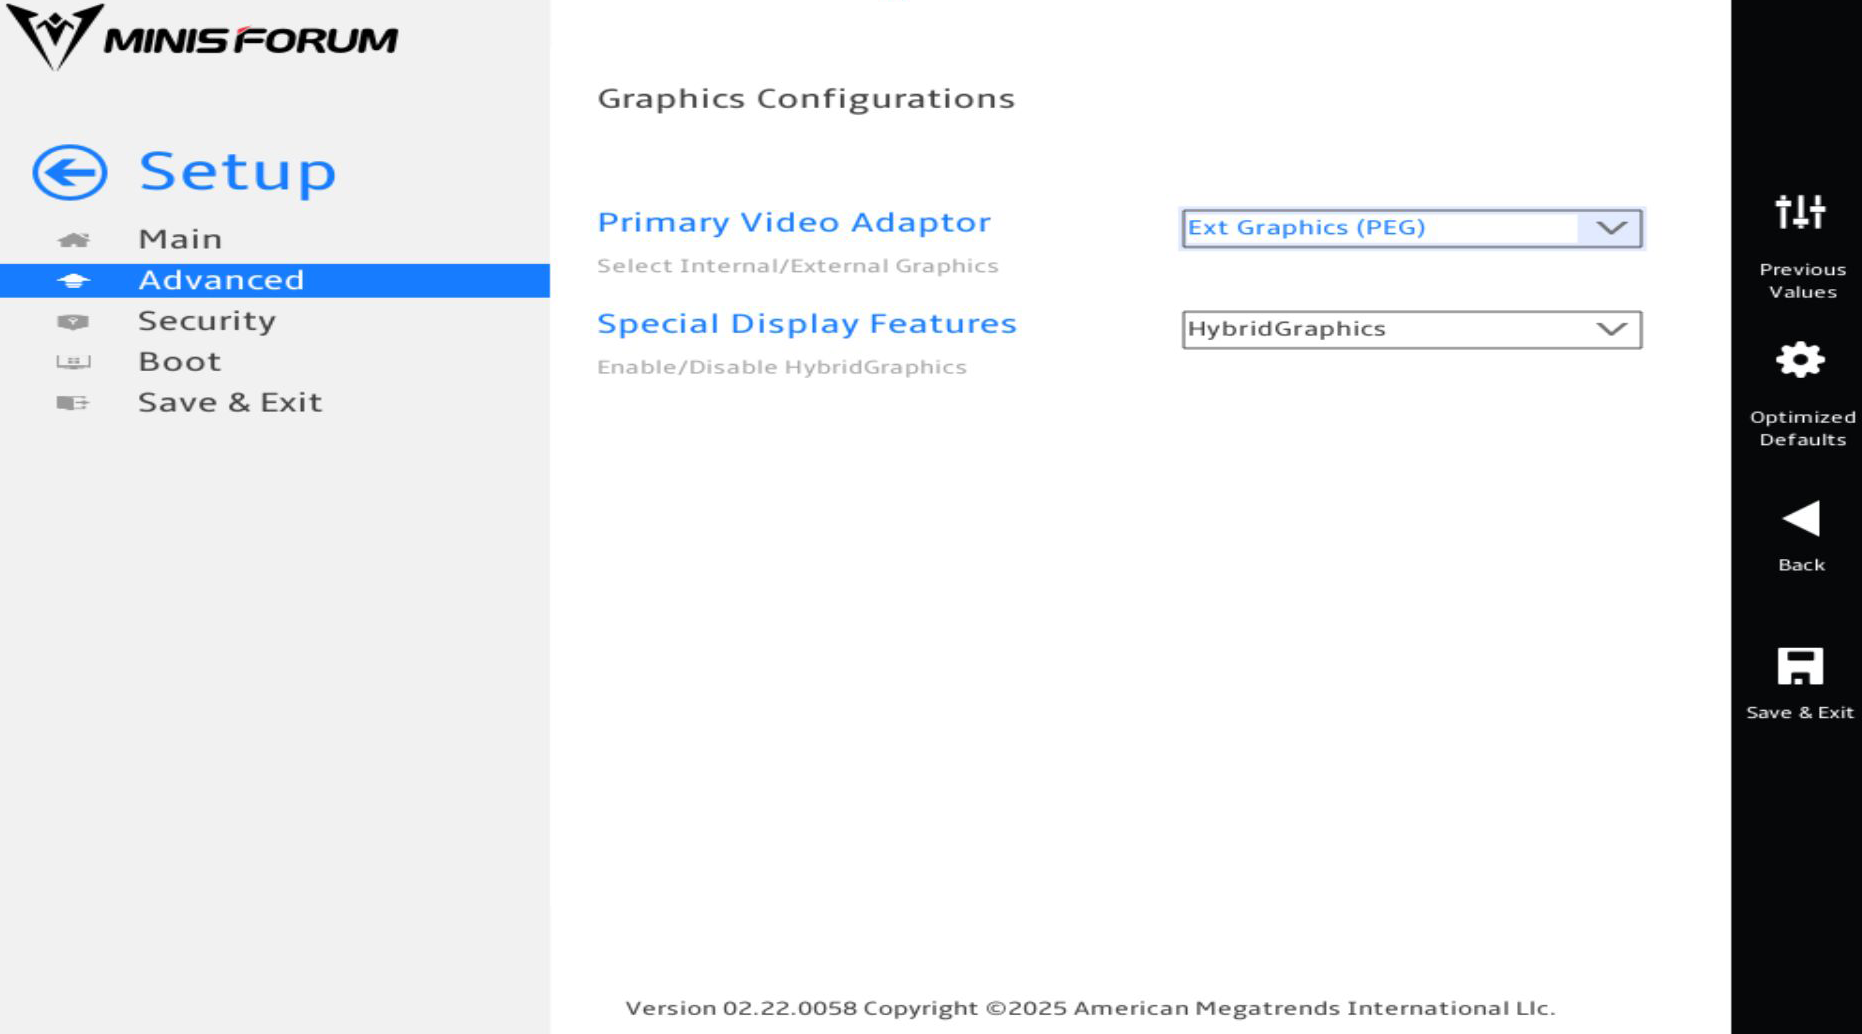
- For Primary Video Adaptor, you can set it to Ext Graphics (PEG) or Int Graphics (IGD).

- For Special Display Features, you can set it to HybridGraphics or Disabled.

Advanced > AMD CBS
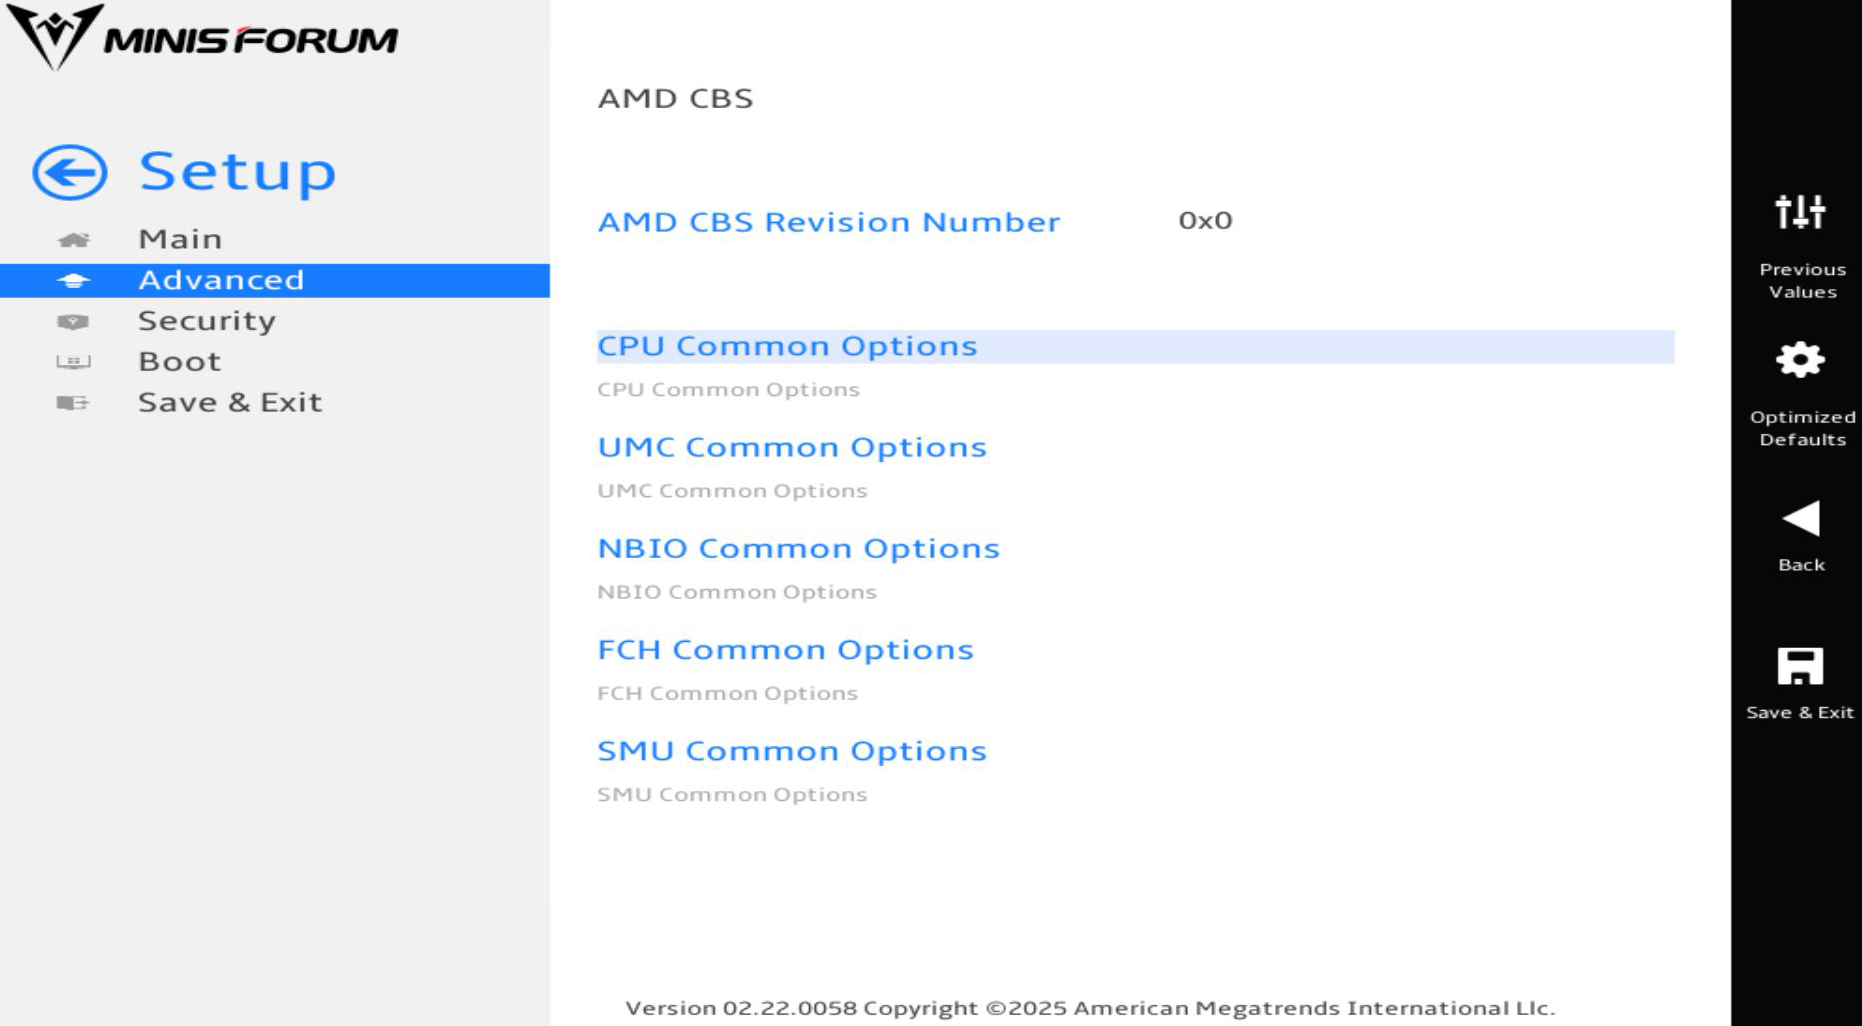
- CPU Common Options is a menu.
- UMC Common Options is a menu.
- NBIO Common Options is a menu.
- FCH Common Options is a menu.
- SMU Common Options is a menu.
Advanced > AMD CBS > CPU Common Options
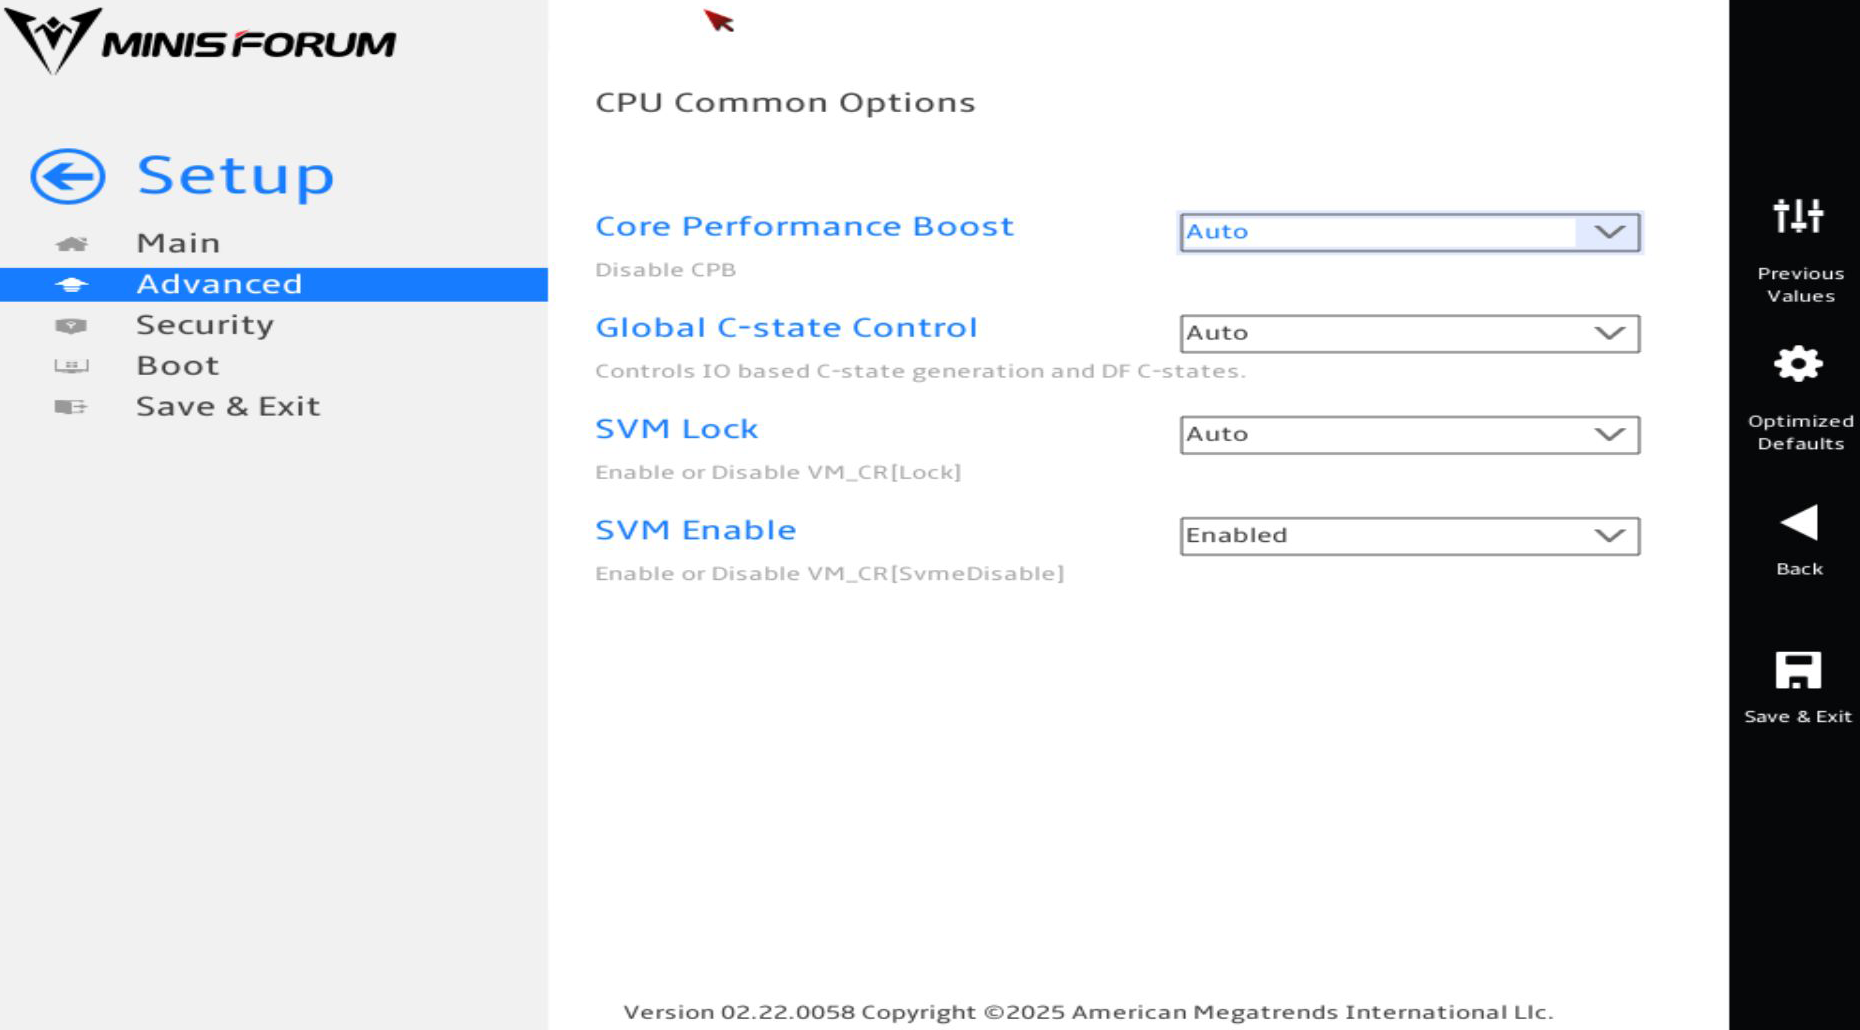
- For Core Performance Boost, you can set it to Auto or Disabled.
- For Global C-state Control, you can set it to Auto or Disabled.
- For SVM Lock, you can set it to Auto, Enabled, or Disabled.
- For SVM Enable, you can set it to Auto, Enabled or Disabled.
Advanced > AMD CBS > UMC Common Options

- DDR Options is a menu.
Advanced > AMD CBS > UMC Common Options > DDR Options

- DDR RAS is a menu.
Advanced > AMD CBS > UMC Common Options > DDR Options > DDR RAS
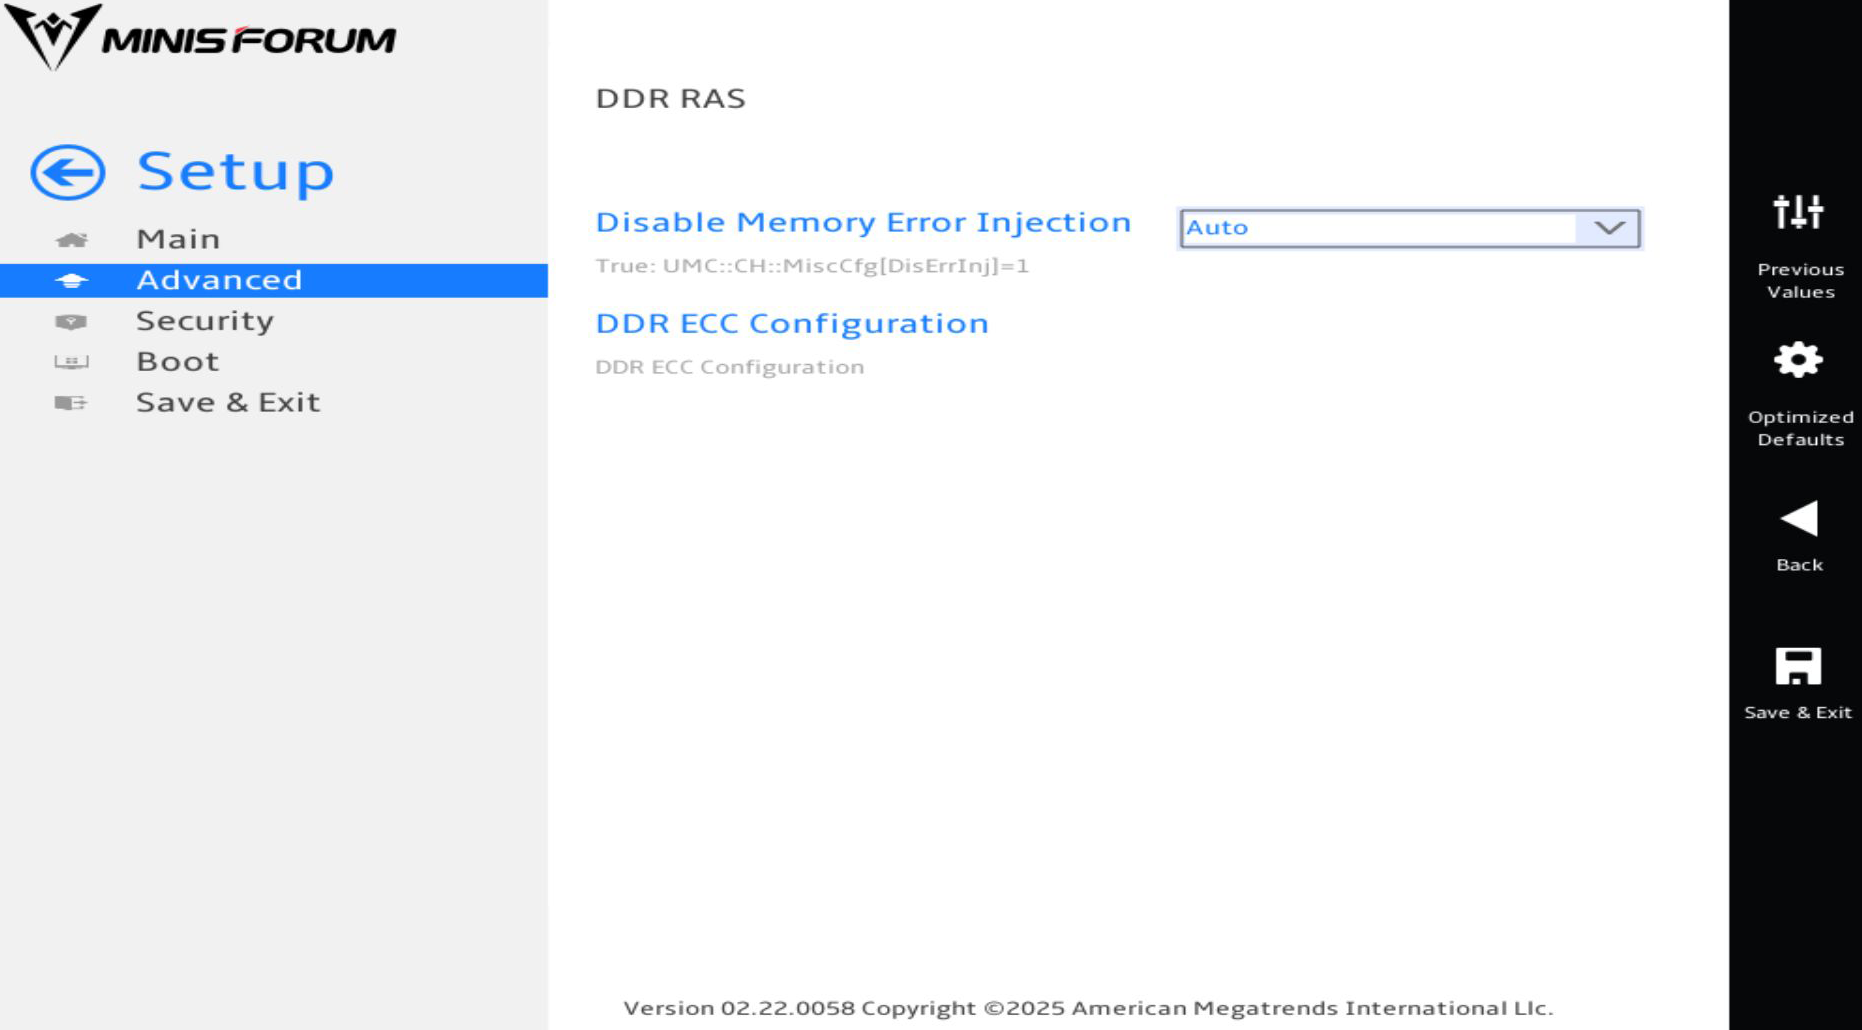
- For Disable Memory Error Injection, you can set it to Auto, True, or False.
- DDR ECC Configuration is a menu.
Advanced > AMD CBS > UMC Common Options > DDR Options > DDR RAS > DDR ECC Configuration
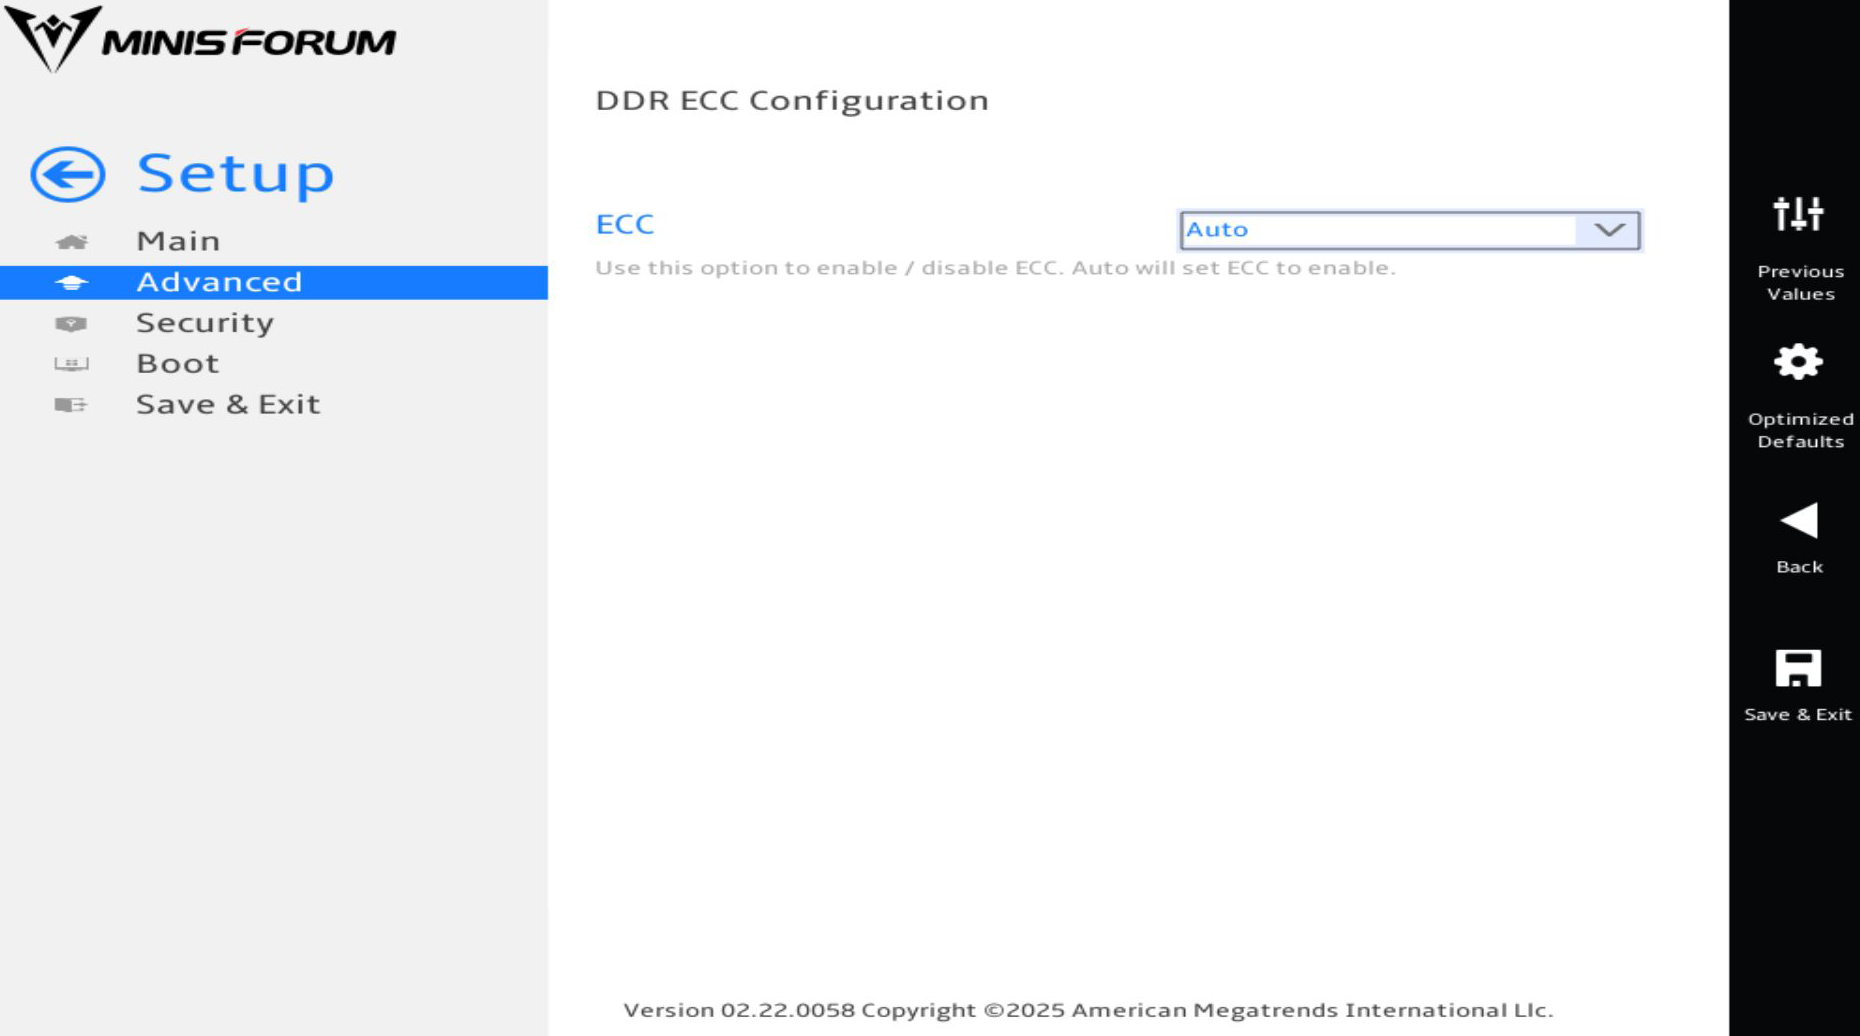
- For ECC, you can set it to Auto, Enabled, or Disabled.
Advanced > AMD CBS > NBIO Common Options

- For IOMMU, you can set it to Auto or Enabled.
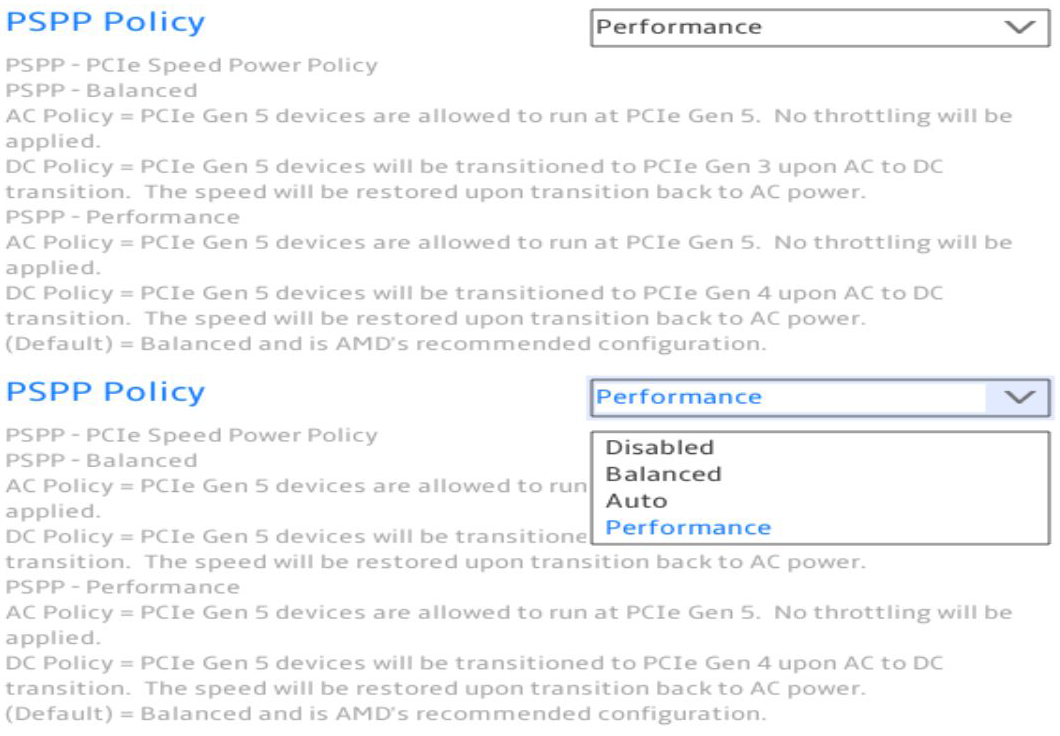
- For PSPP Policy, you can set it to Auto, Performance, Balanced, or Disabled.
- GFX Configuration is a menu.
- Audio Configuration is a menu.
Advanced > AMD CBS > NBIO Common Options > GFX Configuration
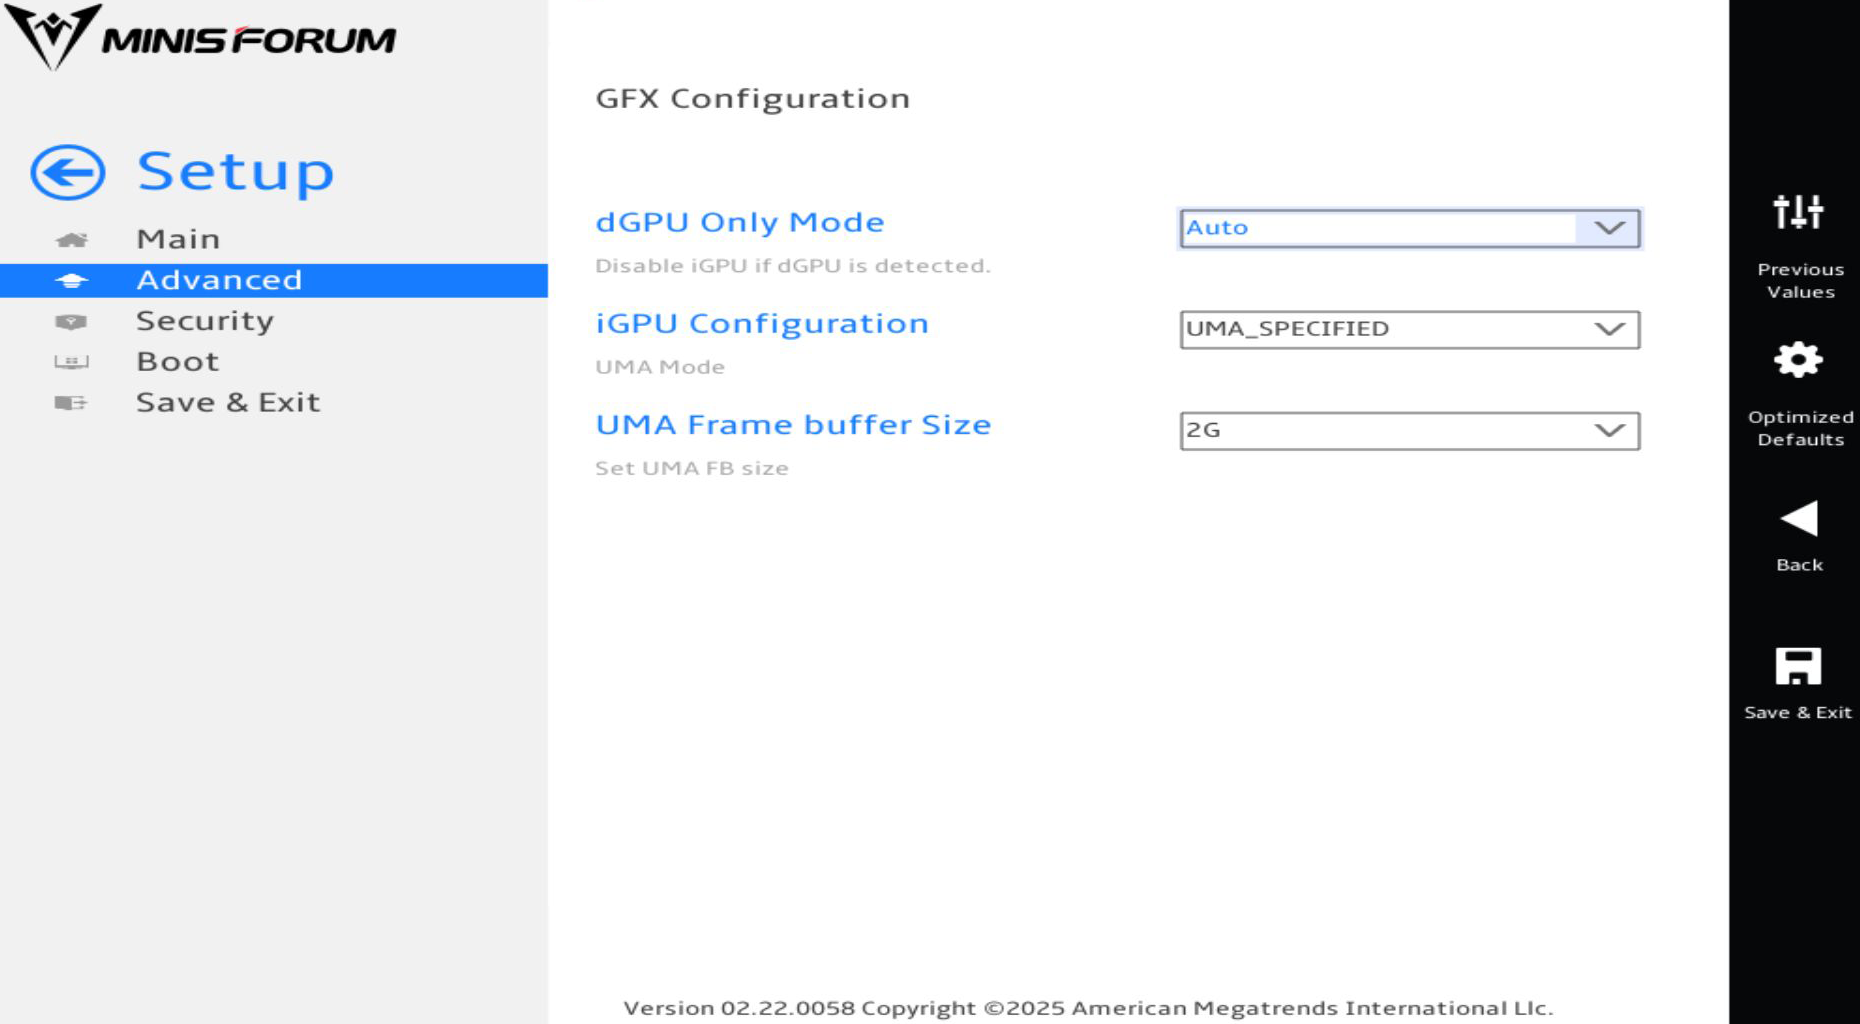
- For dGPU Only Mode, you can set it to Auto, Disabled, or Enabled.
- For iGPU Configuration, you can set it to Auto, iGPU Disabled, UMA_SPECIFIED, or UMA_GAME_OPTIMIZED.

- For UMA Frame buffer Size, you can set it to Auto, 1G, 2G, 3G, 4G, 6G, 8G, or 16G.

Advanced > AMD CBS > NBIO Common Options > Audio Configuration
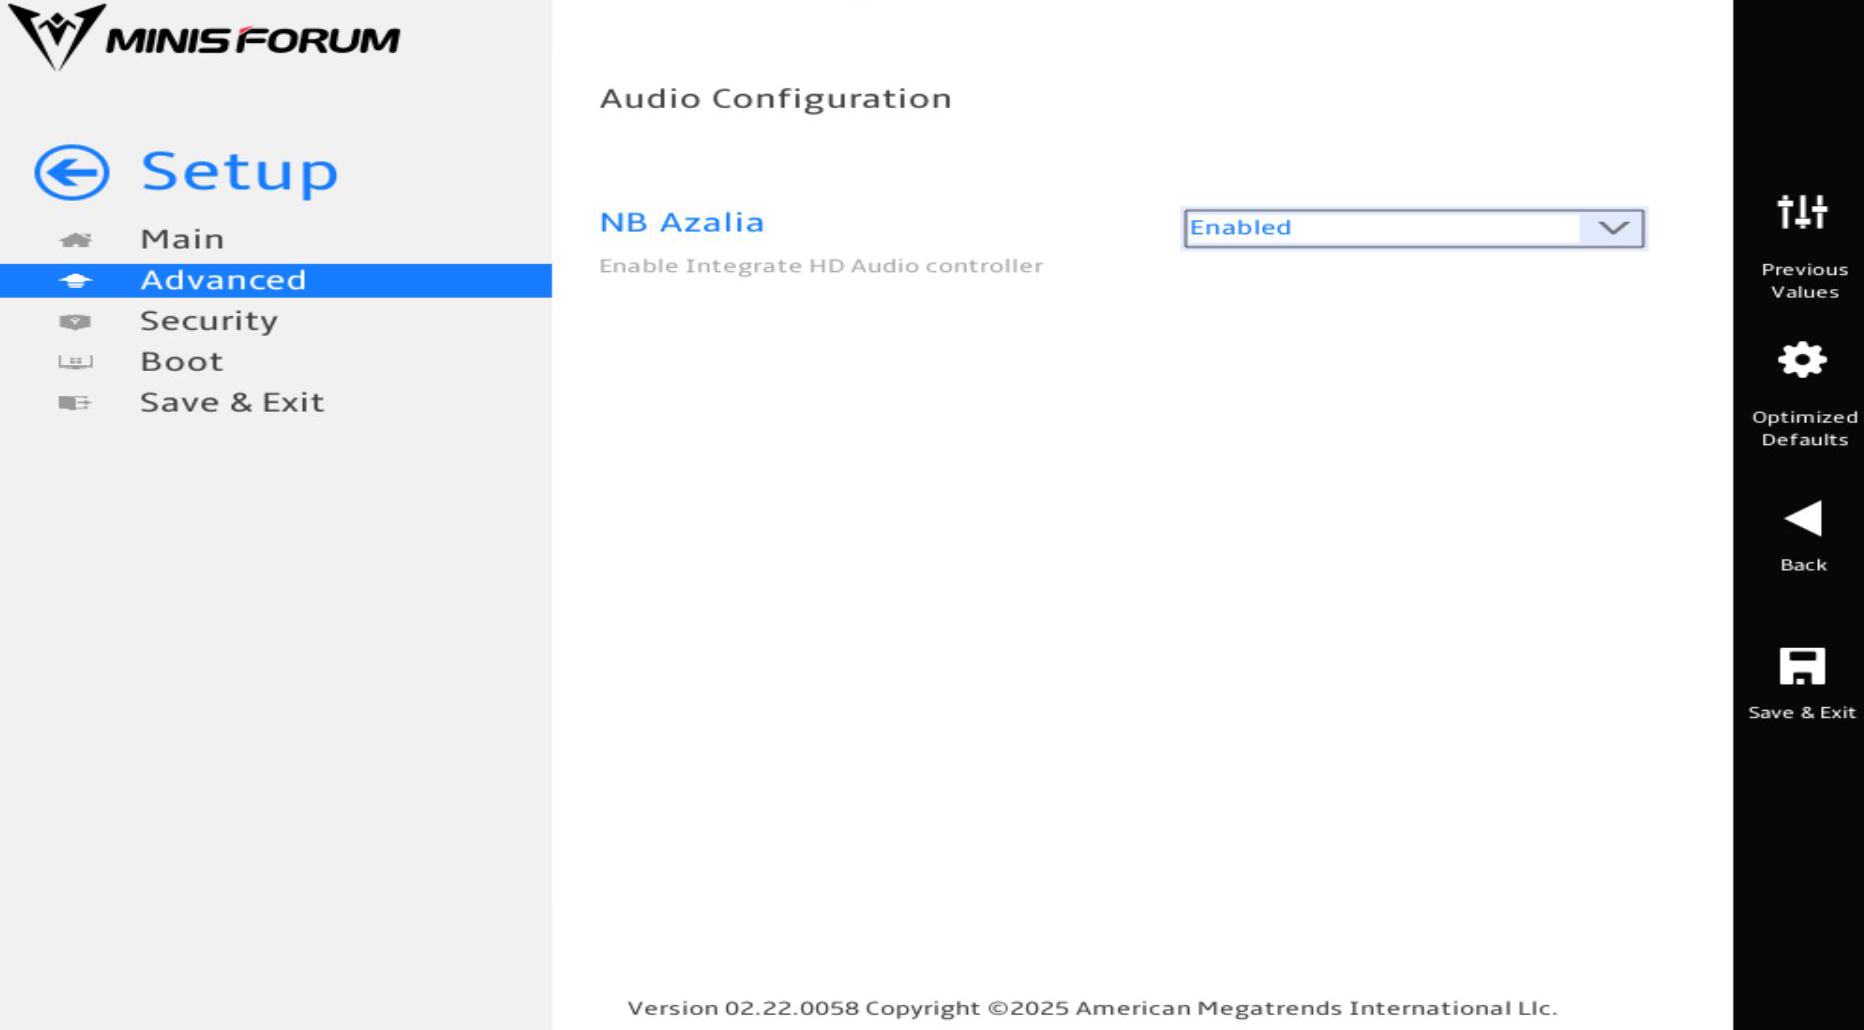
- For NB Azalia, you can set it to Enabled or Disabled.
Advanced > AMD CBS > FCH Common Options

- Ac Power Loss Options is a menu.
Advanced > AMD CBS > FCH Common Options > Ac Power Loss Options
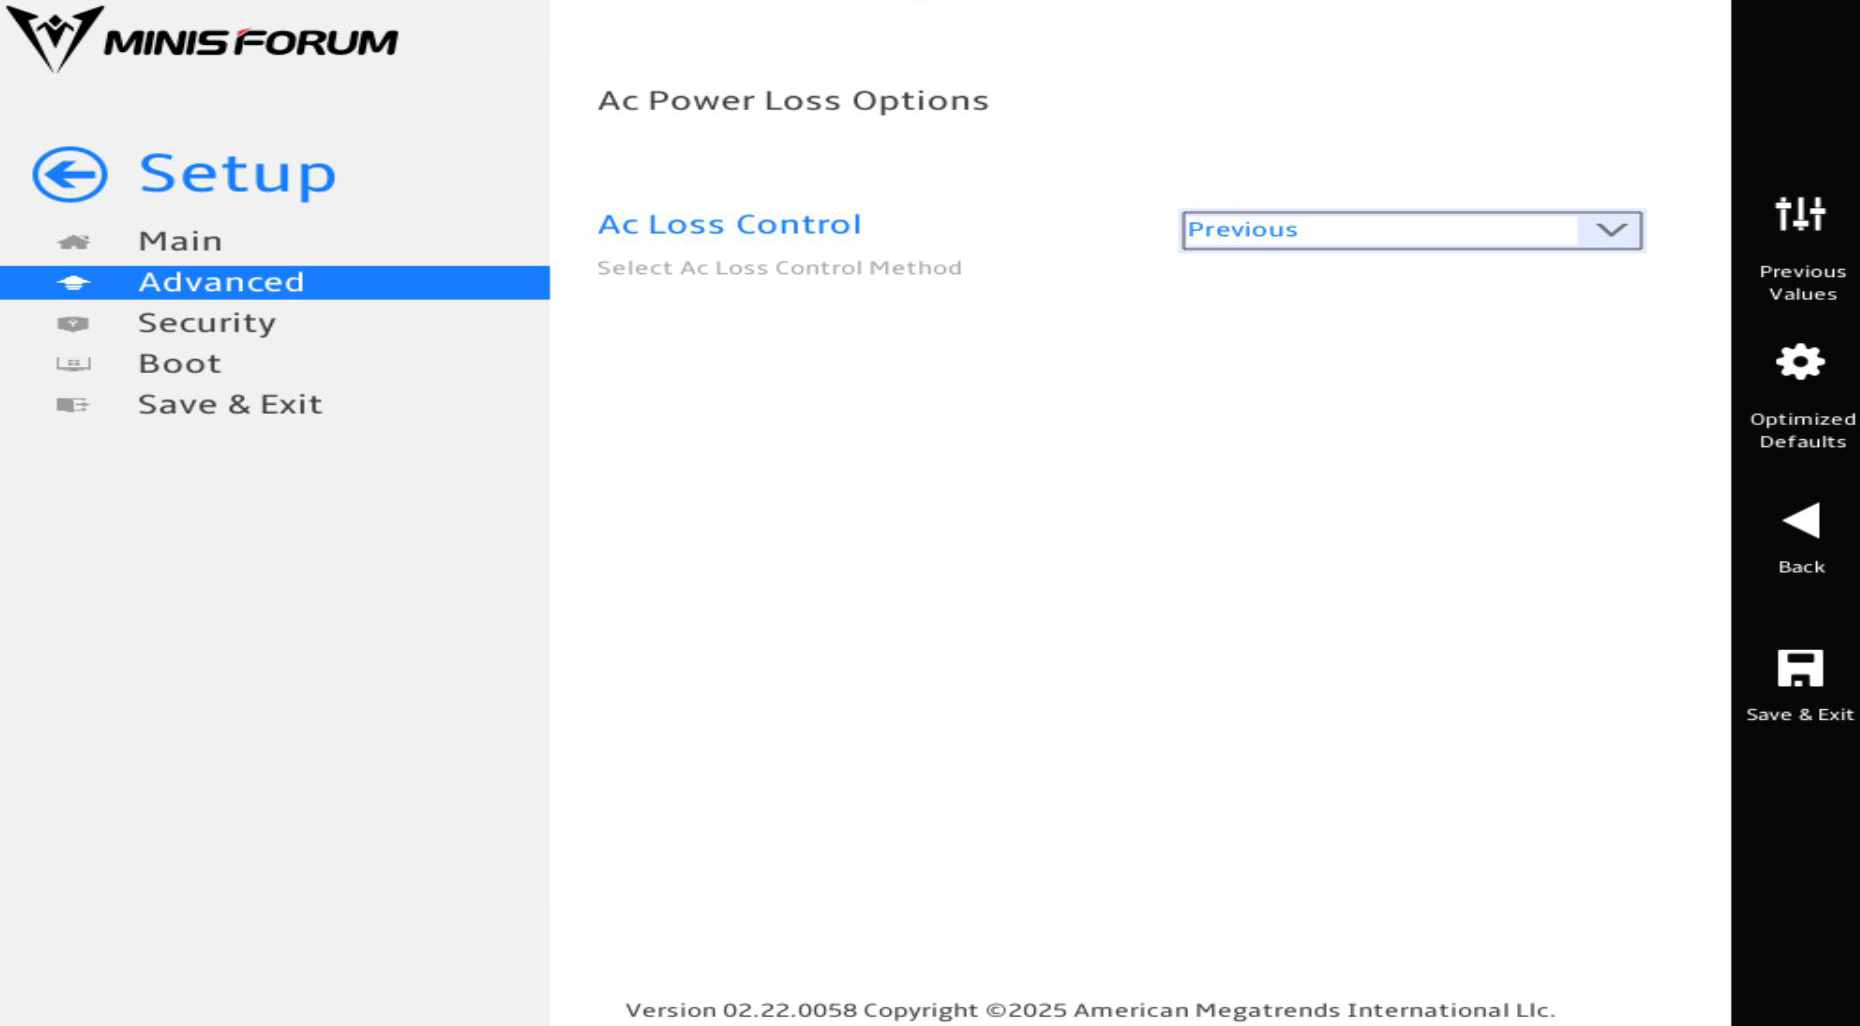
- For Ac Loss Control, you can set it to Previous, Always On, or Always Off.

Advanced > AMD CBS > SMU Common Options
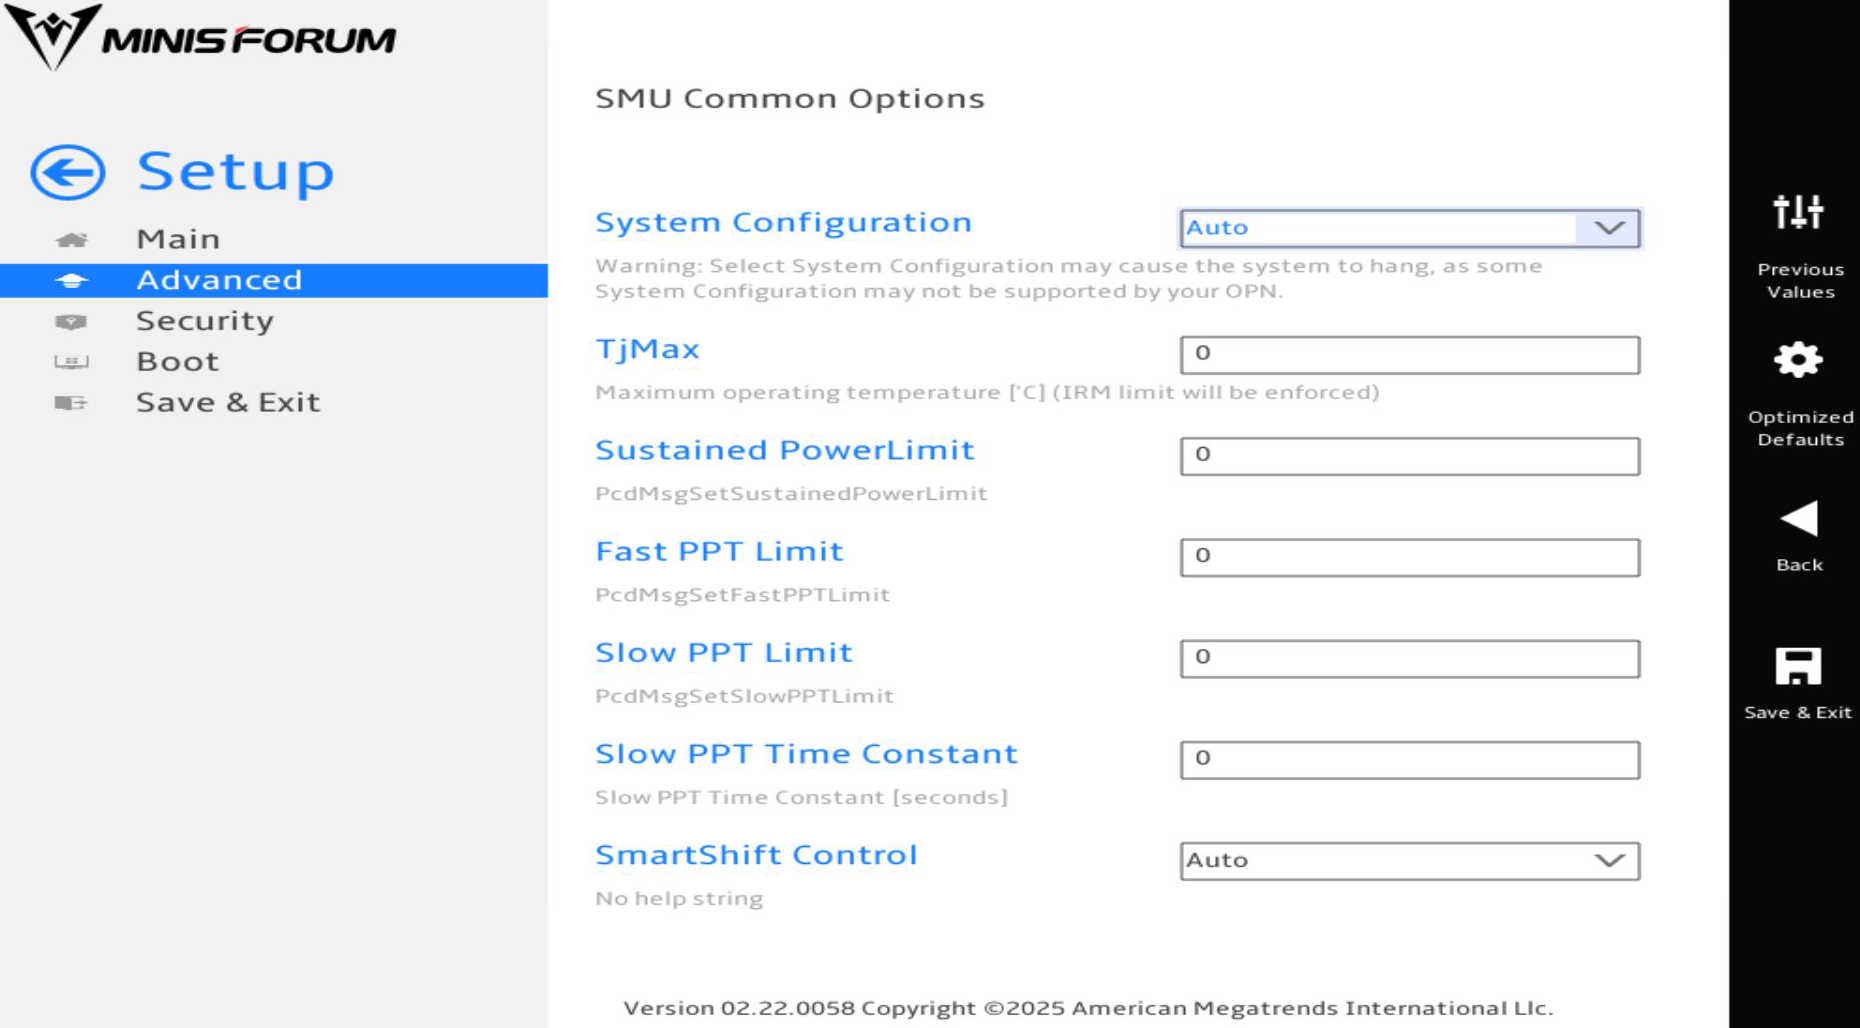
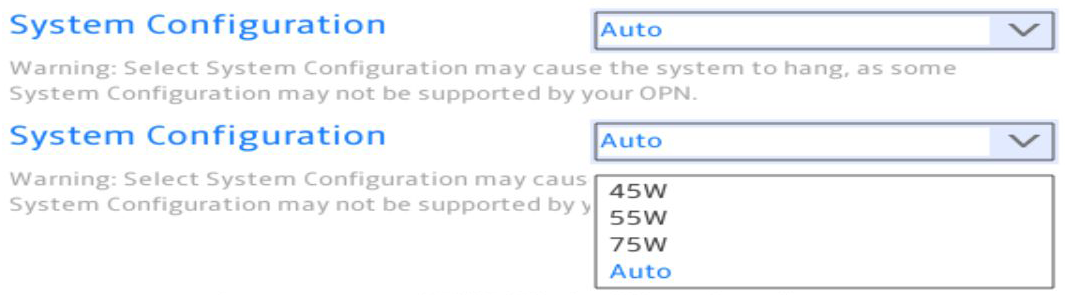
- For System Configuration, you can set it to Auto, 75W, 55W, or 45W.
- For TjMax, you can enter a number.
- For Sustained PowerLimit, you can enter a number.
- For Fast PPT Limit, you can enter a number.
- For Slow PPT Limit, you can enter a number.
- For Slow PPT Time Constant, you can enter a number.
- For SmartShift Control, you can set it to Auto or Manual. If you set it to Manual, you unlock a few more options.
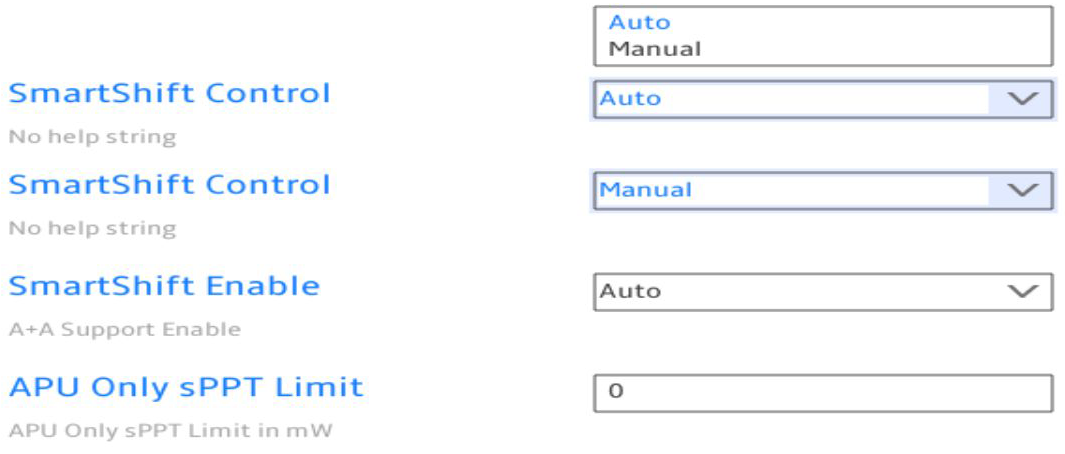
- For SmartShift Enable, you can set it to Auto, Enable, or Disable.
- For APU Only sPPT Limit, you can enter a number.
Advanced > AMD Overclocking
Before you can access the AMD Overclocking menus, you need to accept the warning.
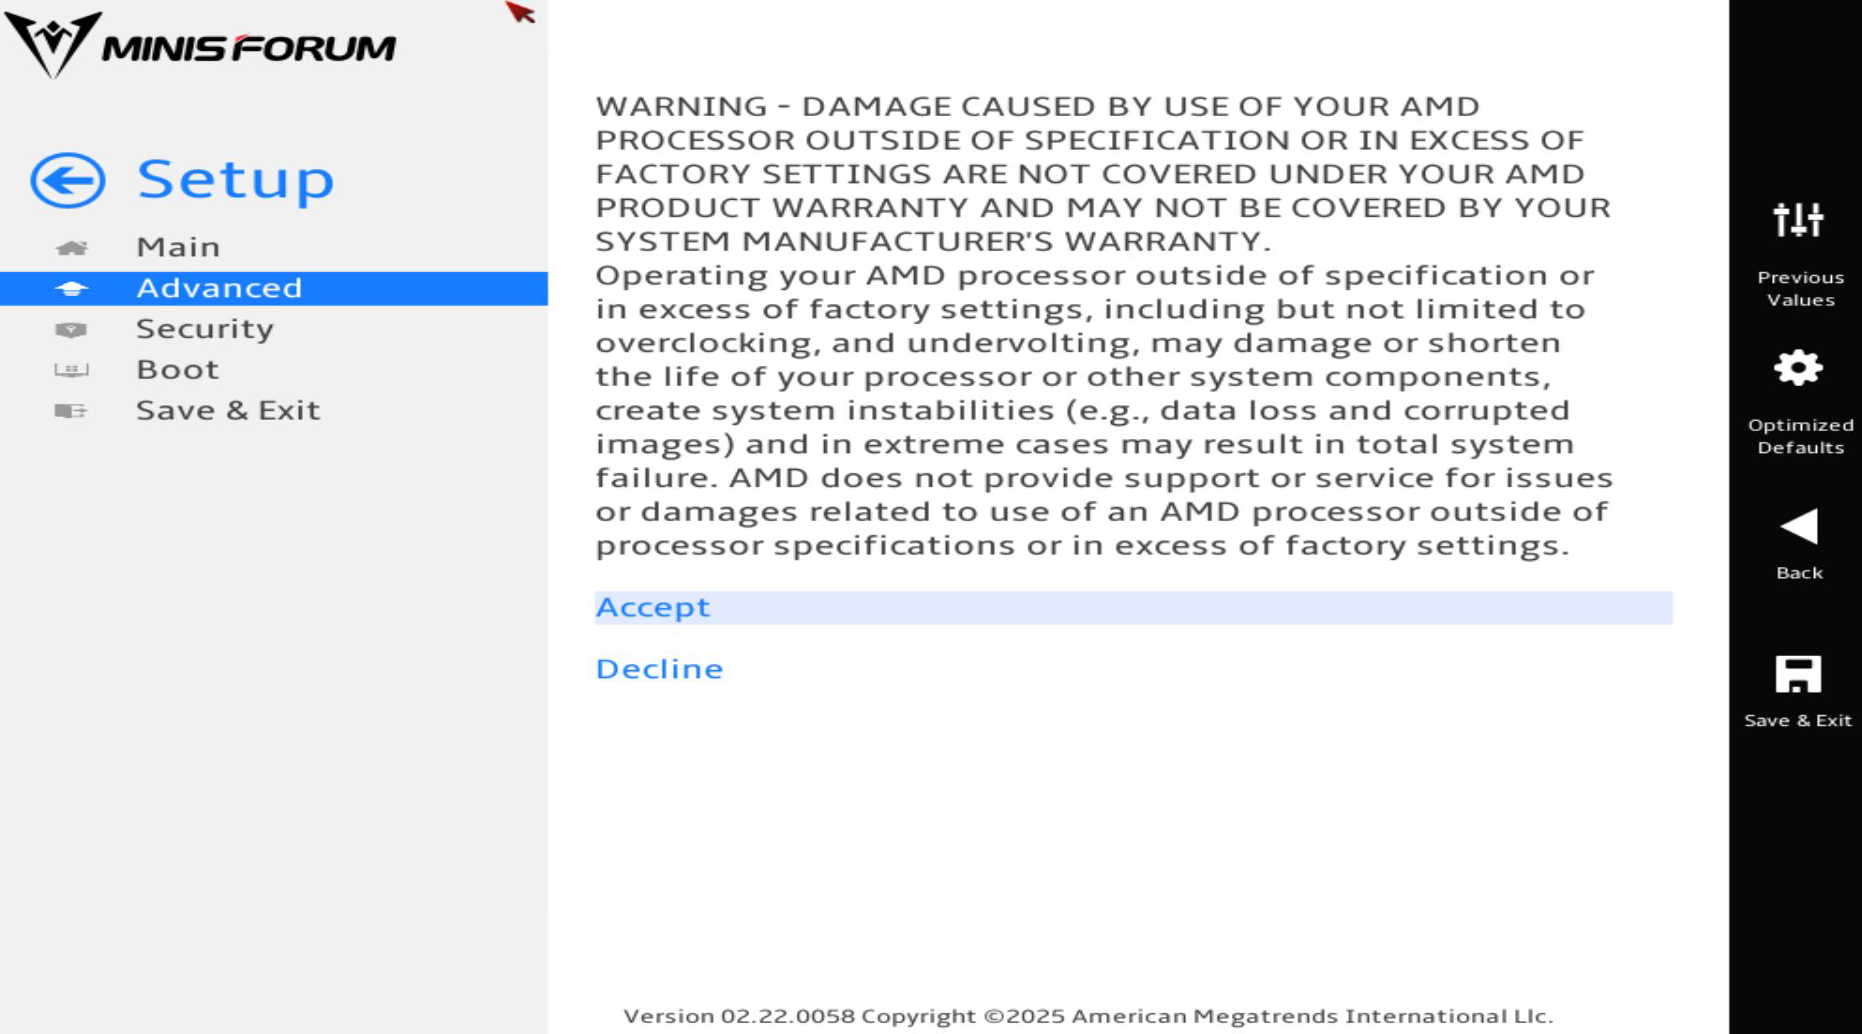
After accepting, you unlock the AMD Overclocking menu.
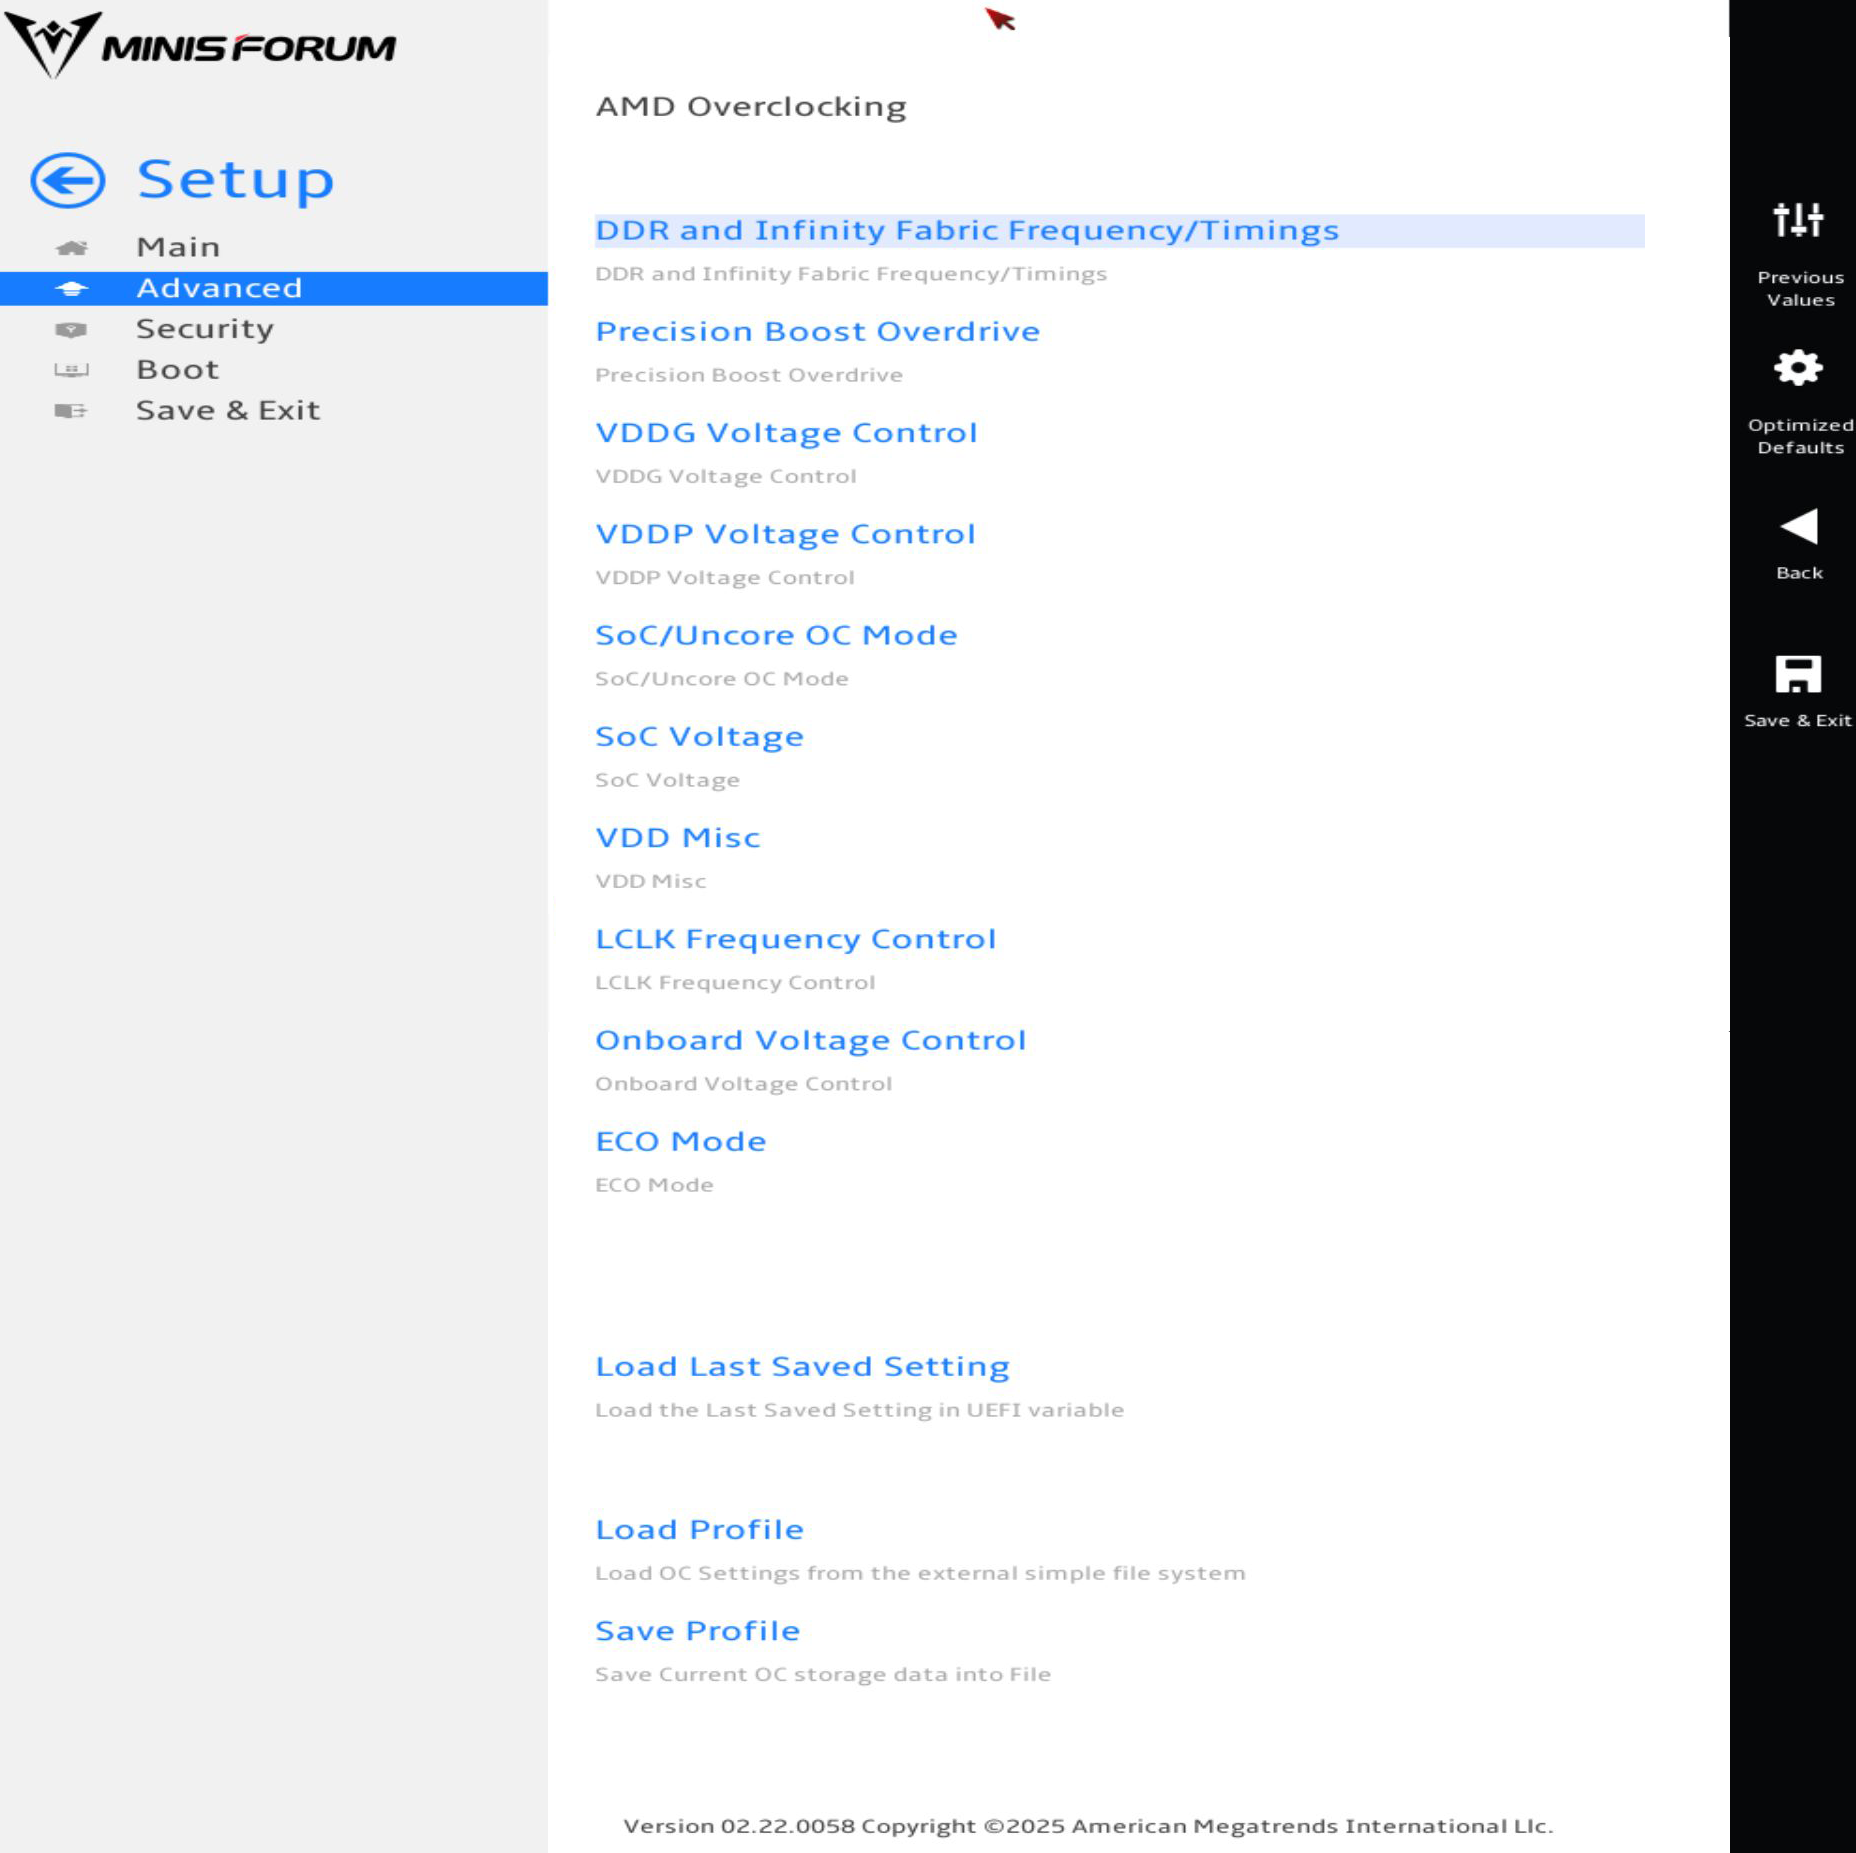
- DDR and Infinity Fabric Frequency/Timings is a menu.
- Precision Boost Overdrive is a menu.
- VDDG Voltage Control is a menu.
- VDDP Voltage Control is a menu.
- SoC/Uncore OC Mode is a menu.
- SoC Voltage is a menu.
- VDD Misc is a menu.
- LCLK Frequency Control is a menu.
- Onboard Voltage Control is a menu.
- ECO Mode is a menu.
- For Load Last Saved Setting, there is no confirmation or anything when you select this option. It just loads the last settings.
- The Load Profile option loads the BIOS file explorer, where you can pick the profile file.
- The Save Profile option loads the BIOS file explorer, where you can select where to save the profile file.
Advanced > AMD Overclocking > DDR and Infinity Fabric Frequency/Timings
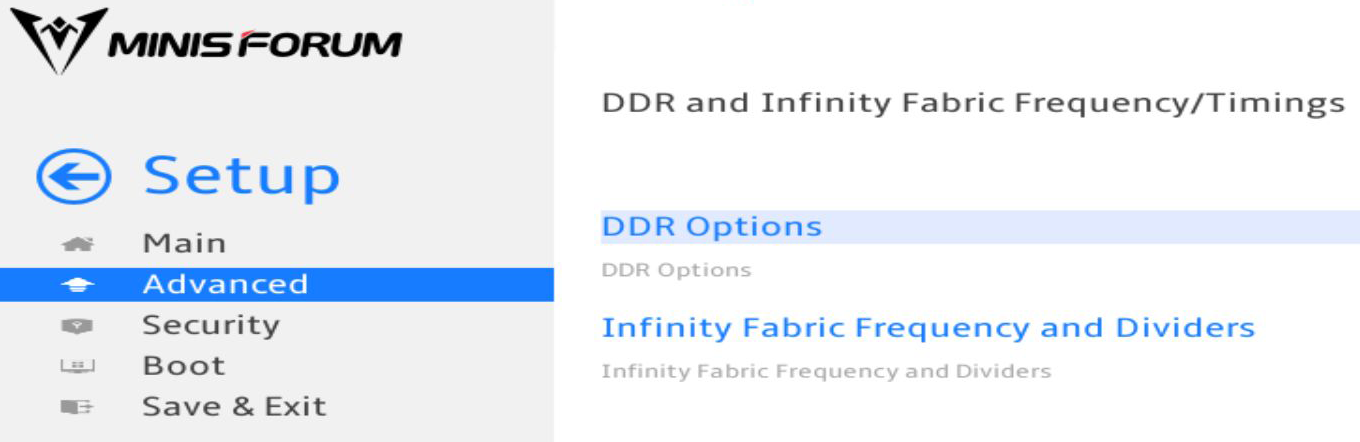
- DDR Options is a menu.
- Infinity Fabric Frequency and Dividers is a menu.
Advanced > AMD Overclocking > DDR and Infinity Fabric Frequency/Timings > DDR Options
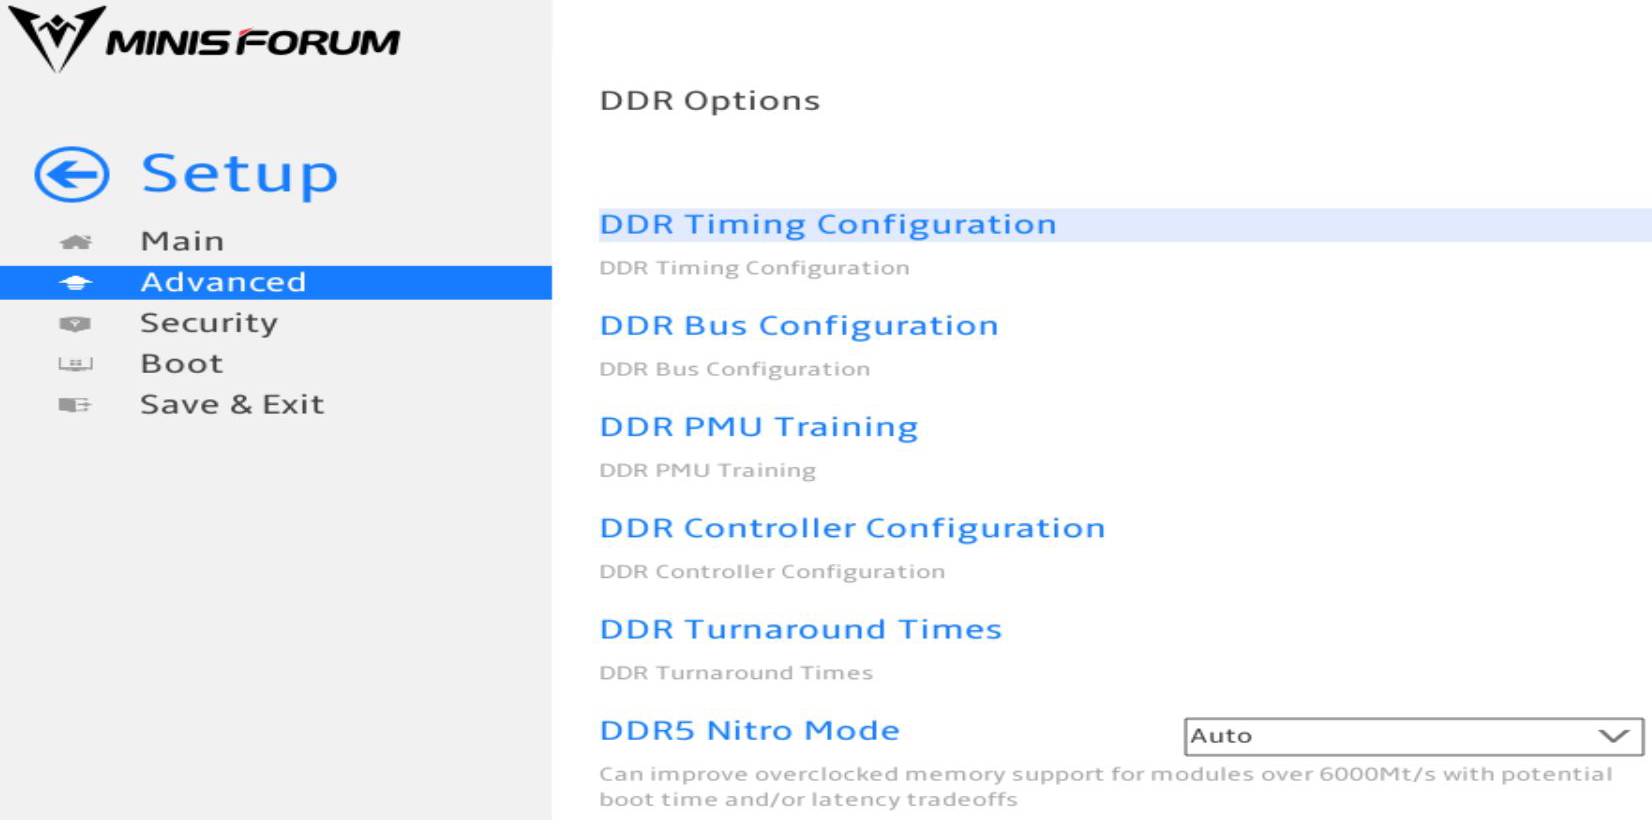
- DDR Timing Configuration is a menu.
- DDR Bus Configuration is a menu.
- DDR PMU Training is a menu.
- DDR Control Configuration is a menu.
- DDR Turnaround Times is a menu.
- For DDR5 Nitro Mode, you can set it to Auto, Enable, or Disable.
Advanced > AMD Overclocking > DDR and Infinity Fabric Frequency/Timings > DDR Options > DDR Timing Configuration
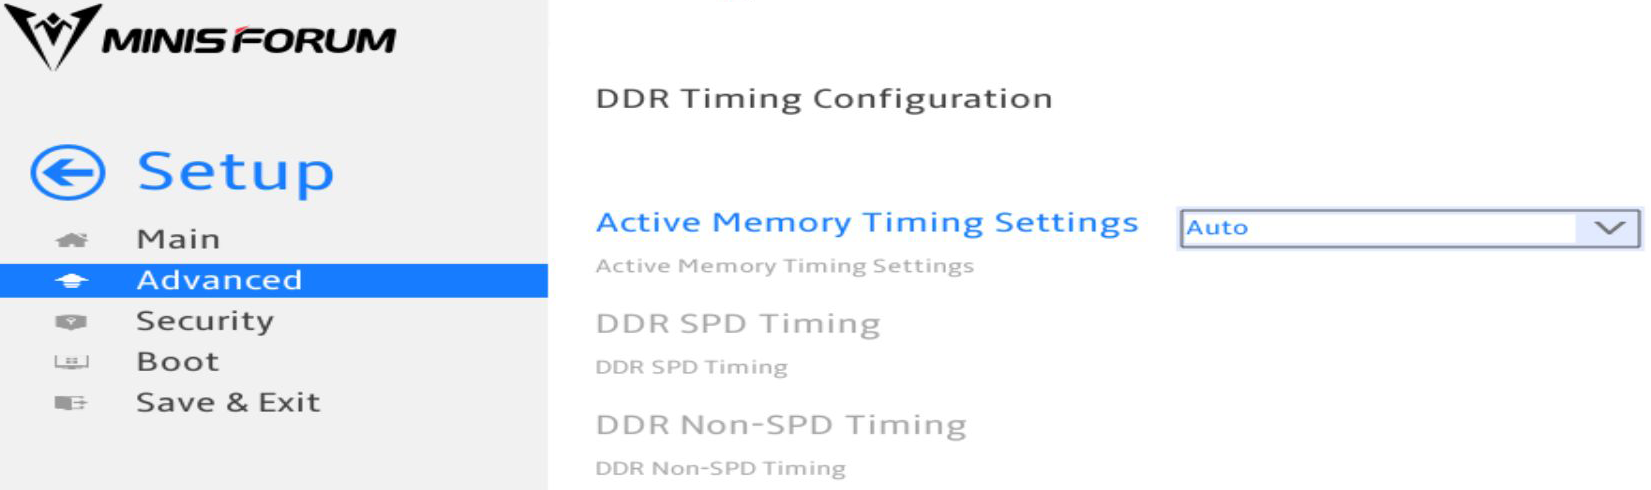
- For Active Memory Timing Settings, you can set it to Auto or Enabled. If you set it to Enabled, you unlock a few more options.
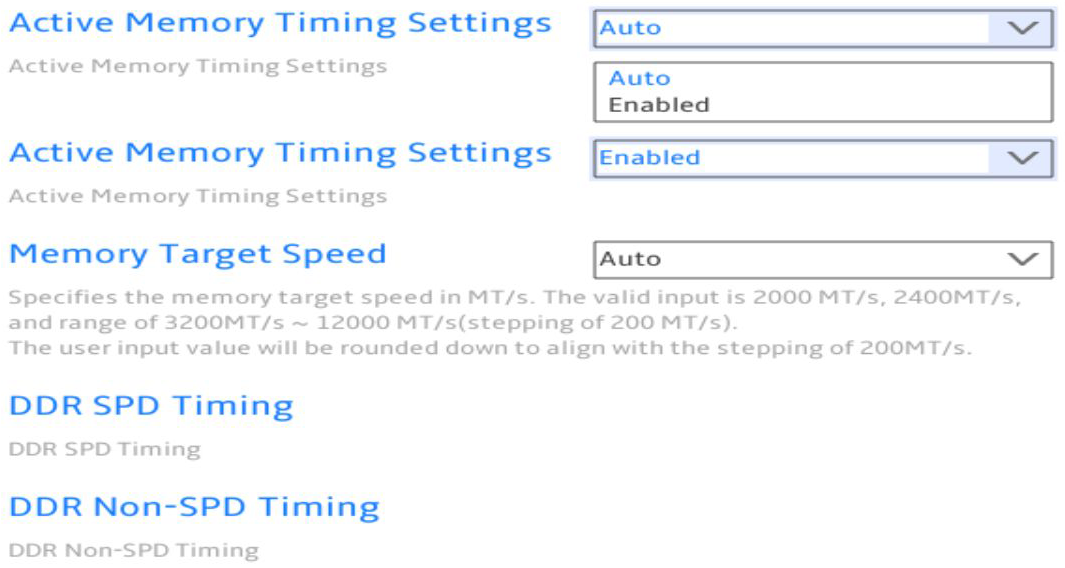
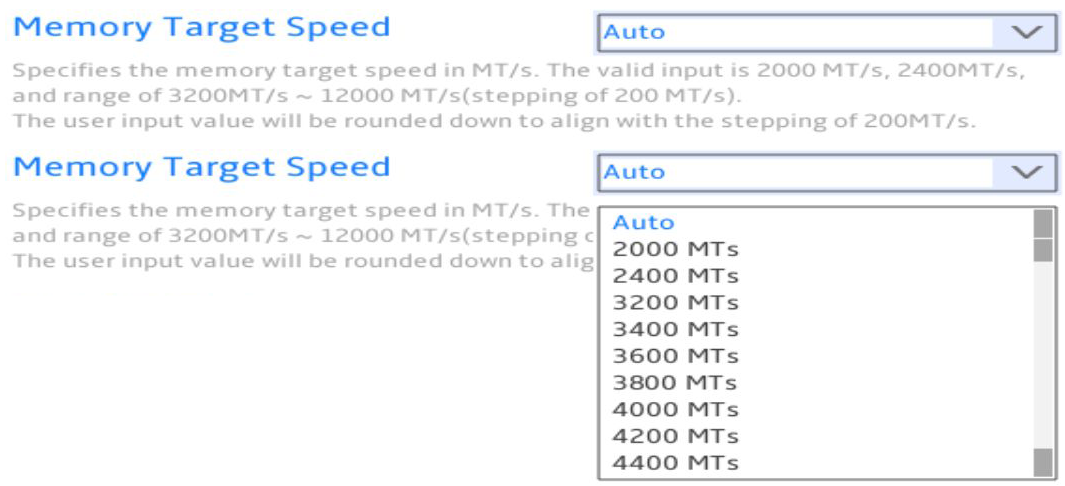
- For Memory Target Speed, you can set it to Auto or select the MTs you want.
- DDR SPD Timing is a menu.
- DDR Non-SPD Timing is a menu.
Advanced > AMD Overclocking > DDR and Infinity Fabric Frequency/Timings > DDR Options > DDR Timing Configuration > DDR SPD Timing
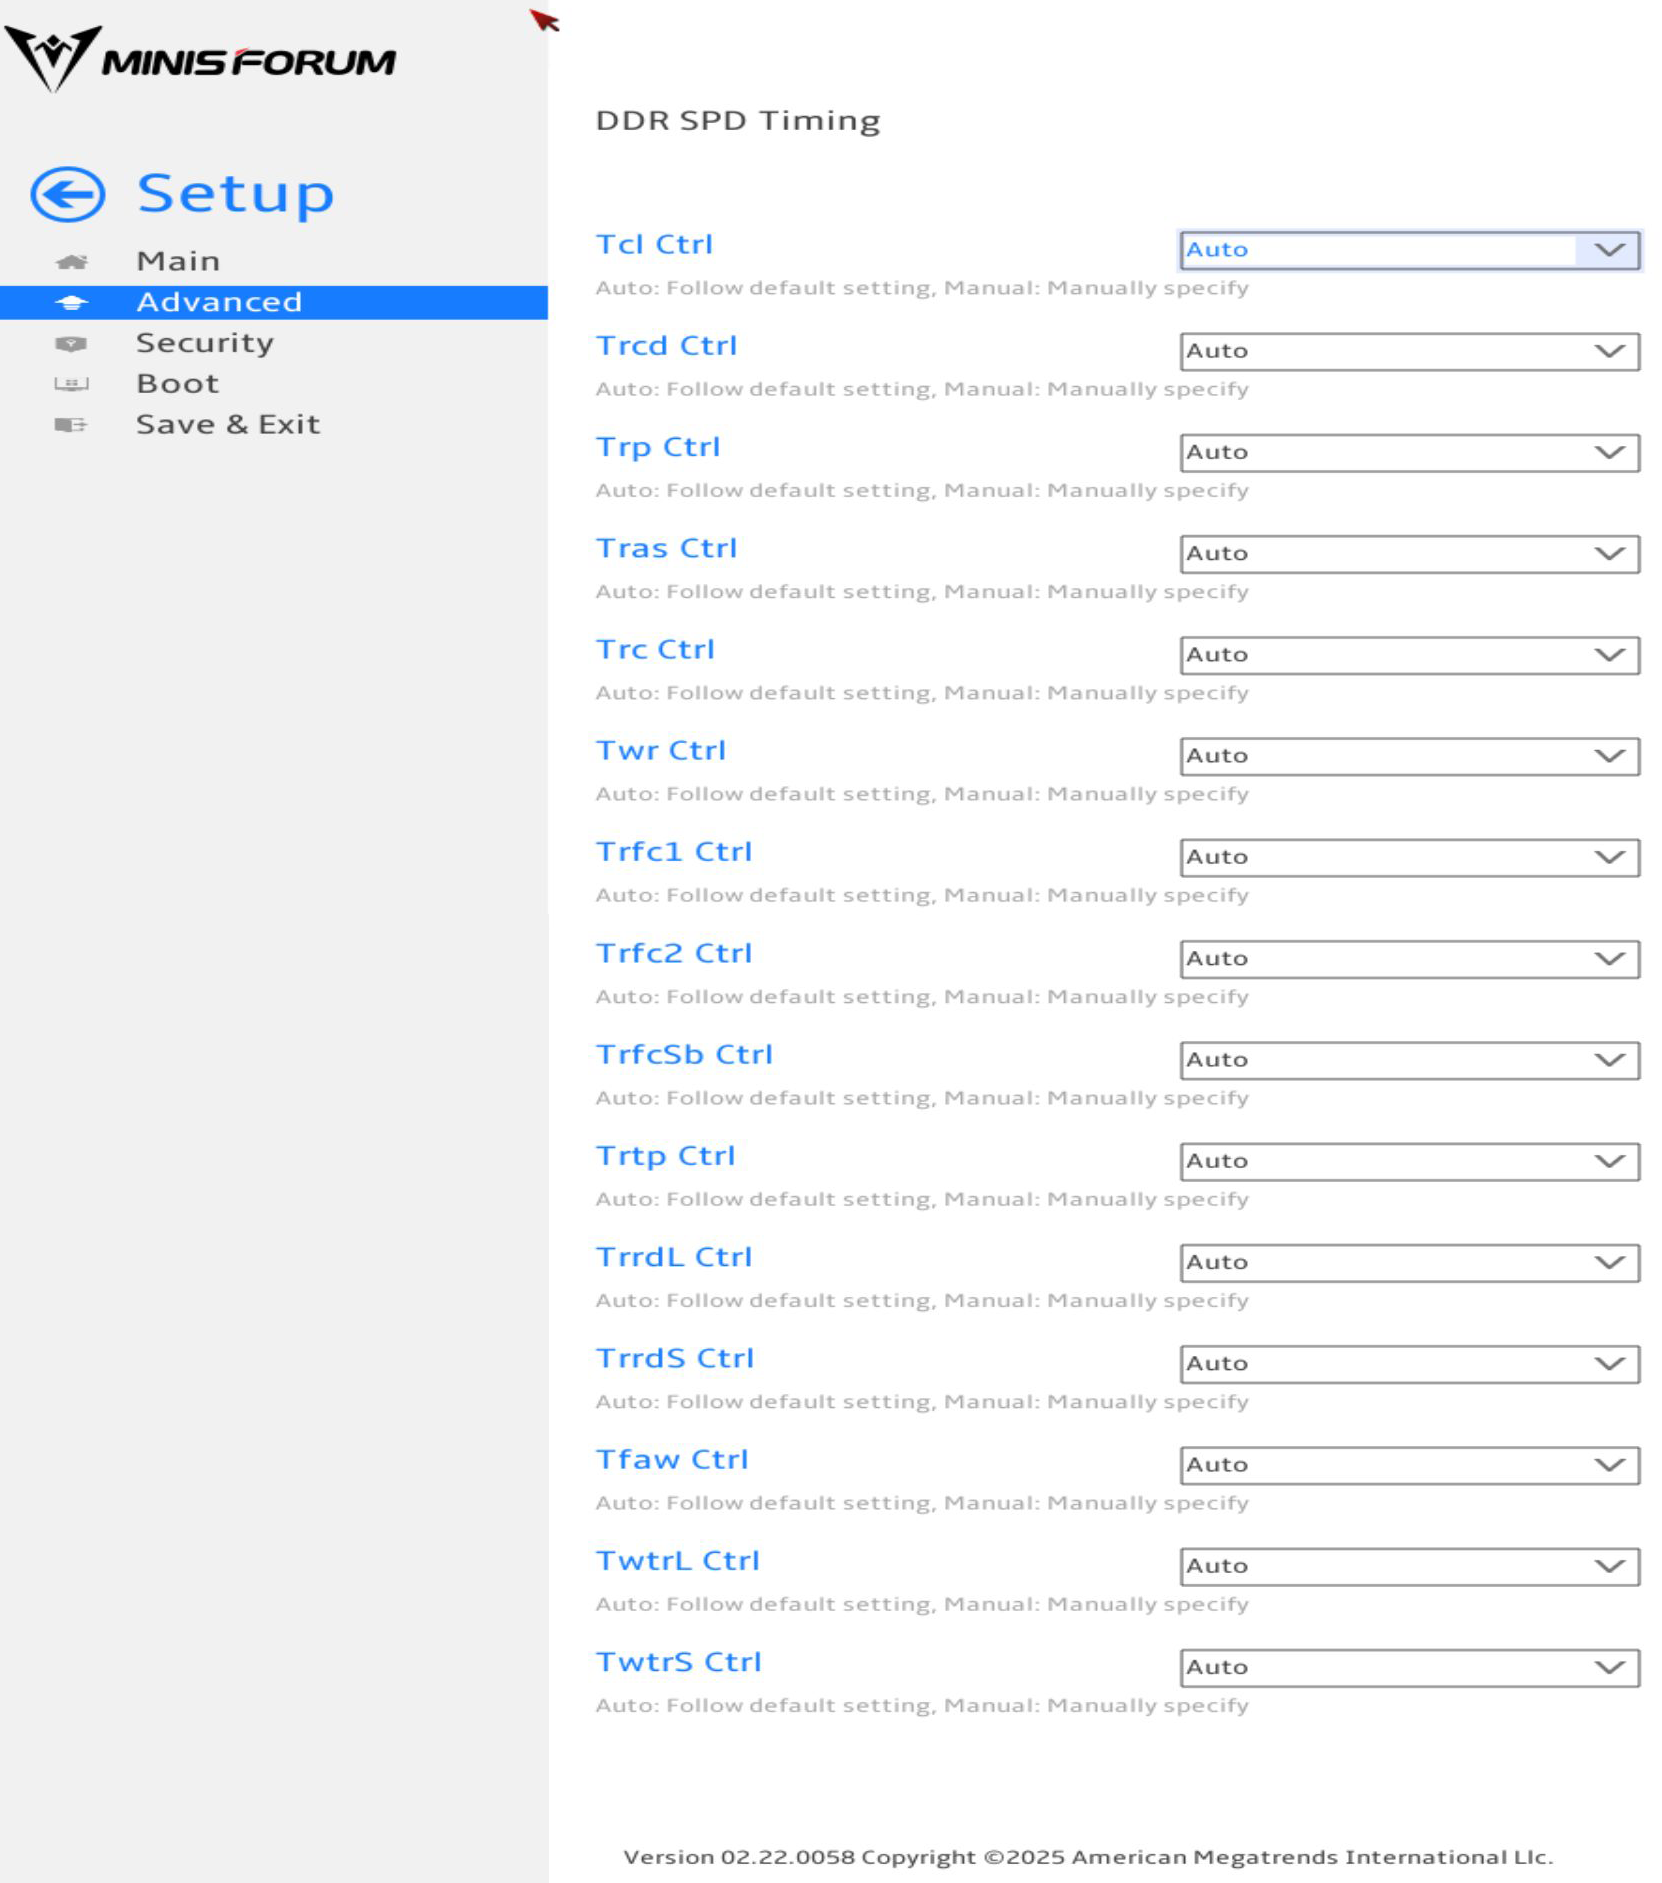
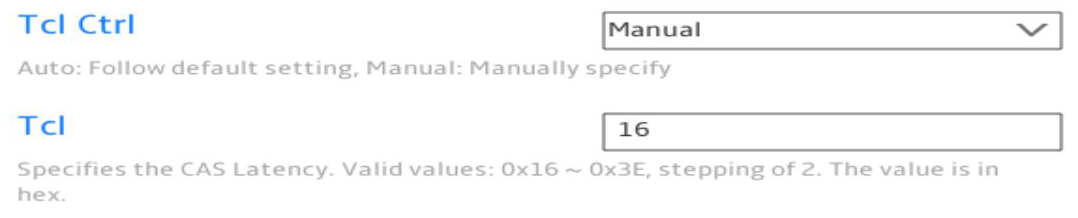
- For Tcl Ctrl, you can set it to Auto or Manual.
- If you set it to manual, you can define the value of Tcl in hex.
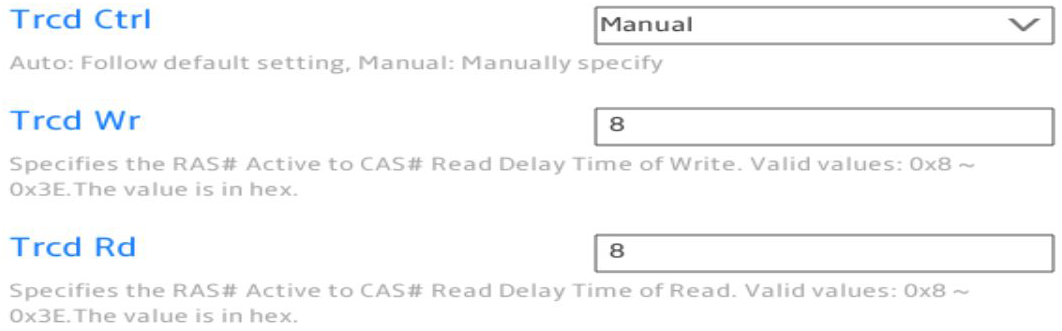
- For Trcd Ctrl, you can set it to Auto or Manual.
- If you set it to manual, you can define the value of Trcd Wr and Trcd Rd in hex.
- For Trp Ctrl, you can set it to Auto or Manual.
- If you set it to manual, you can define the value of Trp in hex.

- For Tras Ctrl, you can set it to Auto or Manual.
- If you set it to manual, you can define the value of Tras in hex.

- For Trc Ctrl, you can set it to Auto or Manual.
- If you set it to manual, you can define the value of Trc in hex.

- For Twr Ctrl, you can set it to Auto or Manual.
- If you set it to manual, you can define the value of Twr in hex.

- For Trfc1 Ctrl, you can set it to Auto or Manual.
- If you set it to manual, you define the value of Trfc1 in hex.

- For Trfc2 Ctrl, you can set it to Auto or Manual.
- If you set it to manual, you define the value of Trfc2 in hex.

- For TrfcSb Ctrl, you can set it to Auto or Manual.
- If you set it to manual, you can define the value of TrfcSb in hex.

- For Trtp Ctrl, you can set it to Auto or Manual.
- If you set it to manual, you can define the value of Trtp in hex.

- For TrrdL Ctrl, you can set it to Auto or Manual.
- If you set it to manual, you can define the value of TrrdL in hex.

- For TrrdS Ctrl, you can set it to Auto or Manual.
- If you set it to manual, you can define the value of TrrdS in hex.

- For Tfaw Ctrl, you can set it to Auto or Manual.
- If you set it to manual, you can define the value of Tfaw in hex.

- For TwtrL Ctrl, you can set it to Auto or Manual.
- If you set it to manual, you can define the value of TwtrL in hex.

- For TwtrS Ctrl, you can set it to Auto or Manual.
- If you set it to manual, you can define the value of TwtrS in hex.

Advanced > AMD Overclocking > DDR and Infinity Fabric Frequency/Timings > DDR Options > DDR Timing Configuration > DDR Non-SPD Timing
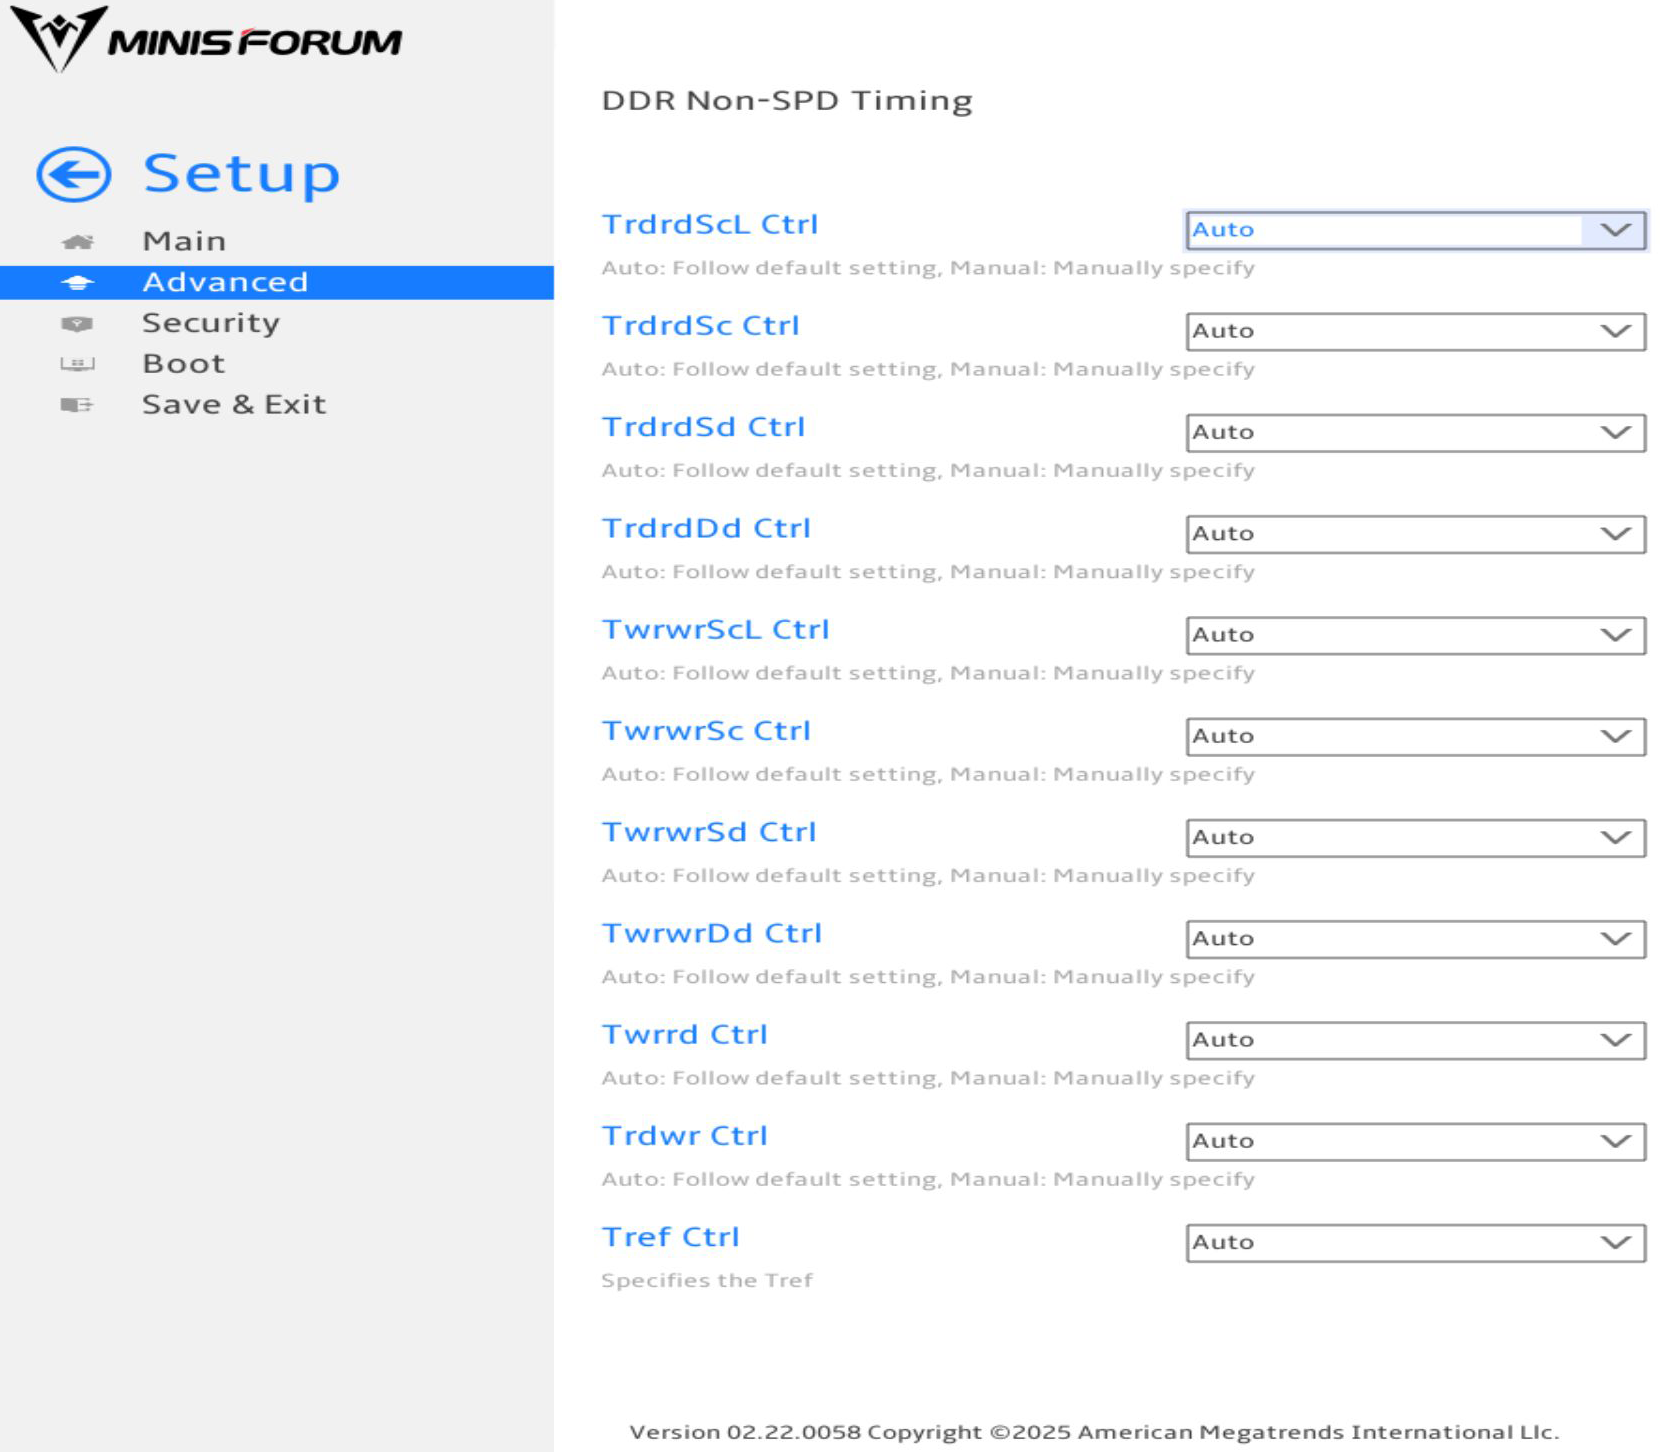
- For TrdrdScL Ctrl, you can set it to Auto or Manual.
- If you set it to manual, you can define the value of TrdrdScL in hex.

- For TrdrdSc Ctrl, you can set it to Auto or Manual.
- If you set it to manual, you can define the value of TrdrdSc in hex.

- For TrdrdSd Ctrl, you can set it to Auto or Manual.
- If you set it to manual, you can define the value of TrdrdSd in hex.

- For TrdrdDd Ctrl, you can set it to Auto or Manual.
- If you set it to manual, you can define the value of TrdrdDd in hex.

- For TwrwrScL Ctrl, you can set it to Auto or Manual.
- If you set it to manual, you can define the value of TwrwrScL in hex.

- For TwrwrSc Ctrl, you can set it to Auto or Manual.
- If you set it to manual, you can define the value of TwrwrSc in hex.

- For TwrwrSd Ctrl, you can set it to Auto or Manual.
- If you set it to manual, you can define the value of TwrwrSd in hex.

- For TwrwrDd Ctrl, you can set it to Auto or Manual.
- If you set it to manual, you can define the value of TwrwrDd in hex.

- For Twrrd Ctrl, you can set it to Auto or Manual.
- If you set it to manual, you can define the value of Twrrd in hex.

- For Trdwr Ctrl, you can set it to Auto or Manual.
- If you set it to manual, you can define the value of Trdwr in hex.

- For Tref Ctrl, you can set it to Auto or Manual.
- If you set it to manual, you can define the value of Tref in hex.

Advanced > AMD Overclocking > DDR and Infinity Fabric Frequency/Timings > DDR Options > DDR Bus Configuration
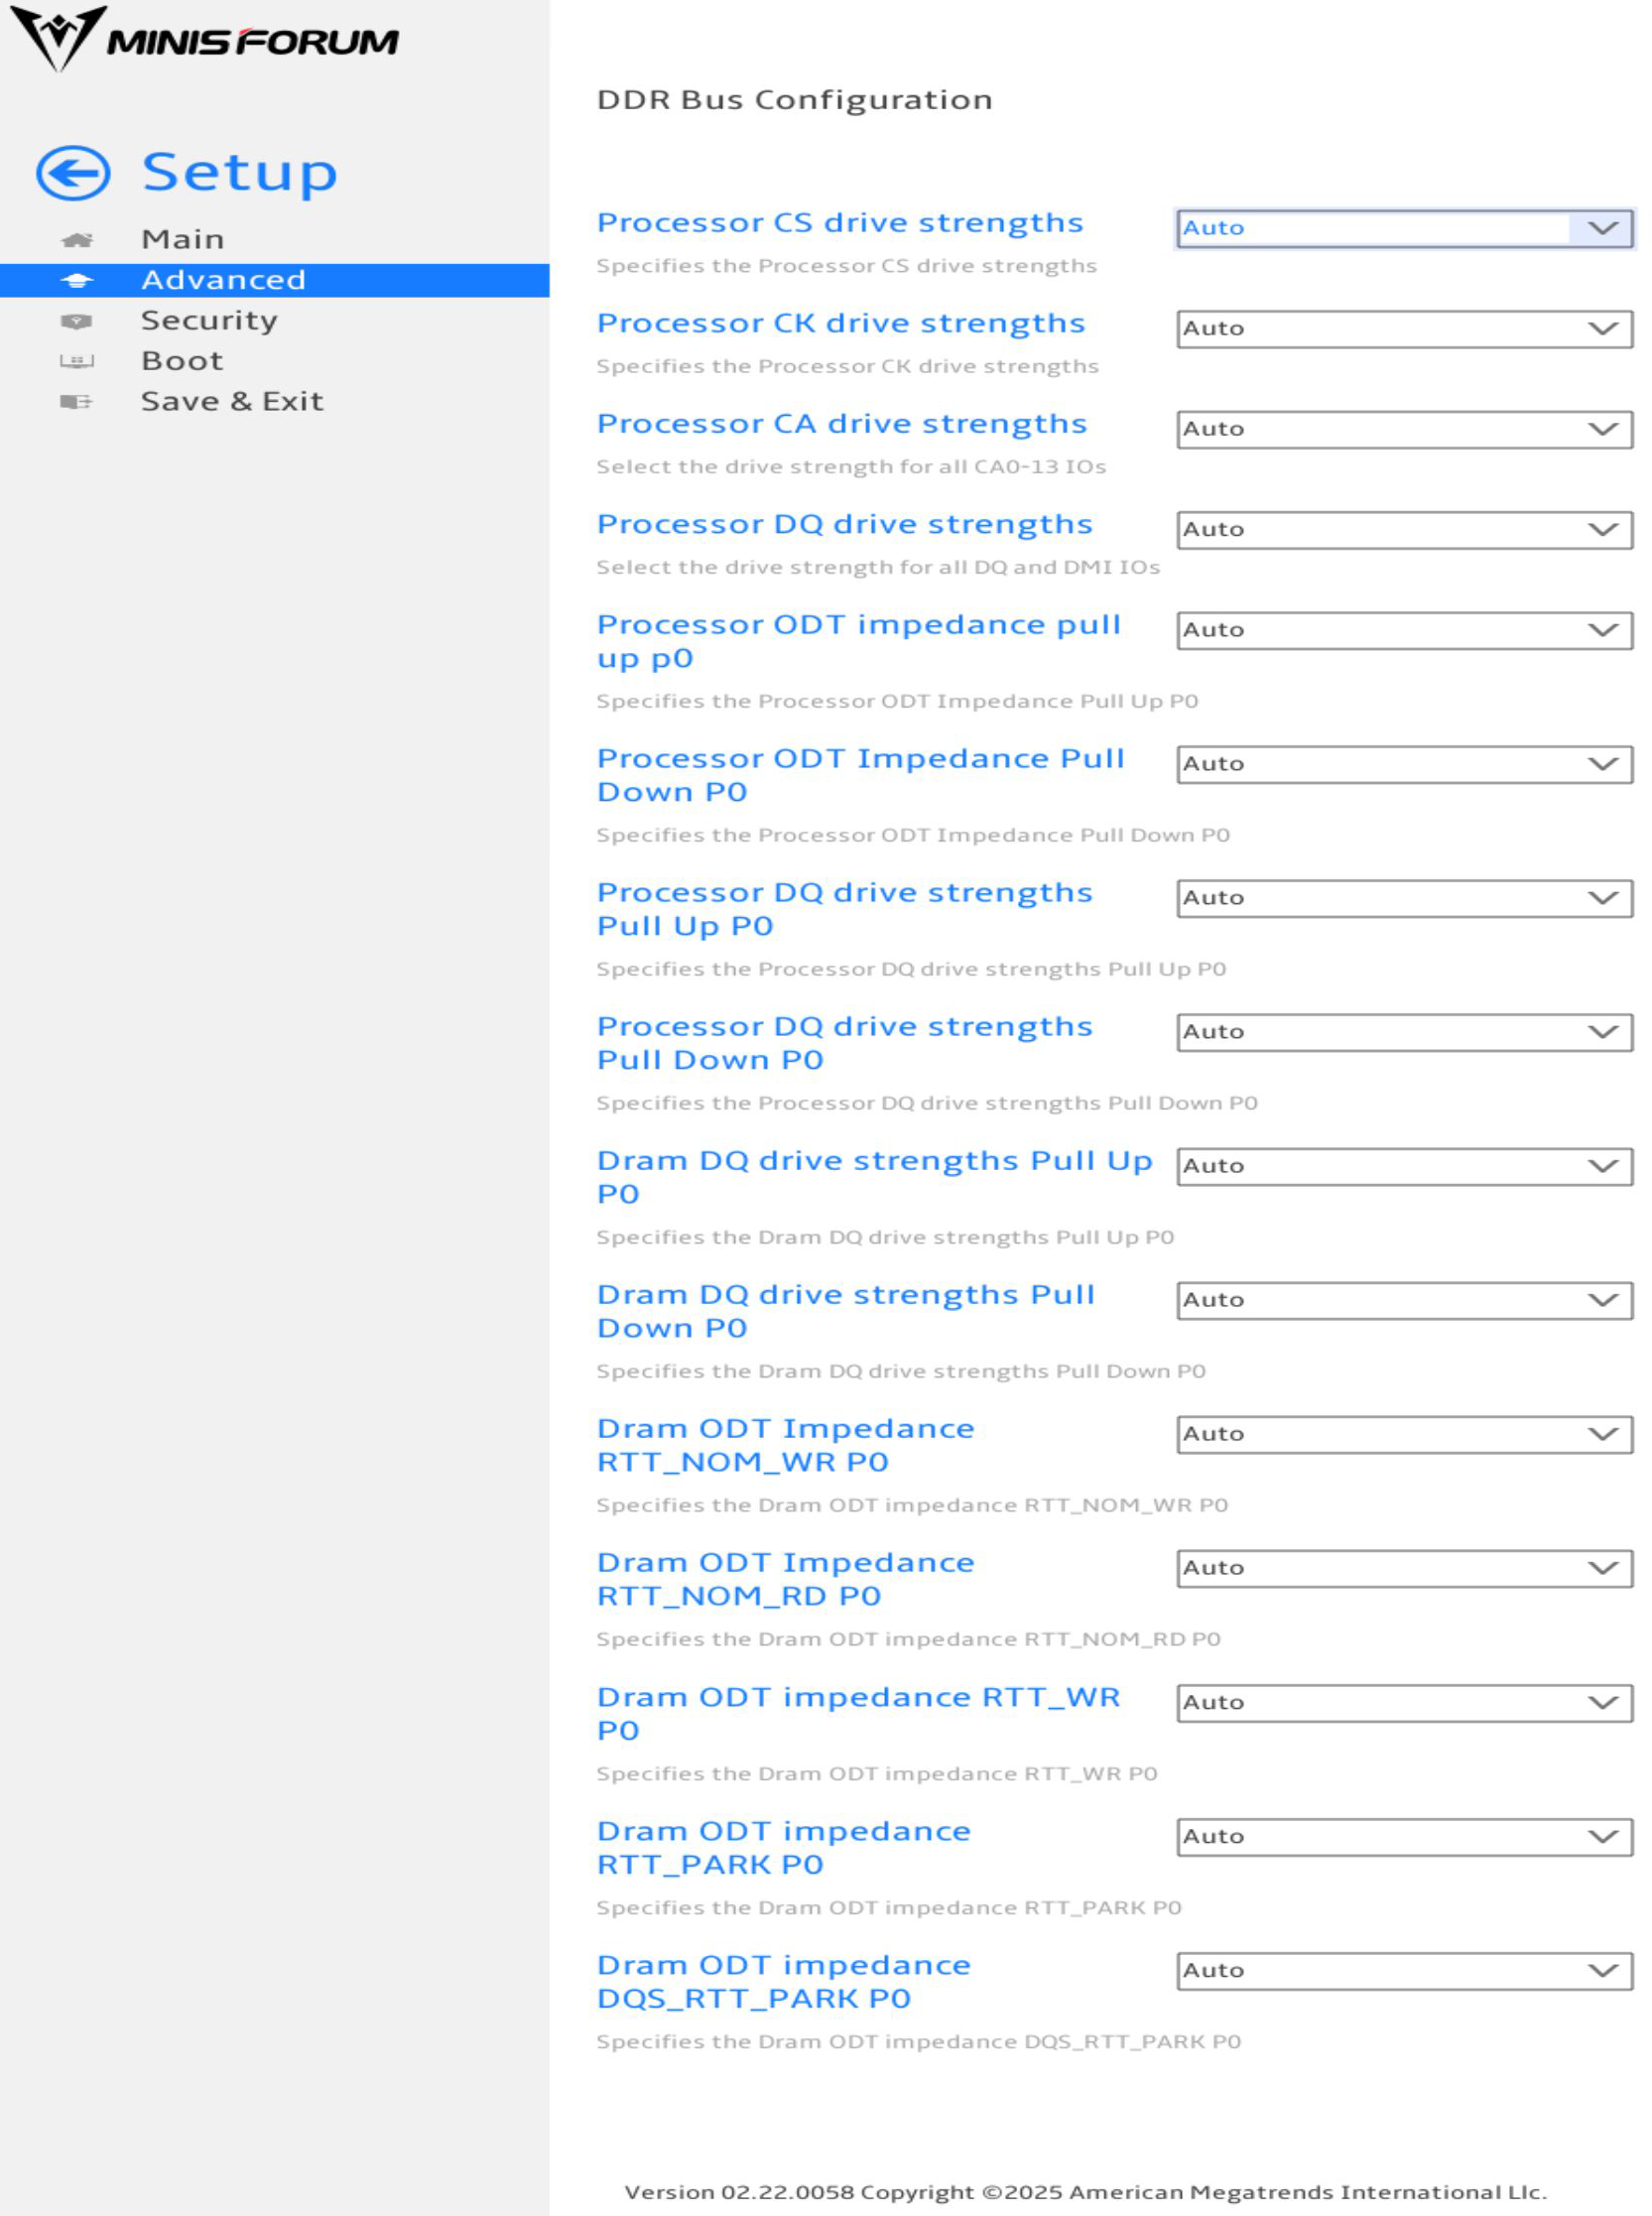
- For Processor CS drive strengths, you can set it to Auto, 120.0 Ohm, 60.0 Ohm, 40.0 Ohm, or 30.0 Ohm.

- For Processor CK drive strengths, you can set it to Auto, 120.0 Ohm, 60.0 Ohm, 40.0 Ohm, or 30.0 Ohm.

- For Processor CA drive strengths, you can set it to Auto, 120.0 Ohm, 60.0 Ohm, 40.0 Ohm, or 30.0 Ohm.

- For Processor CA drive strengths, you can set it to Auto, High Impedance, 240 ohm, 120 ohm, 80 ohm, 60 ohm, 48 ohm, 40 ohm, or 34.3 ohm.

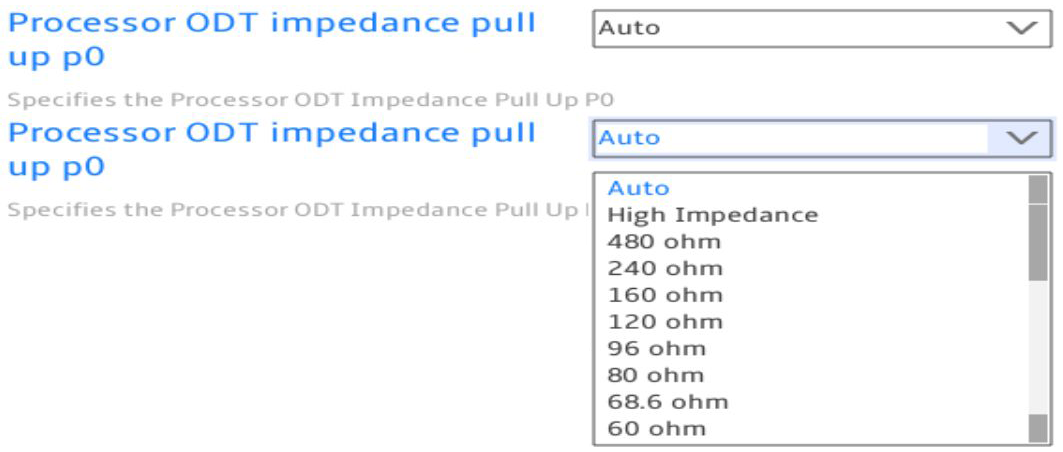
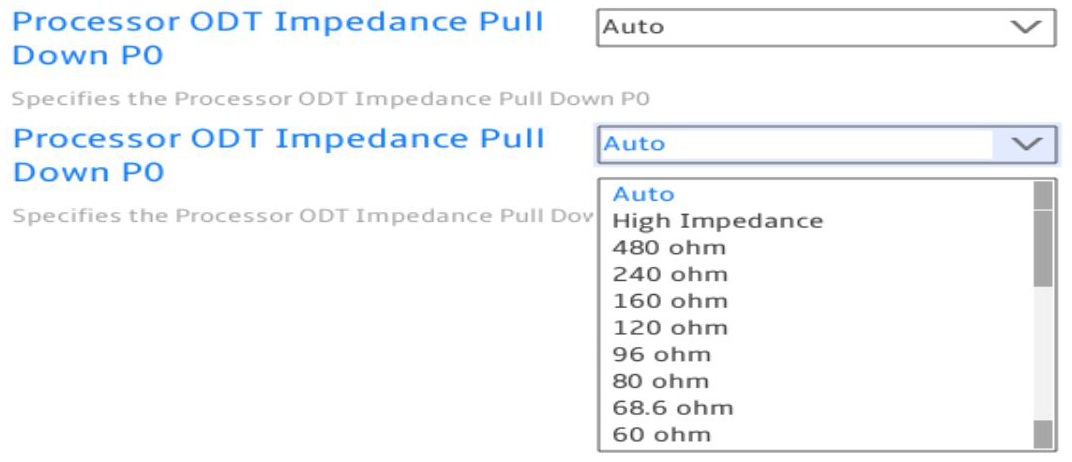
- For Processor ODT impedance pull up p0, you can set it to Auto, High Impedance, or a predefined ohm value.
- For Processor ODT Impedance Pull Down P0, you can set it to Auto, High Impedance, or a predefined ohm value.
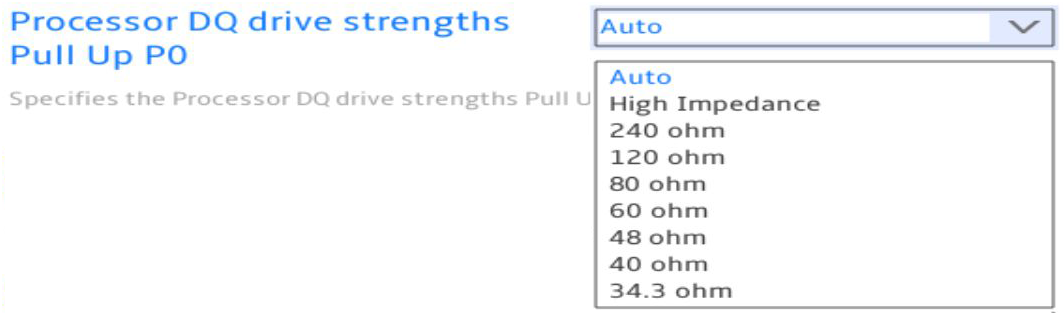
- For Processor DQ drive strengths Pull Up P0, you can set it to Auto, High Impedance, 240 ohm, 120 ohm, 80 ohm, 60 ohm, 48 ohm, 40 ohm, or 34.3 ohm.
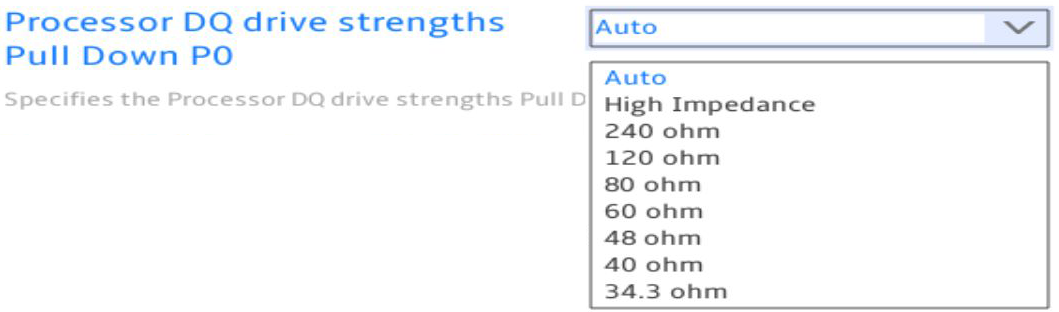
- For Processor DQ drive strengths Pull Down P0, you can set it to Auto, High Impedance, 240 ohm, 120 ohm, 80 ohm, 60 ohm, 48 ohm, 40 ohm, or 34.3 ohm.
- For Dram DQ drive strengths Pull Up P0, you can set it to Auto, 48 ohm, 40 ohm, or 34 ohm.

- For Dram DQ drive strengths Pull Down P0, you can set it to Auto, 48 ohm, 40 ohm, or 34 ohm.

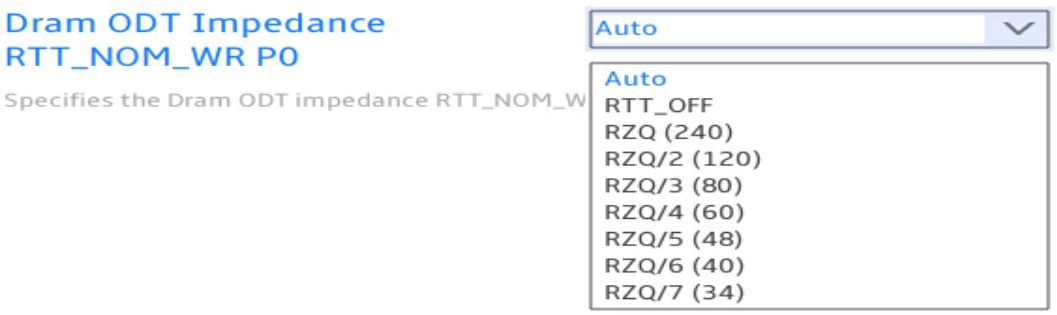
- For Dram ODT Impedance RTT_NOM_WR P0, you can set it to Auto, RTT_OFF, RZQ (240), RZQ/2 (120), RZQ/3 (80), RZQ/4 (60), RZQ/5 (48), RZQ/6 (40), or RZQ/7 (34).
- For Dram ODT Impedance RTT_RD P0, you can set it to Auto, RTT_OFF, RZQ (240), RZQ/2 (120), RZQ/3 (80), RZQ/4 (60), RZQ/5 (48), RZQ/6 (40), or RZQ/7 (34).

- For Dram ODT impedance RTT_WR P0, you can set it to Auto, RTT_OFF, RZQ (240), RZQ/2 (120), RZQ/3 (80), RZQ/4 (60), RZQ/5 (48), RZQ/6 (40), or RZQ/7 (34).

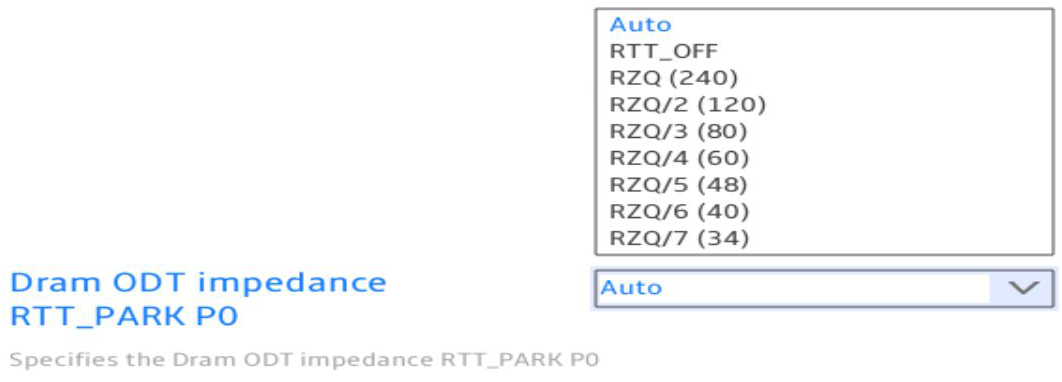
- For Dram ODT impedance RTT_PARK P0, you can set it to Auto, RTT_OFF, RZQ (240), RZQ/2 (120), RZQ/3 (80), RZQ/4 (60), RZQ/5 (48), RZQ/6 (40), or RZQ/7 (34).
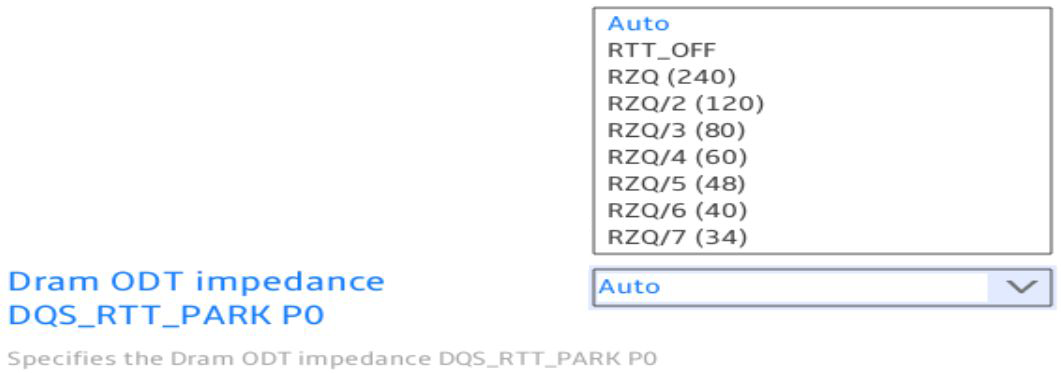
- For Dram ODT impedance DQS_RTT_PARK P0, you can set it to Auto, RTT_OFF, RZQ (240), RZQ/2 (120), RZQ/3 (80), RZQ/4 (60), RZQ/5 (48), RZQ/6 (40), or RZQ/7 (34).
Advanced > AMD Overclocking > DDR and Infinity Fabric Frequency/Timings > DDR Options > DDR PMU Training
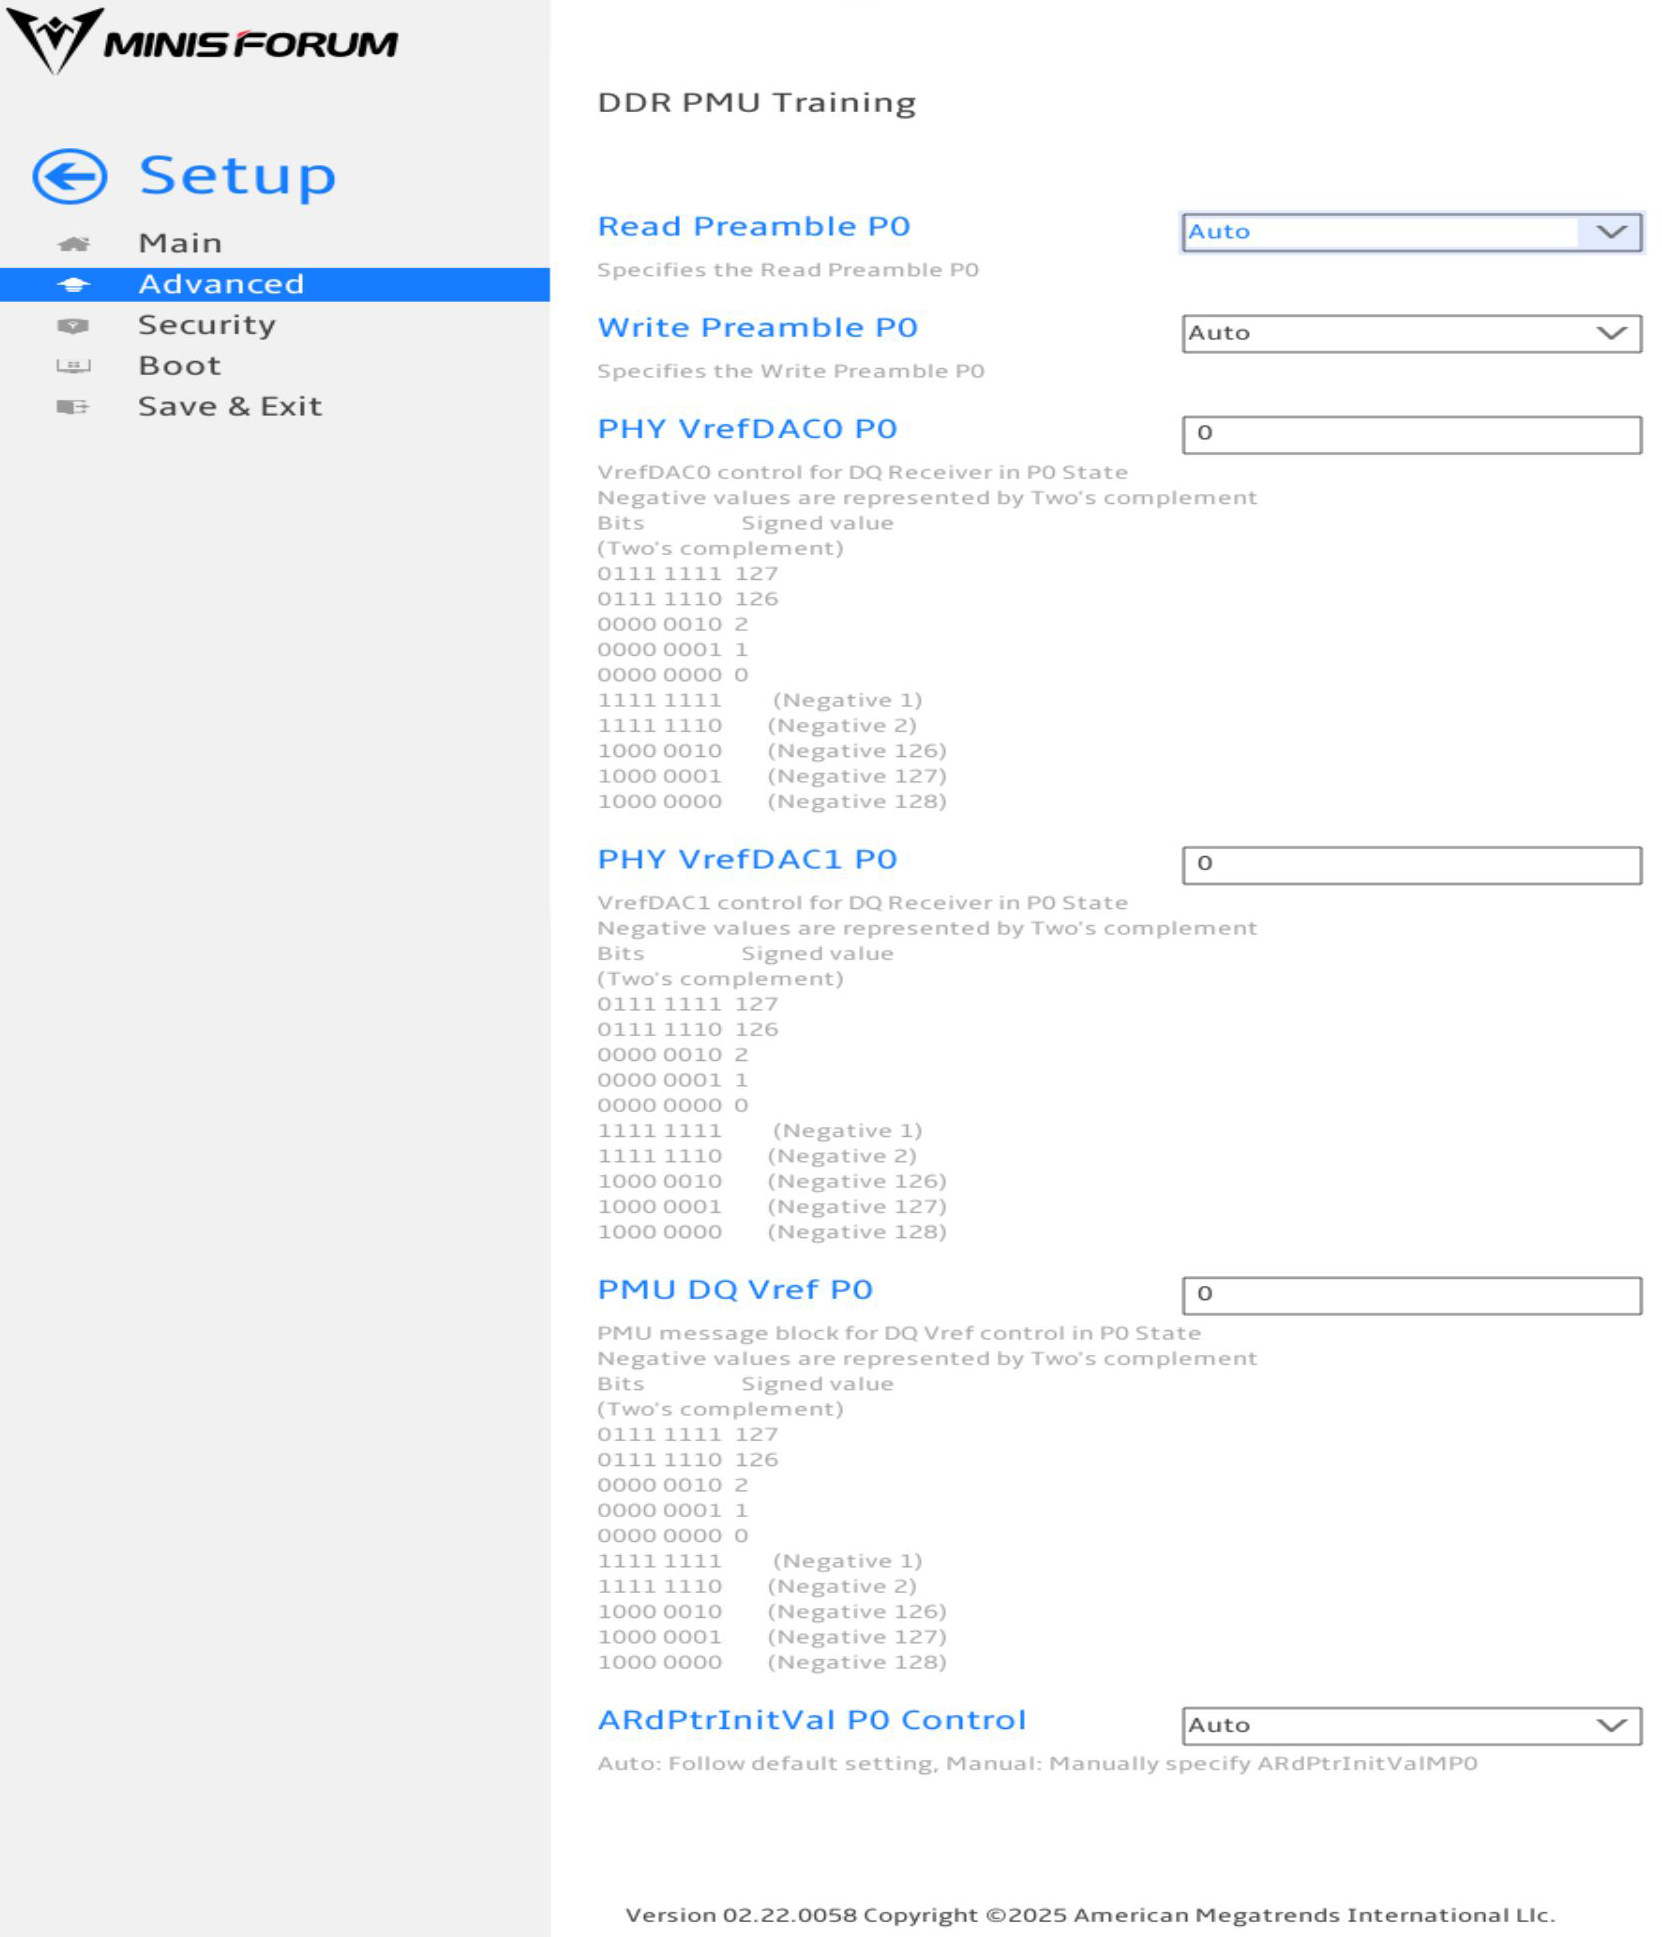
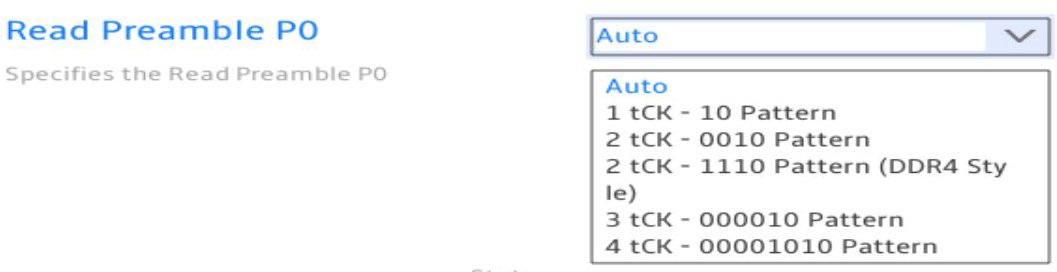
- For Read Preamble P0, you can set it to Auto, 1 tCK – 10 Pattern, 2 tCK – 0010 Pattern, 2 tCK – 1110 Pattern (DDR4 Style), 3 tCK – 000010 Pattern, or 4 tCK 00001010 Pattern.
- For Write Preamble P0, you can set it to Auto, 2 tCK – 0010 Pattern, 3 tCK – 000010 Pattern, or 4 tCK 00001010 Pattern.

- For PHY VrefDAC0 P0, you can enter a number.
- For PHY VrefDAC1 P0, you can enter a number.
- For PMU DQ Vref P0, you can enter a number.
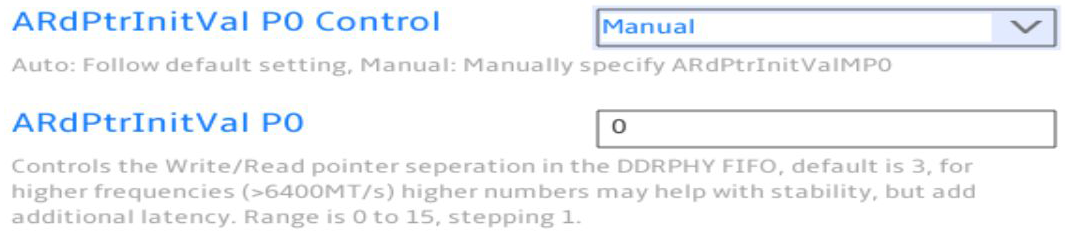
- For ARdPtrInitVal P0 Control, you can set it to Auto or Manual.
- If you set it to manual, you can enter a number for ARdPtrInitVal P0.
Advanced > AMD Overclocking > DDR and Infinity Fabric Frequency/Timings > DDR Options > DDR Control Configuration
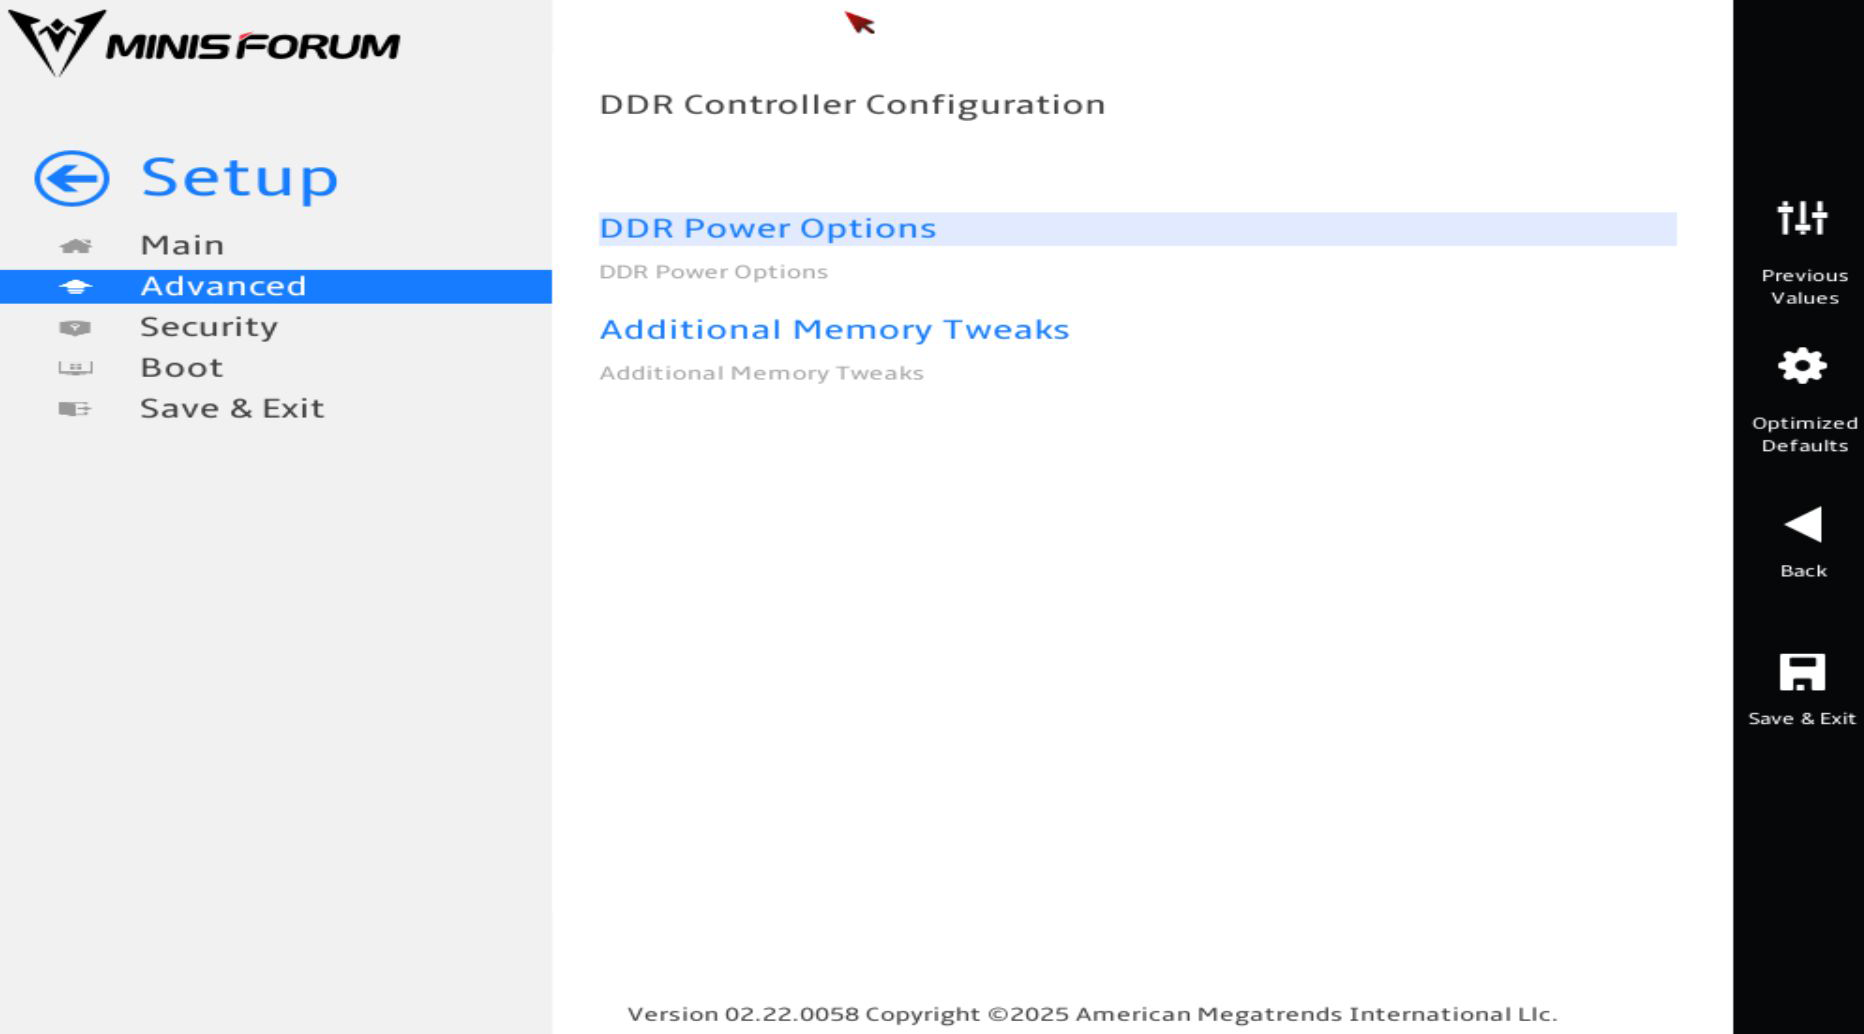
- DDR Power Options is a menu.
- Additional Memory Tweaks is a menu.
Advanced > AMD Overclocking > DDR and Infinity Fabric Frequency/Timings > DDR Options > DDR Control Configuration > DDR Power Options
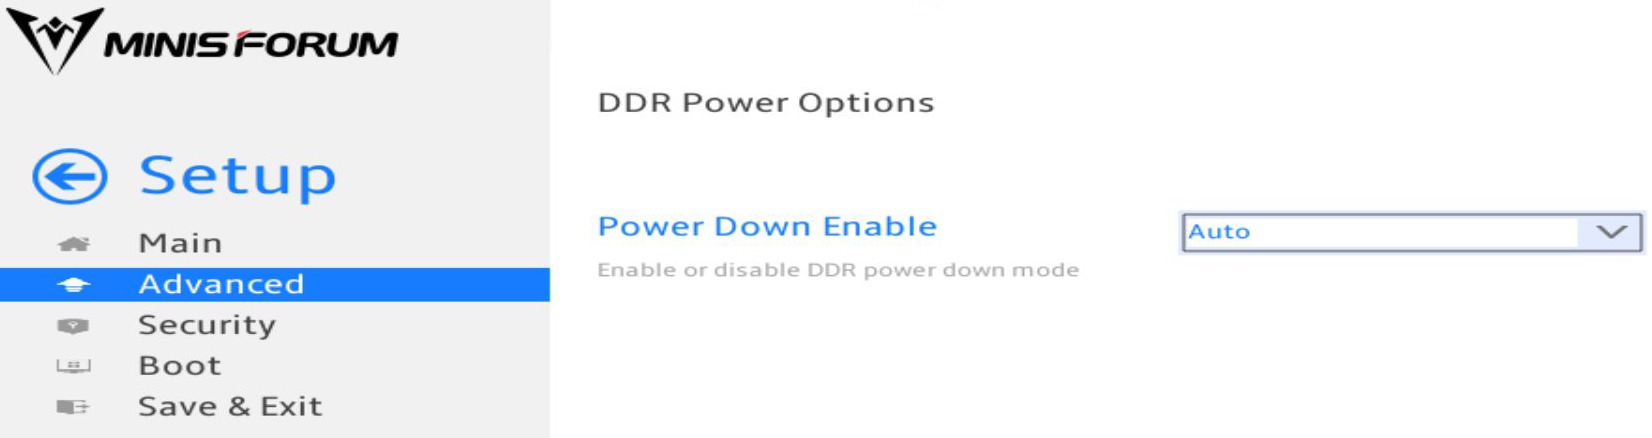
- For Power Down Enable, you can set it to Auto, Disabled, or Enabled.
Advanced > AMD Overclocking > DDR and Infinity Fabric Frequency/Timings > DDR Options > DDR Control Configuration > Additional Memory Tweaks
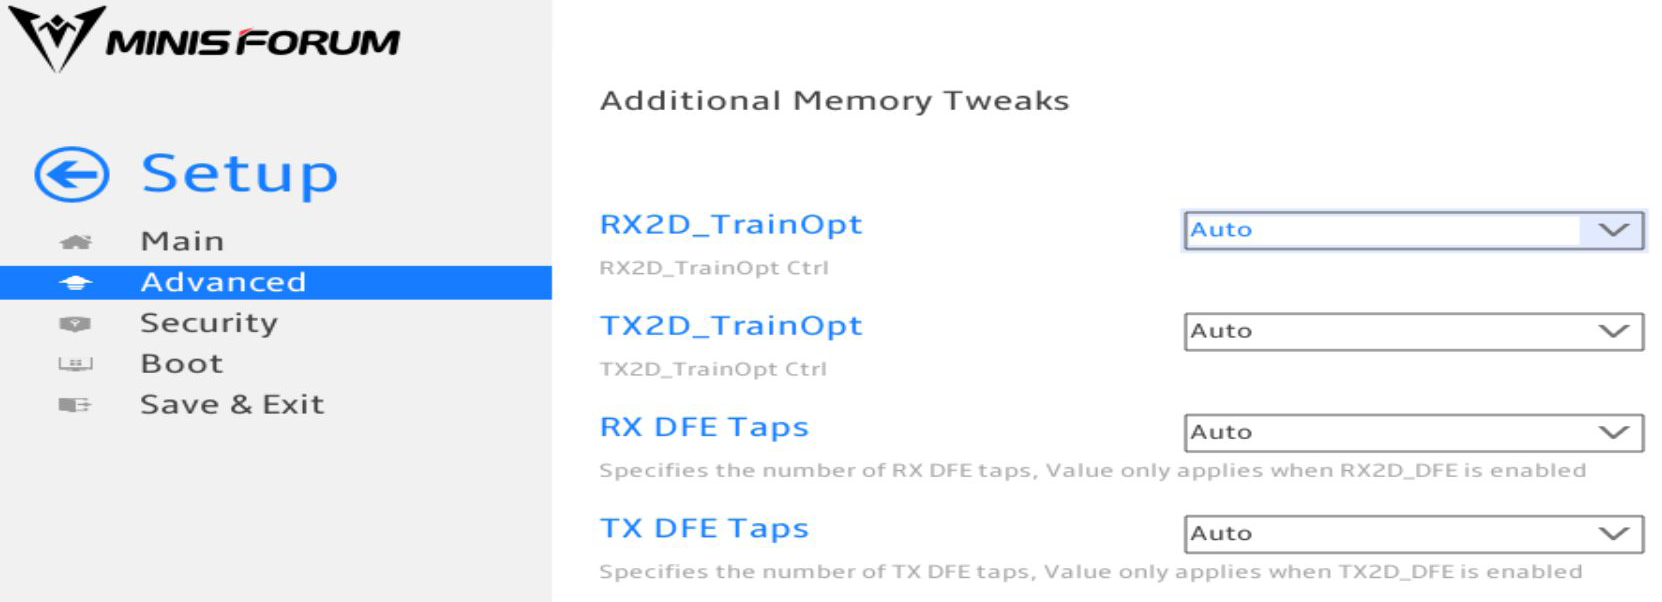
- For RX2D_TrainOpt, you can set it to Auto or Manual. If you set it to manual, you can set more settings.
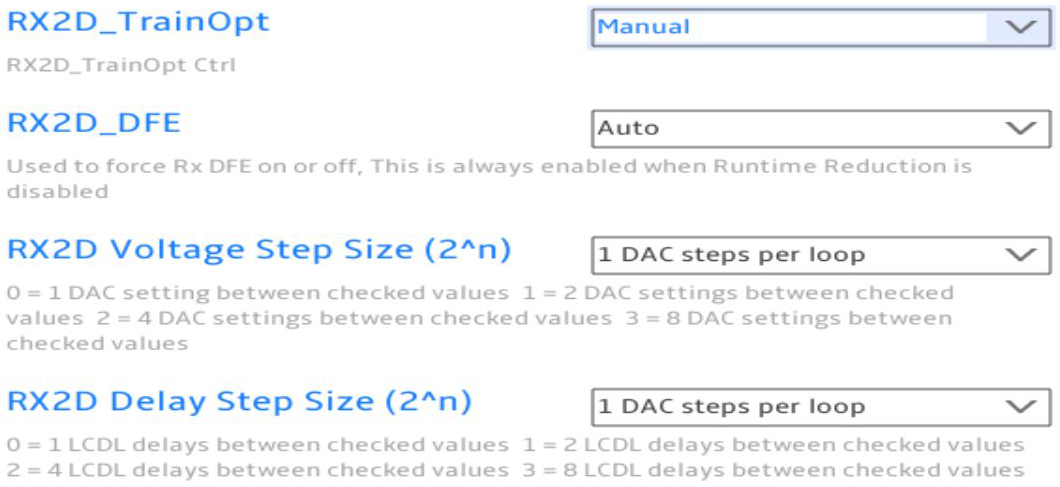
- For RX2D_DFE, you can set it to Auto, Disable, or Enable.
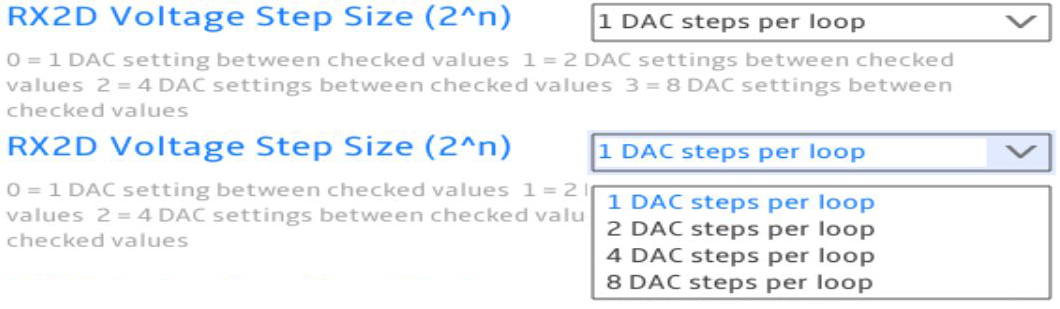
- For RX2D Voltage Step Size (2^n), you can set it to 1 DAC steps per loop, 2 DAC steps per loop, 4 DAC steps per loop, or 8 DAC steps per loop.
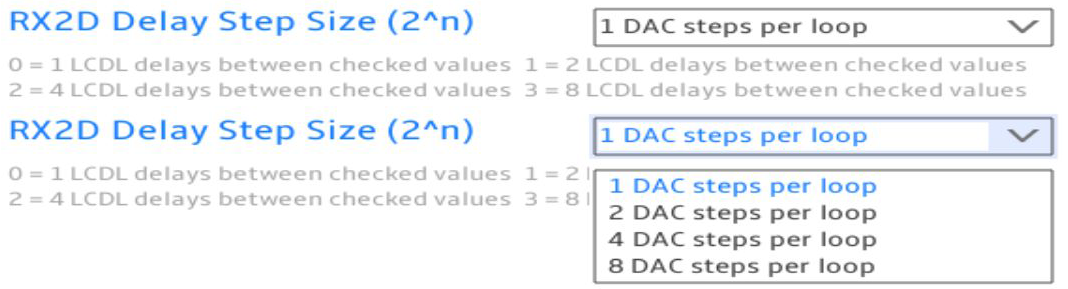
- For RX2D Delay Step Size (2^n), you can set it to 1 DAC steps per loop, 2 DAC steps per loop, 4 DAC steps per loop, or 8 DAC steps per loop.
- For TX2D_TrainOpt, you can set it to Auto or Manual. If you set it to manual, you unlock more options.
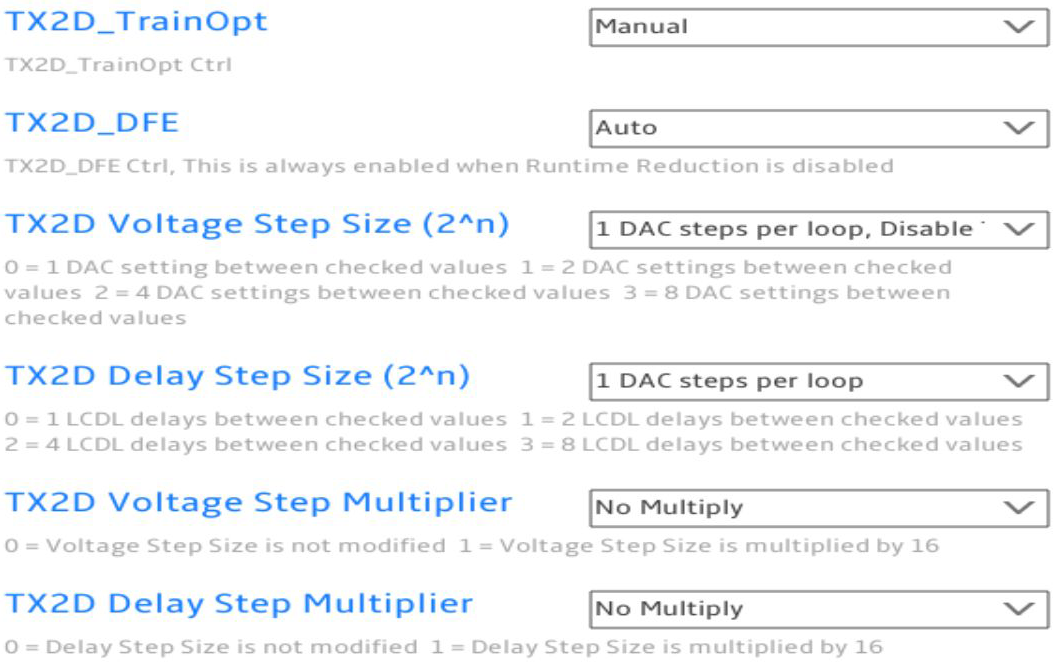
- For TX2D_DFE, you can set it to Auto, Disable, or Enabled.
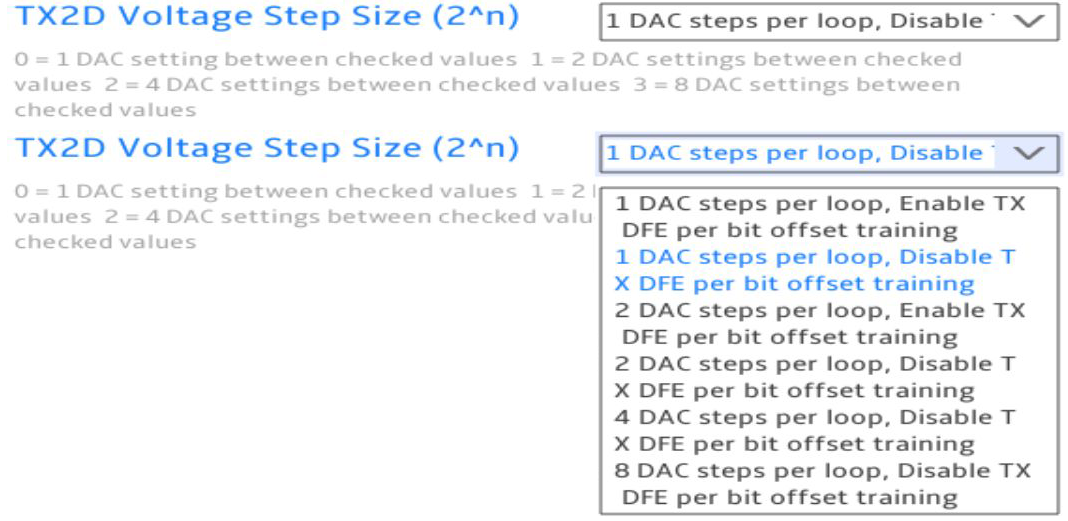
- For TX2D Voltage Step Size (2^n), you can set it to 1 DAC steps per loop, 2 DAC steps per loop, 4 DAC steps per loop, or 8 DAC steps per loop. For each option, you can also select whether to Enable or Disable TX DFE per bit offset training.
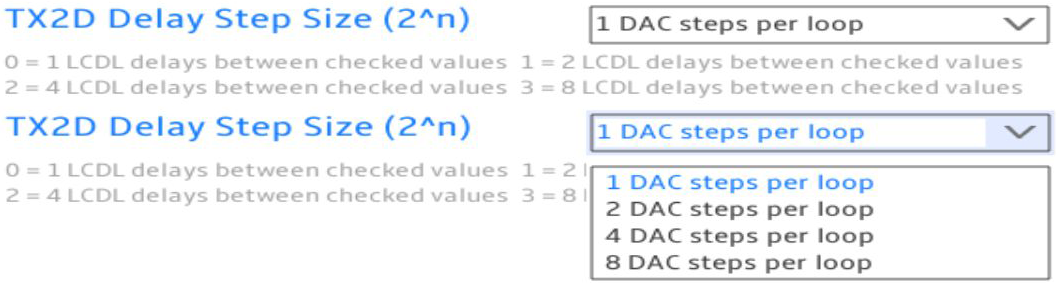
- For TX2D Delay Step Size (2^n), you can set it to 1 DAC steps per loop, 2 DAC steps per loop, 4 DAC steps per loop, or 8 DAC steps per loop.
- For TX2D Voltage Step Multiplier, you can set it to No Multiply or Multiply DAC step size by 16.

- For TX2D Delay Step Multiplier, you can set it to No Multiply or Multiply DAC step size by 16.

- For RX DFE Taps, you can set it to Auto, 1 Tap, 2 Tap, 3 Tap, or 4 Tap.

- For TX DFE Taps, you can set it to Auto, 1 Tap, 2 Tap, 3 Tap, or 4 Tap.

Advanced > AMD Overclocking > DDR and Infinity Fabric Frequency/Timings > DDR Options > DDR Turnaround Times
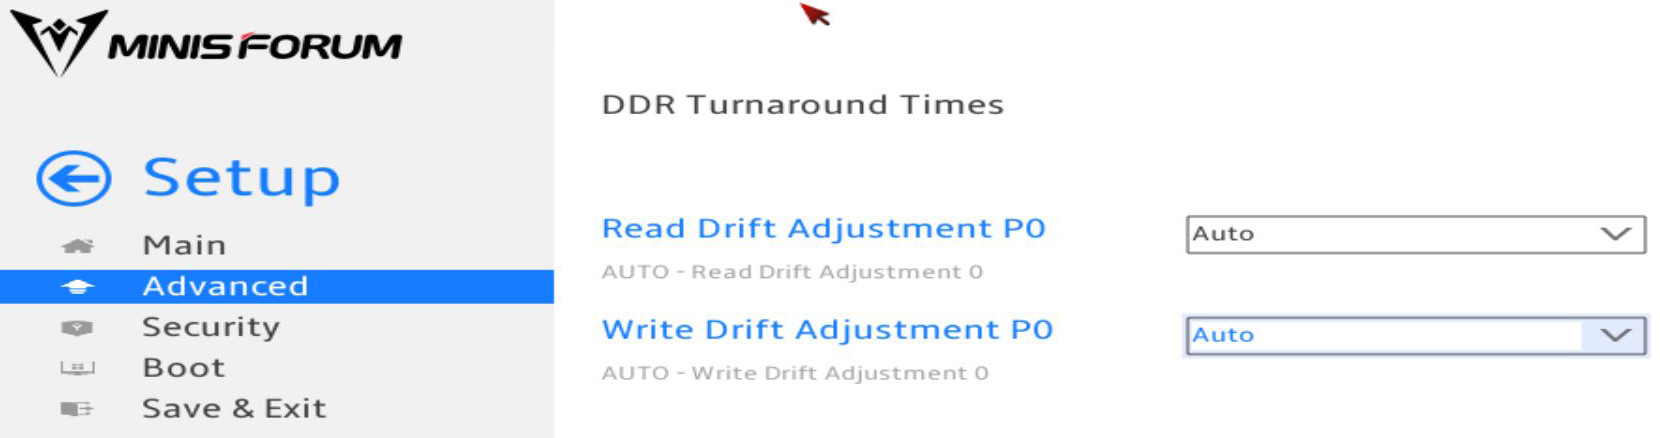
- For Read Drift Adjustment P0, you can set it to Auto, minus 4, minus 3, minus 2, minus 1, plus 1, plus 2, plus 3, or plus 4.

- For Write Drift Adjustment P0, you can set it to Auto, minus 4, minus 3, minus 2, minus 1, plus 1, plus 2, plus 3, or plus 4.

Advanced > AMD Overclocking > DDR and Infinity Fabric Frequency/Timings > Infinity Fabric Frequency and Dividers
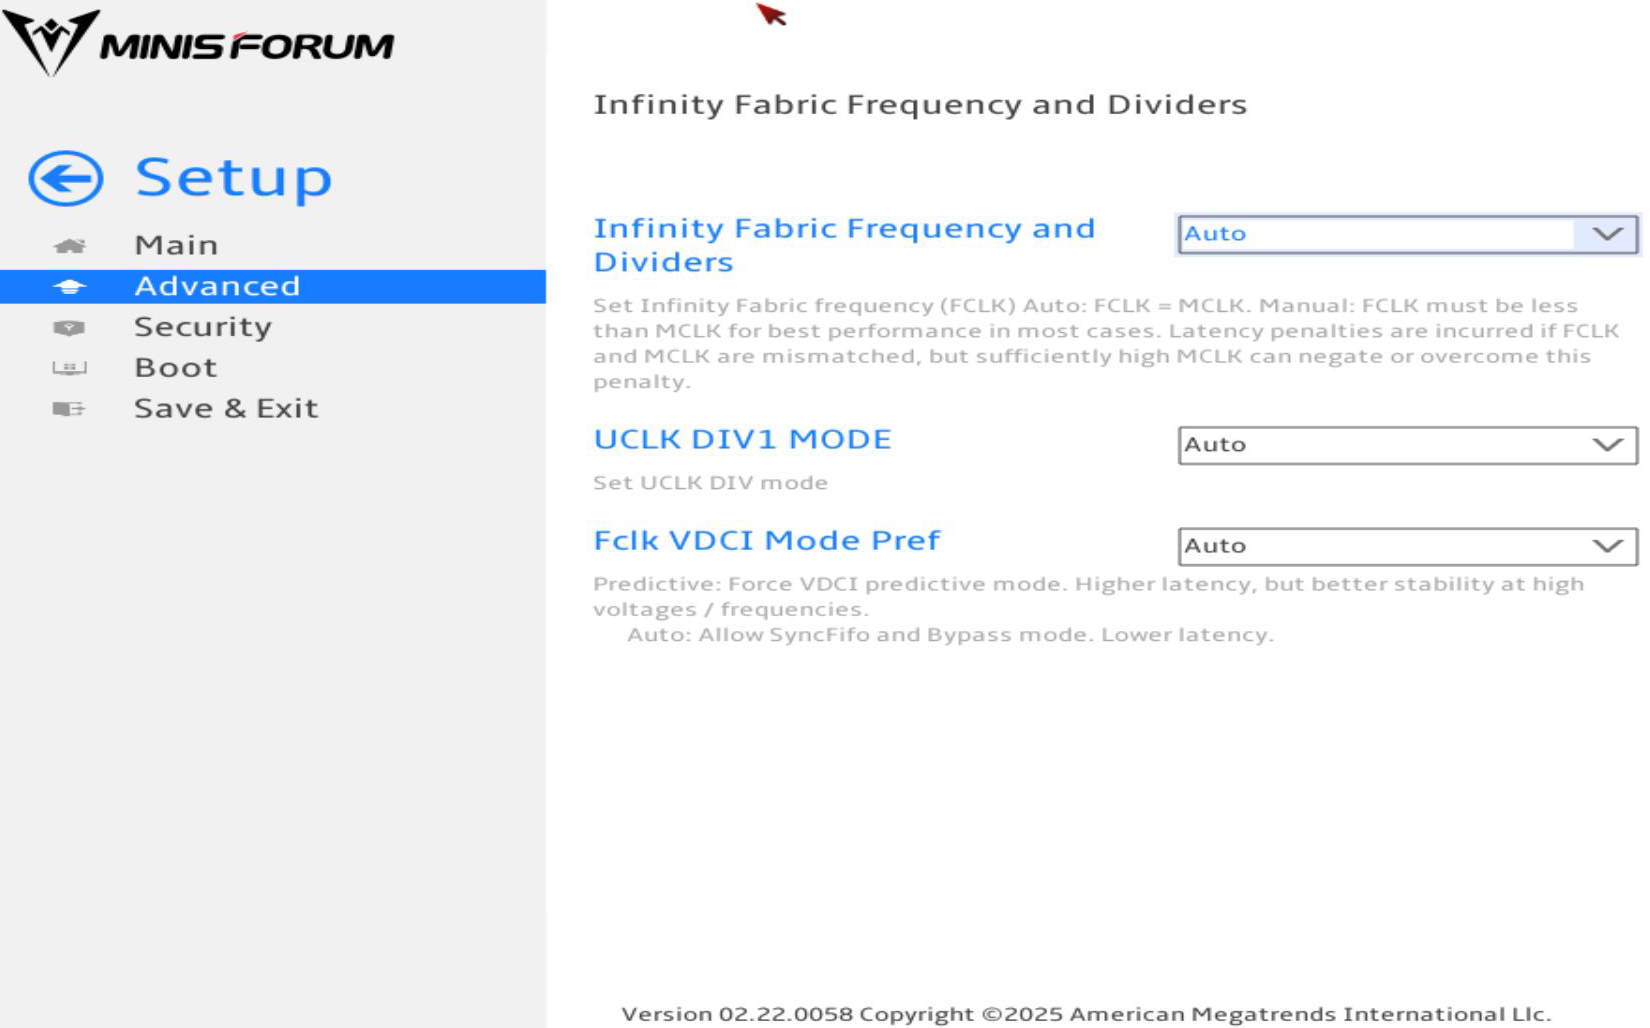
- For Infinity Fabric Frequency and Dividers, you can set it to Auto or a predefined MHz option.
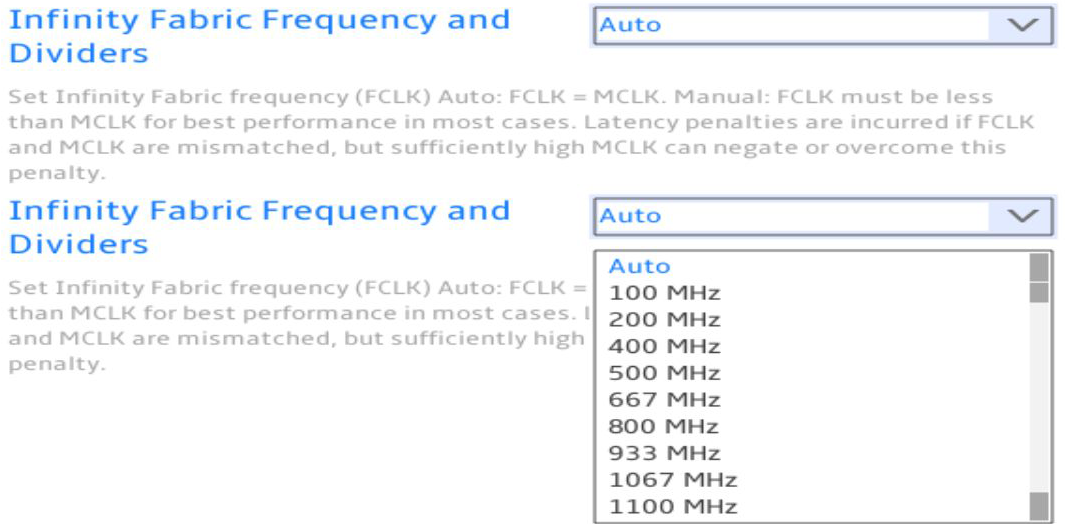
- For UCLK DIV1 MODE, you can set it to Auto, UCLK=MEMCLK, or UCLK=MEMCLK/2.

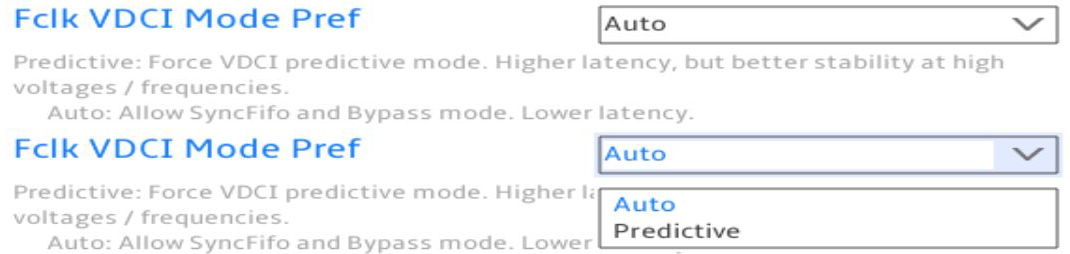
- For Fclk VDCI Mode Pref, you can set it to Auto or Predictive.
Advanced > AMD Overclocking > Precision Boost Overdrive
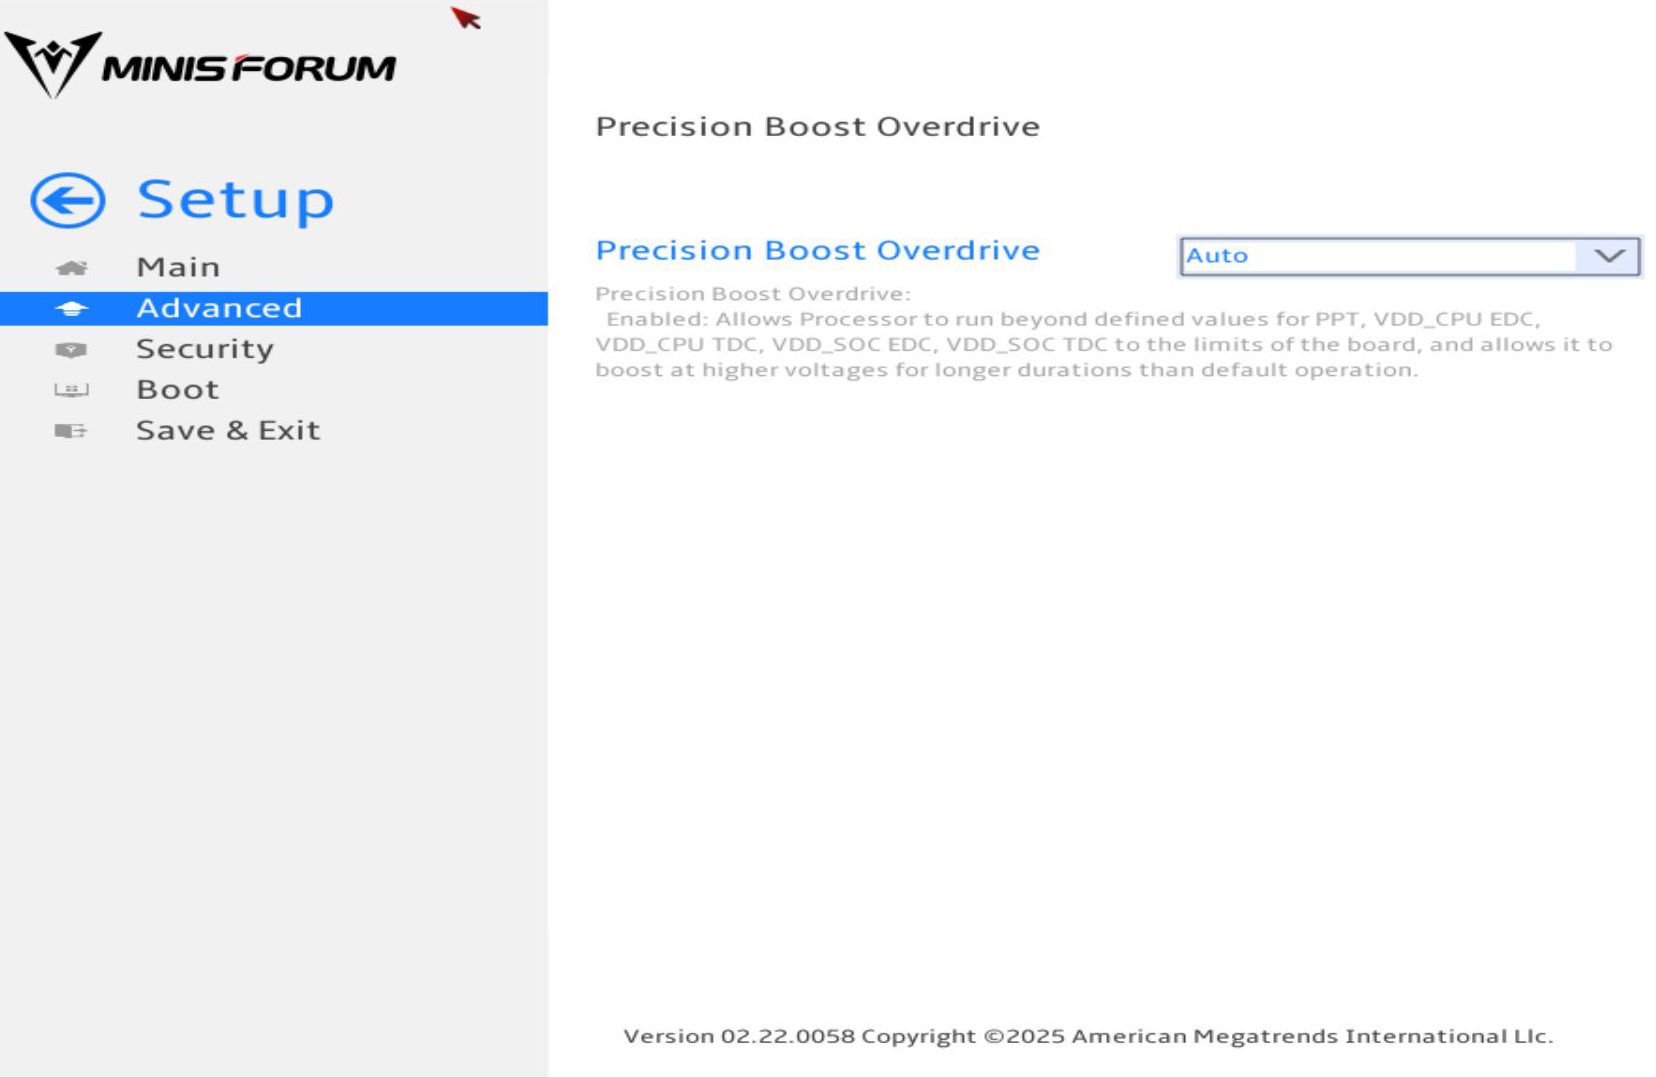
- For Precision Boost Overdrive, you can set it to Auto, Disable, Enabled, or Advanced. If you set it to advanced, you get more menu options.

- For PBO Limits, you can set it to Auto, Disable, Motherboard, or Manual. If you set it to manual, you unlock more options.
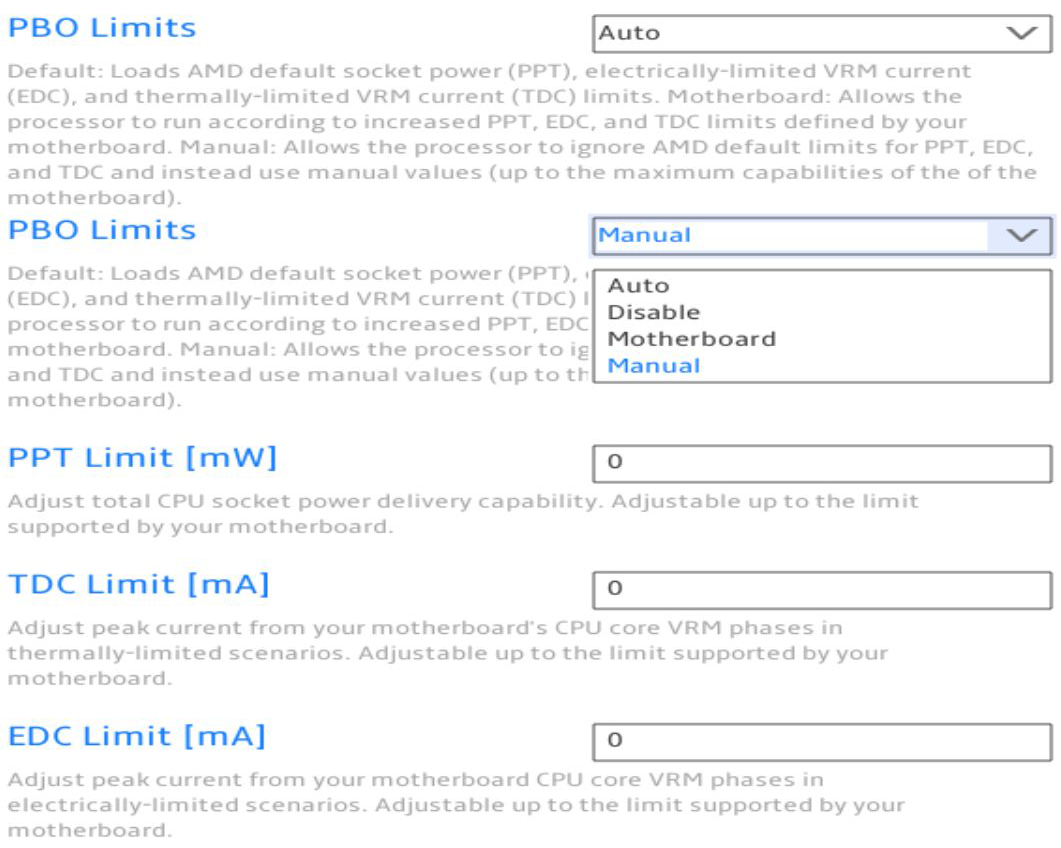
- For PPT Limit [mW], you can enter a number.
- For TDC Limit [mA], you can enter a number.
- For EDC Limit [mA], you can enter a number.
- For Precision Boost Overdrive Scalar Ctrl, you can set it to Auto or Manual. If you set it to manual, you unlock more options.
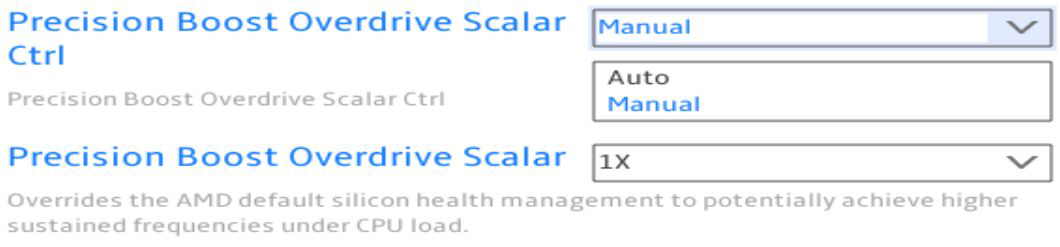
- For Precision Boost Overdrive Scalar, you can set it to 1X, 2X, 3X, 4X, 5X, 6X, 7X, 8X, 9X, or 10X.

- For CPU Boost Clock Override, you can set it to Disabled, Enabled (Positive), or Enabled (Negative). If you select either of the enabled options, you unlock a few more options.
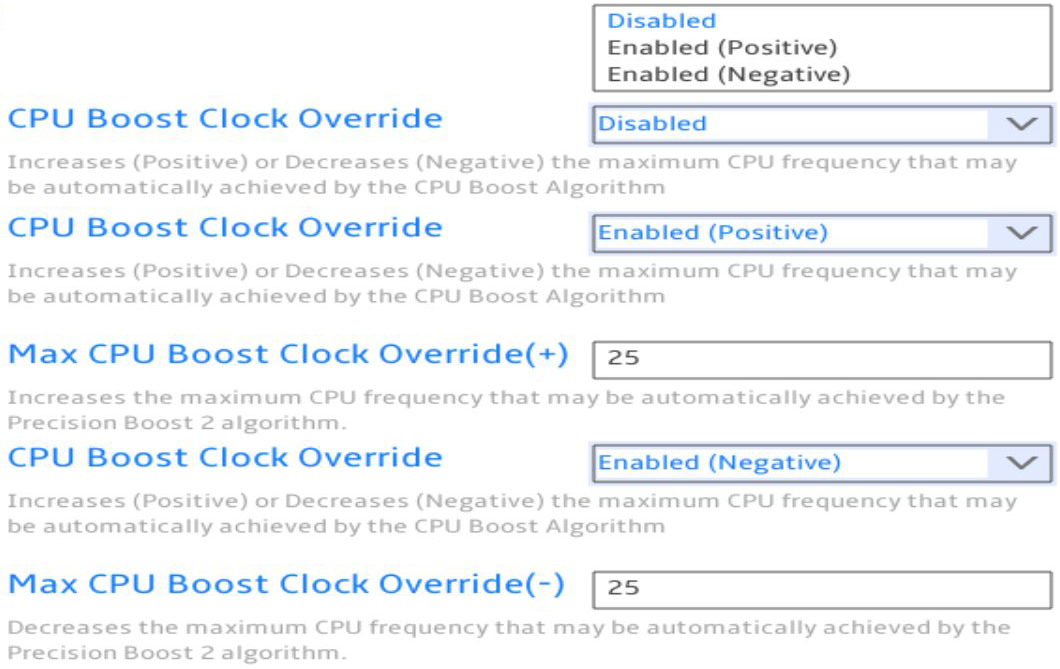
- For Max CPU Boost Clock Override (+), you can enter a number.
- For Max CPU Boost Clock Override (-), you can enter a number.
- For Platform Thermal Throttle Ctrl, you can set it to Auto or Manual. If you set it to manual, you unlock more options.

- For Platform Thermal Throttle Limit, you can enter a number.
- GFX Curve Optimizer is a menu.
- Curve Optimizer is a menu.
- Curve Shaper is a menu.
Advanced > AMD Overclocking > Precision Boost Overdrive > GFX Curve Optimizer

- For GFX Curve Optimizer, you can set it to Disable or GFX Curve Optimizer. If you set it to GFX Curve Optimizer, you unlock more options.
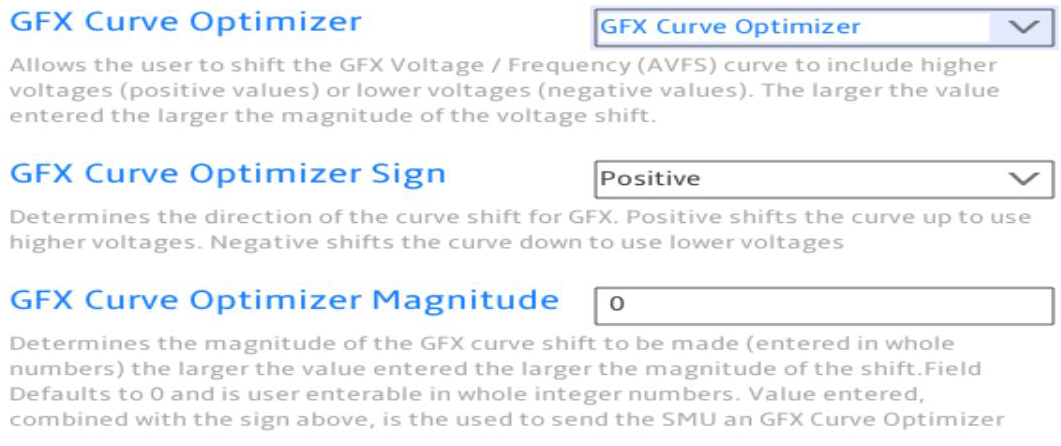
- For GFX Curve Optimizer Sign, you can set it to Positive or Negative.
- For GFX Curve Optimizer Magnitude, you can enter a number.
Advanced > AMD Overclocking > Precision Boost Overdrive > Curve Optimizer
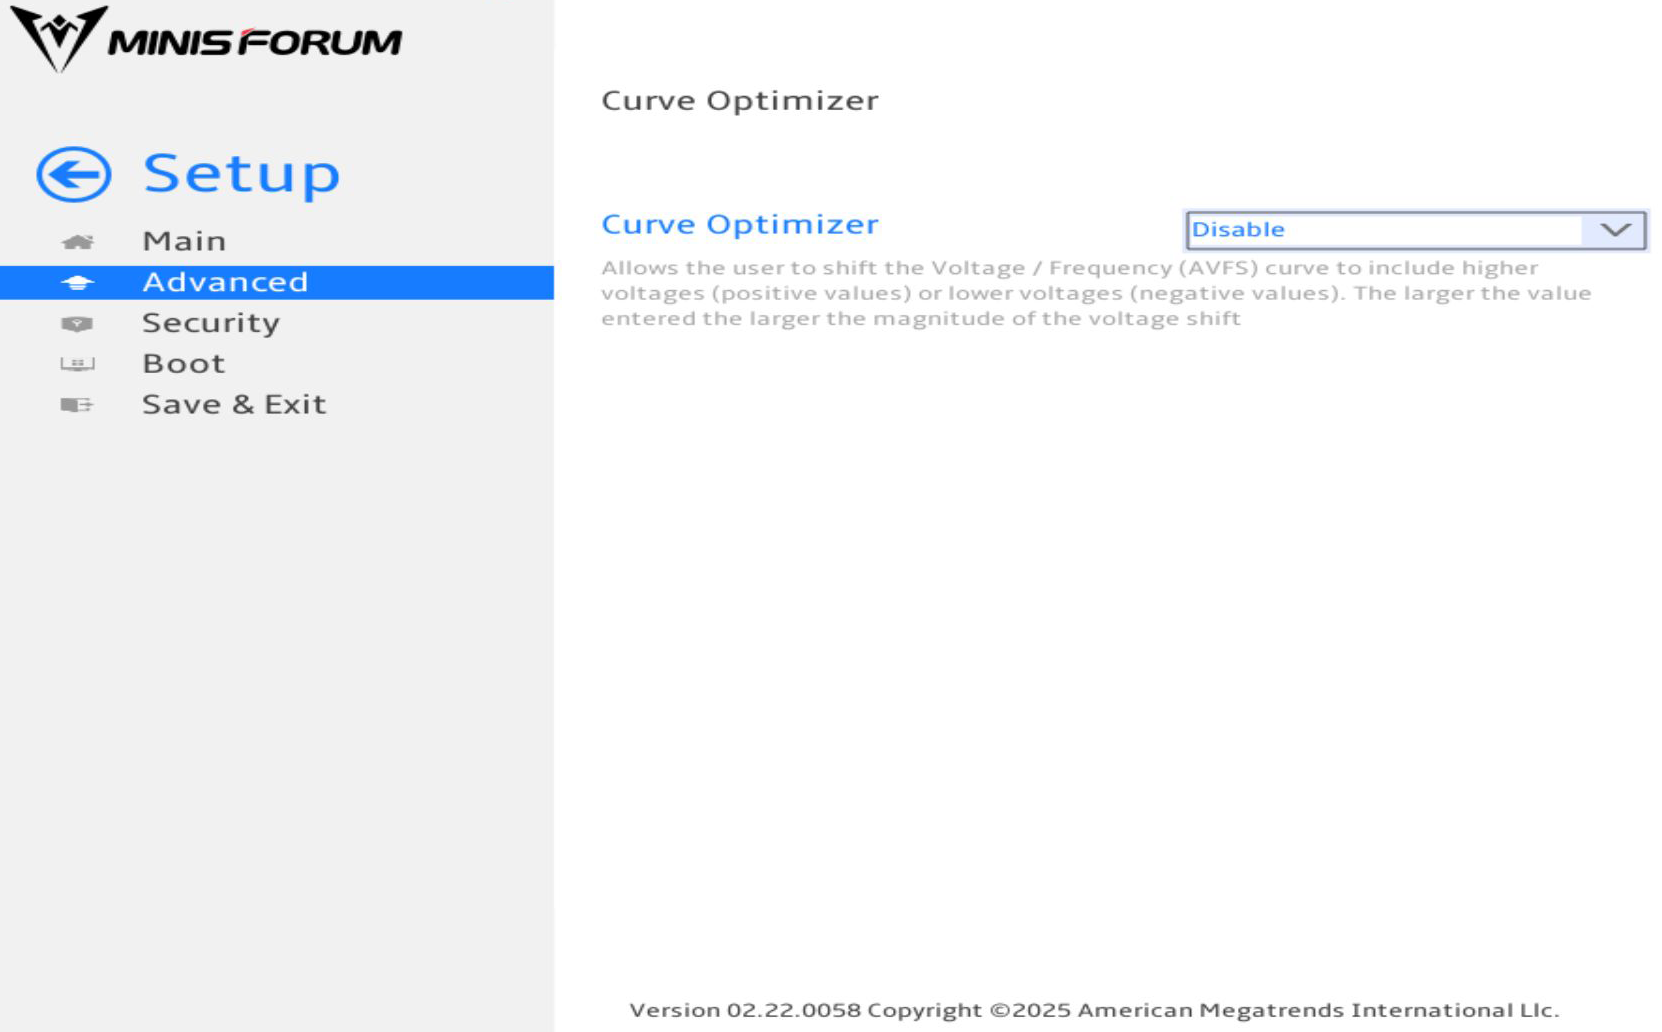
- For Curve Optimizer, you can set it to Disable, All Cores, Per Core, or Per CCD. Each option, except for disable unlocks more settings.
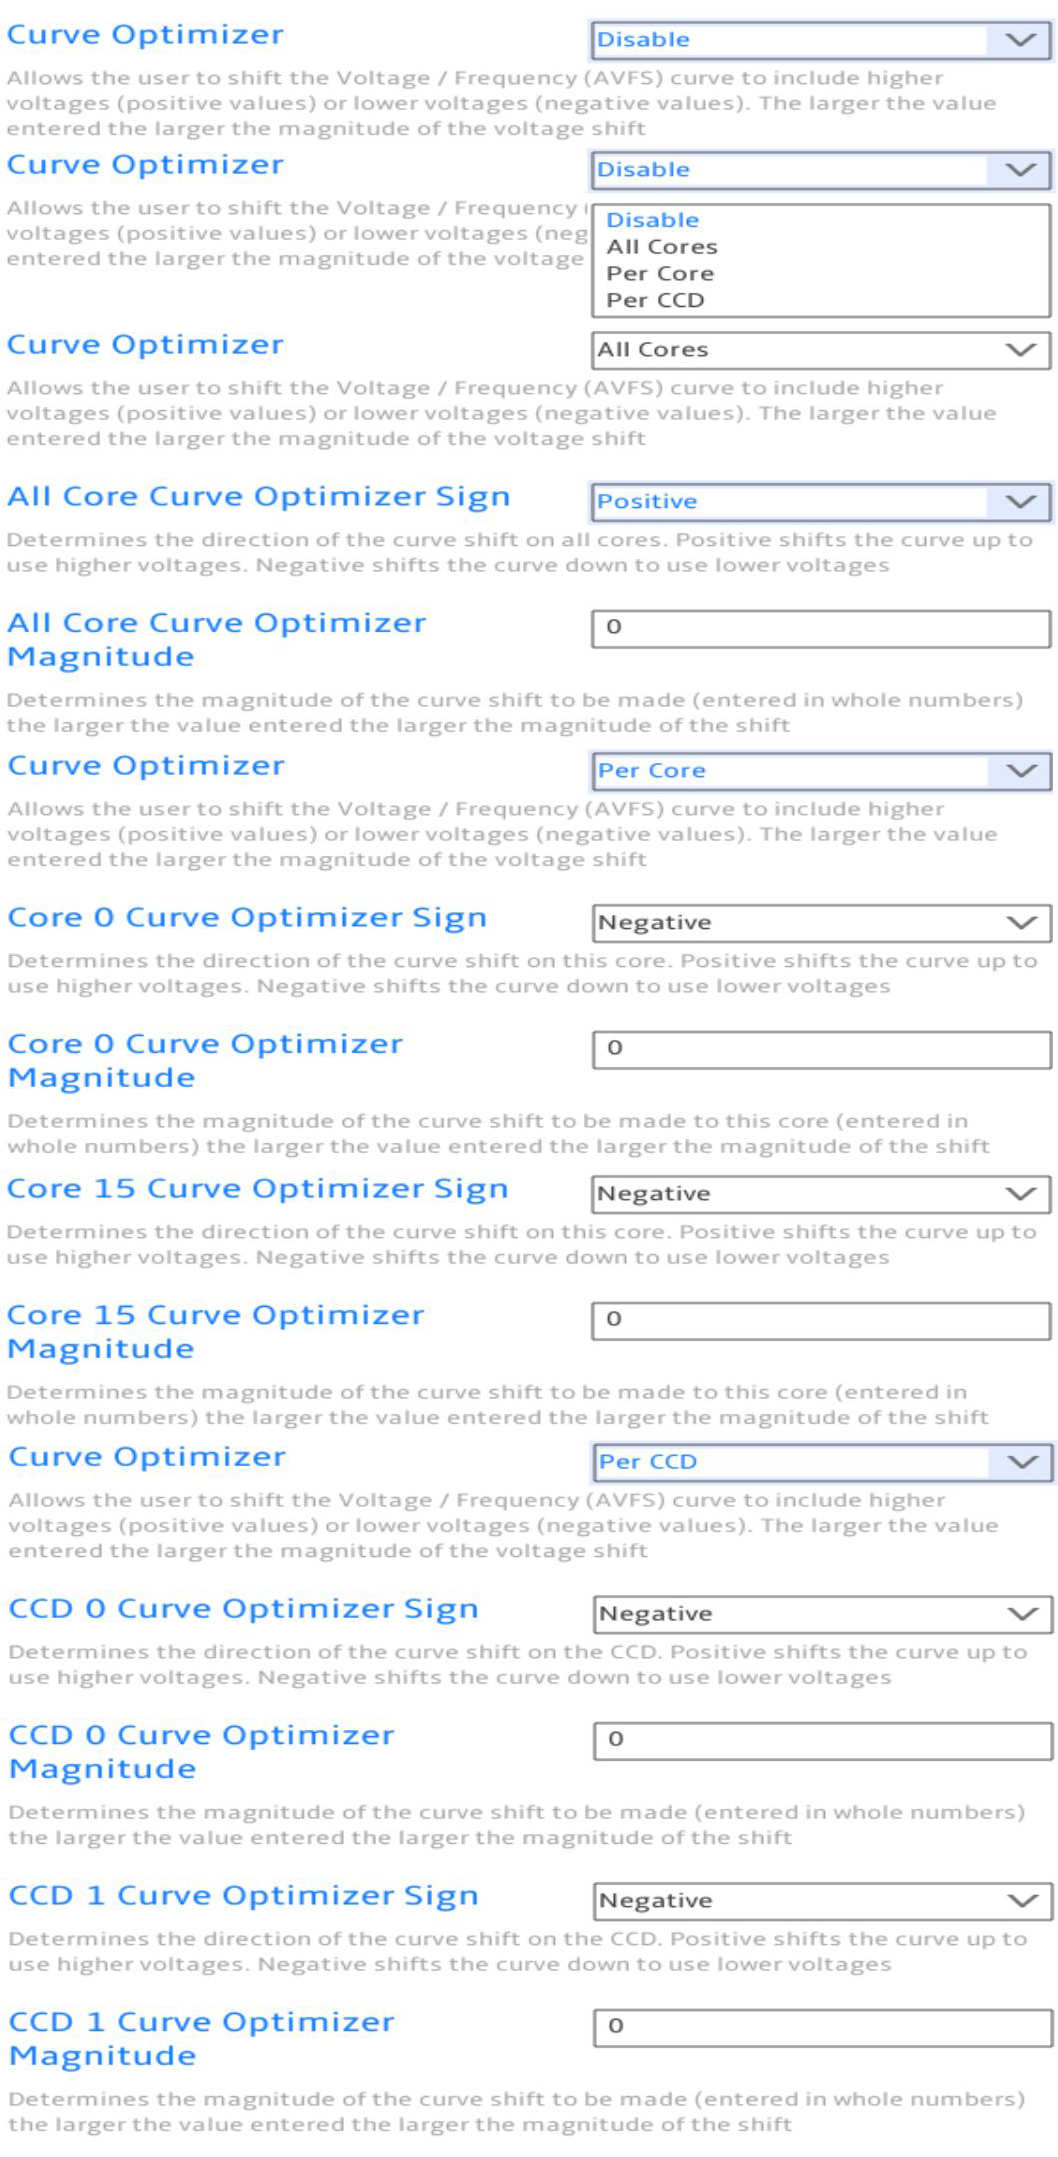
- For All Core Curve Optimizer Sign, you can set it to either Positive or Negative.
- For All Core Curve Optimizer Magnitude, you can enter a numerical value.
- For Core 0 Curve Optimizer Sign, you can set it to either Negative or Positive. (You can do this for each core individually.)
- For Core 0 Curve Optimizer Magnitude, you can enter a numerical value. (You can do this for each core individually.)
- For CCD 0 Curve Optimizer Sign, you can set it to either Negative or Positive.
- For CCD 0 Curve Optimizer Magnitude, you can enter a numerical value.
- For CCD 1 Curve Optimizer Sign, you can set it to either Negative or Positive.
- For CCD 1 Curve Optimizer Magnitude, you can enter a numerical value.
Advanced > AMD Overclocking > Precision Boost Overdrive > Curve Shaper
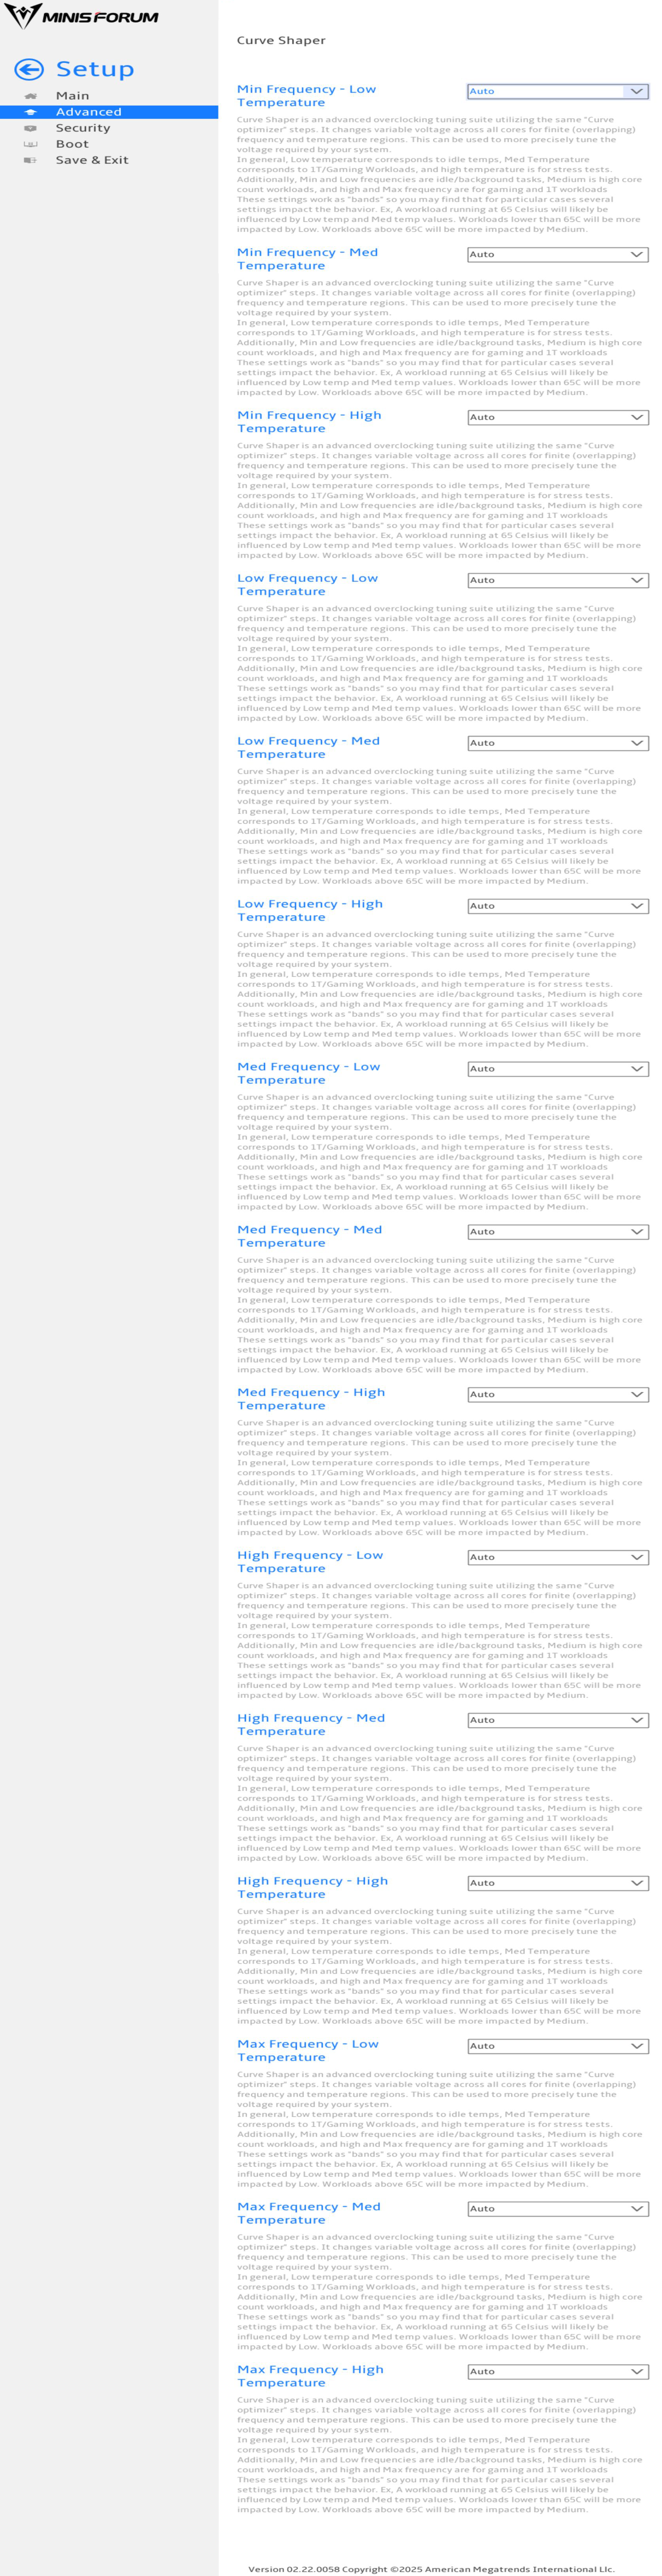
- For Min Frequency – Low Temperature, you can set it to Auto, Enable, or Disable.
- If you set it to Enable, you can set the Min Frequency – Low Temperature Sign to Positive or Negative.
- If you set it to Enable, you can also enter a number for Min Frequency – Low Temperature Magnitude.

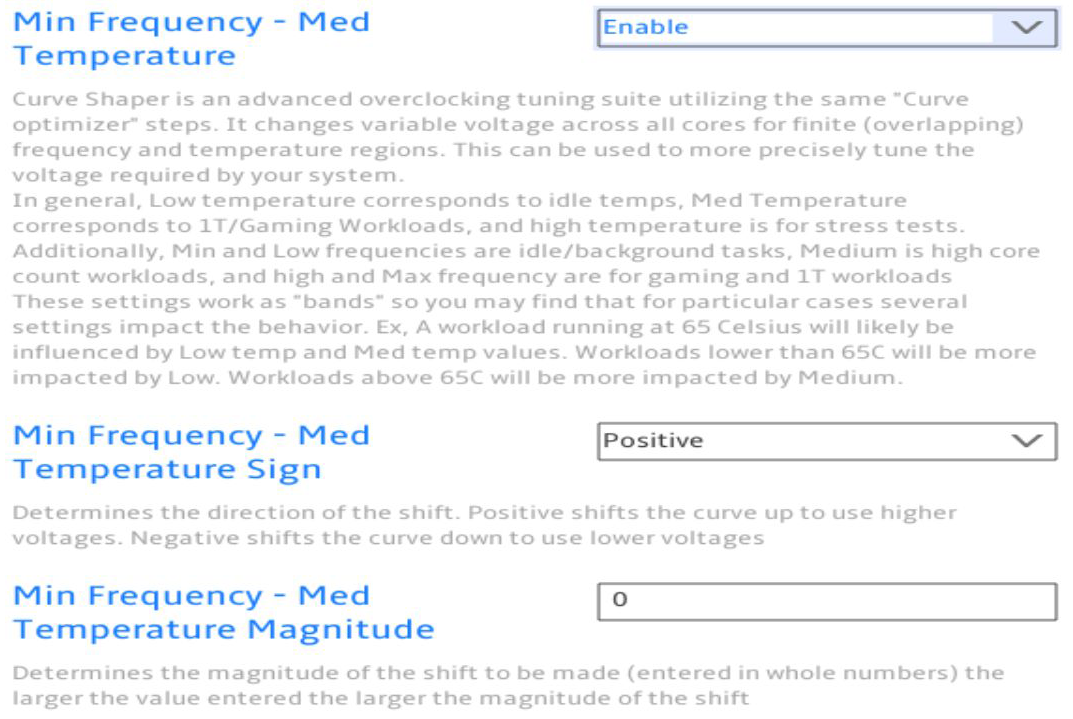
- For Min Frequency – Med Temperature, you can set it to Auto, Enable, or Disable.
- If you set it to Enable, you can set the Min Frequency – Med Temperature Sign to Positive or Negative.
- If you set it to Enable, you can also enter a number for Min Frequency – Med Temperature Magnitude.
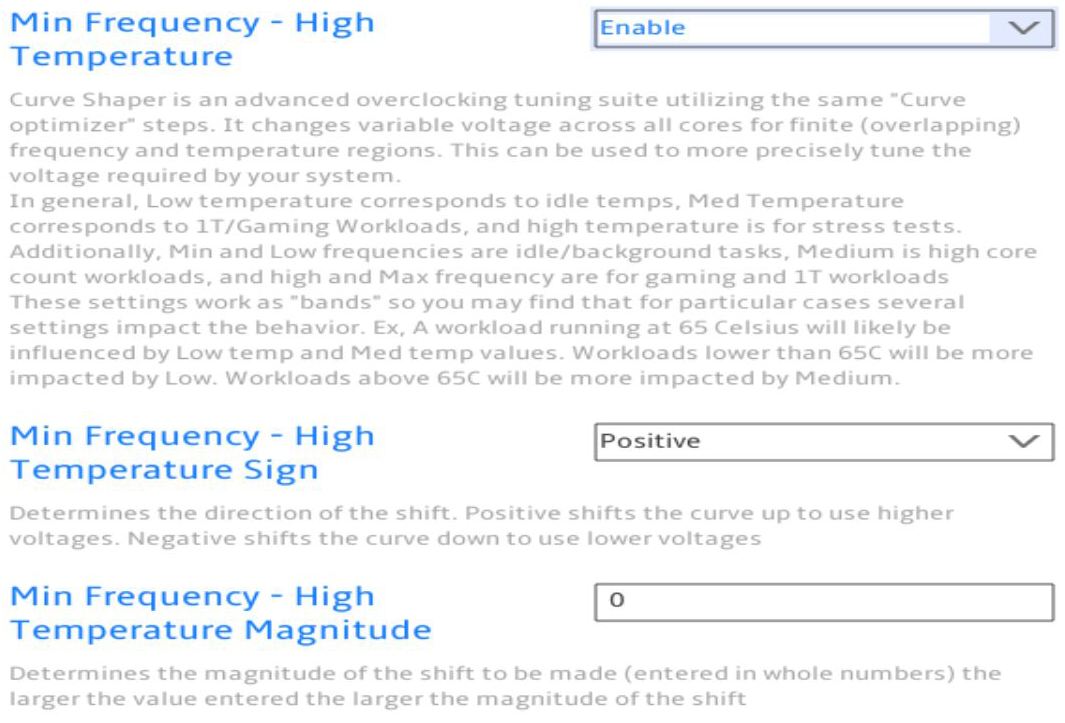
- For Min Frequency – High Temperature, you can set it to Auto, Enable, or Disable.
- If you set it to Enable, you can set the Min Frequency – High Temperature Sign to Positive or Negative.
- If you set it to Enable, you can also enter a number for Min Frequency – High Temperature Magnitude.
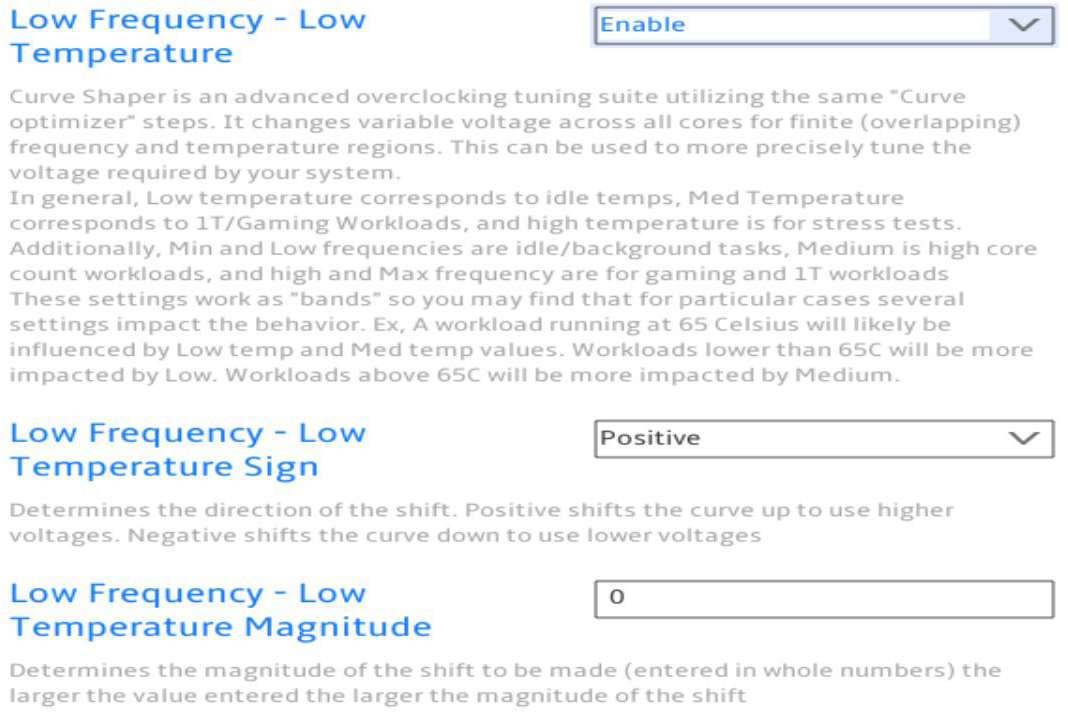
- For Low Frequency – Low Temperature, you can set it to Auto, Enable, or Disable.
- If you set it to Enable, you can set the Low Frequency – Low Temperature Sign to Positive or Negative.
- If you set it to Enable, you can also enter a number for Low Frequency – Low Temperature Magnitude.
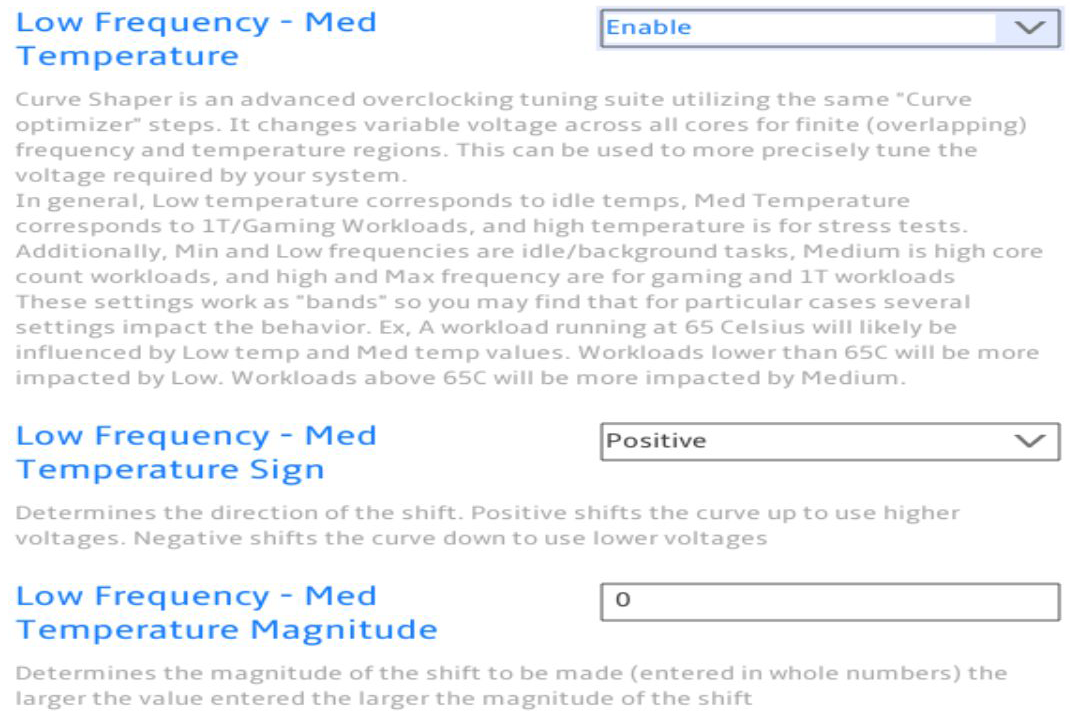
- For Low Frequency – Med Temperature, you can set it to Auto, Enable, or Disable.
- If you set it to Enable, you can set the Low Frequency – Med Temperature Sign to Positive or Negative.
- If you set it to Enable, you can also enter a number for Low Frequency – Med Temperature Magnitude.
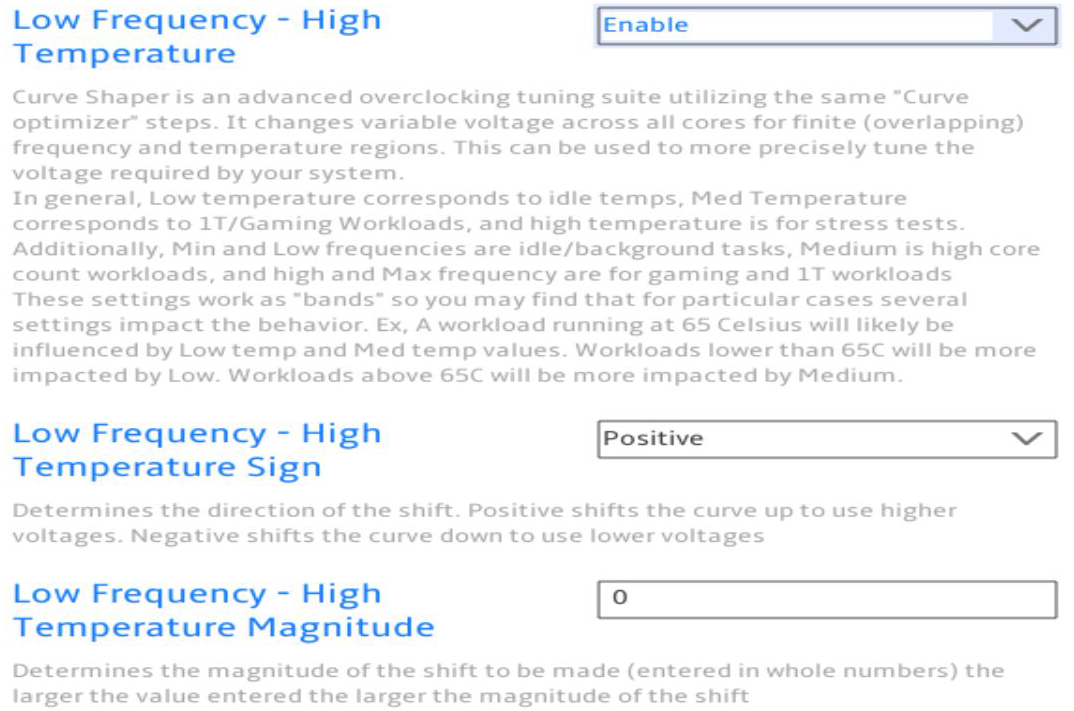
- For Low Frequency – High Temperature, you can set it to Auto, Enable, or Disable.
- If you set it to Enable, you can set the Low Frequency – High Temperature Sign to Positive or Negative.
- If you set it to Enable, you can also enter a number for Low Frequency – High Temperature Magnitude.
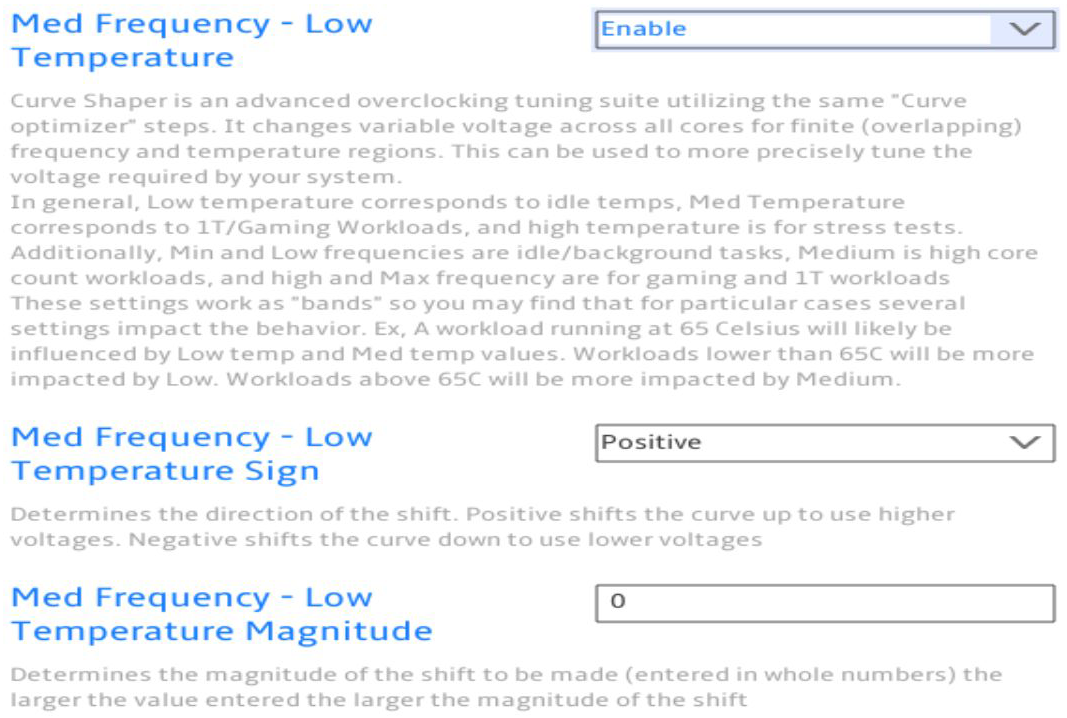
- For Med Frequency – Low Temperature, you can set it to Auto, Enable, or Disable.
- If you set it to Enable, you can set the Med Frequency – Low Temperature Sign to Positive or Negative.
- If you set it to Enable, you can also enter a number for Med Frequency – Low Temperature Magnitude.
- For Med Frequency – Med Temperature, you can set it to Auto, Enable, or Disable.
- If you set it to Enable, you can set the Med Frequency – Med Temperature Sign to Positive or Negative.
- If you set it to Enable, you can also enter a number for Med Frequency – Med Temperature Magnitude.

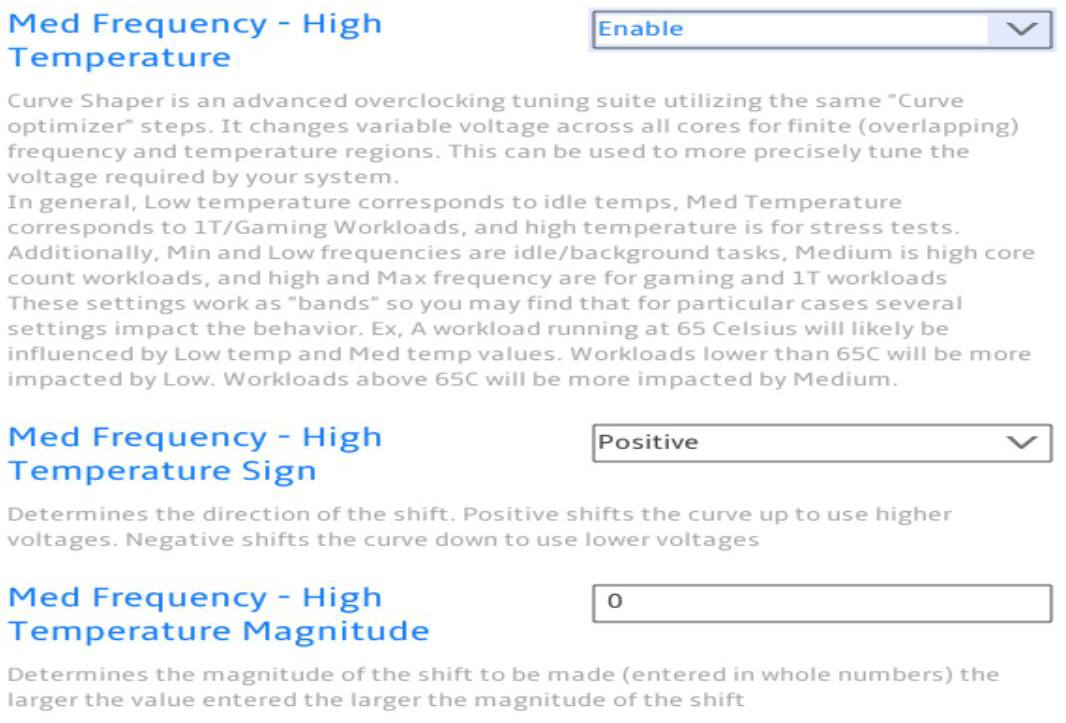
- For Med Frequency – High Temperature, you can set it to Auto, Enable, or Disable.
- If you set it to Enable, you can set the Med Frequency – High Temperature Sign to Positive or Negative.
- If you set it to Enable, you can also enter a number for Med Frequency – High Temperature Magnitude.
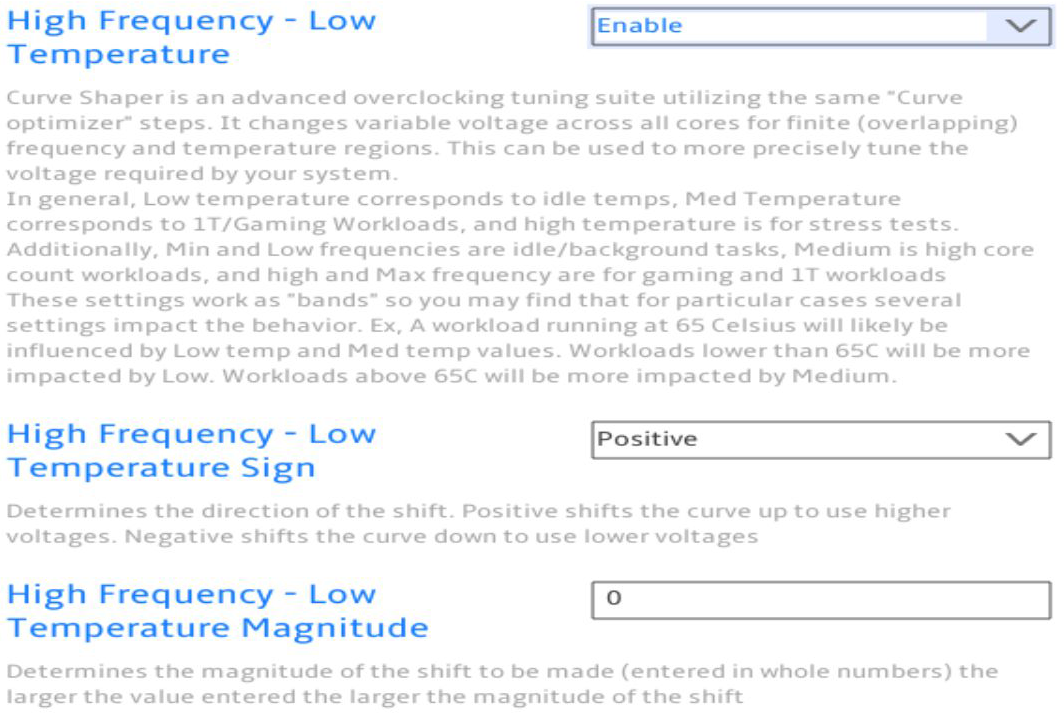
- For High Frequency – Low Temperature, you can set it to Auto, Enable, or Disable.
- If you set it to Enable, you can set the High Frequency – Low Temperature Sign to Positive or Negative.
- If you set it to Enable, you can also enter a number for High Frequency – Low Temperature Magnitude.
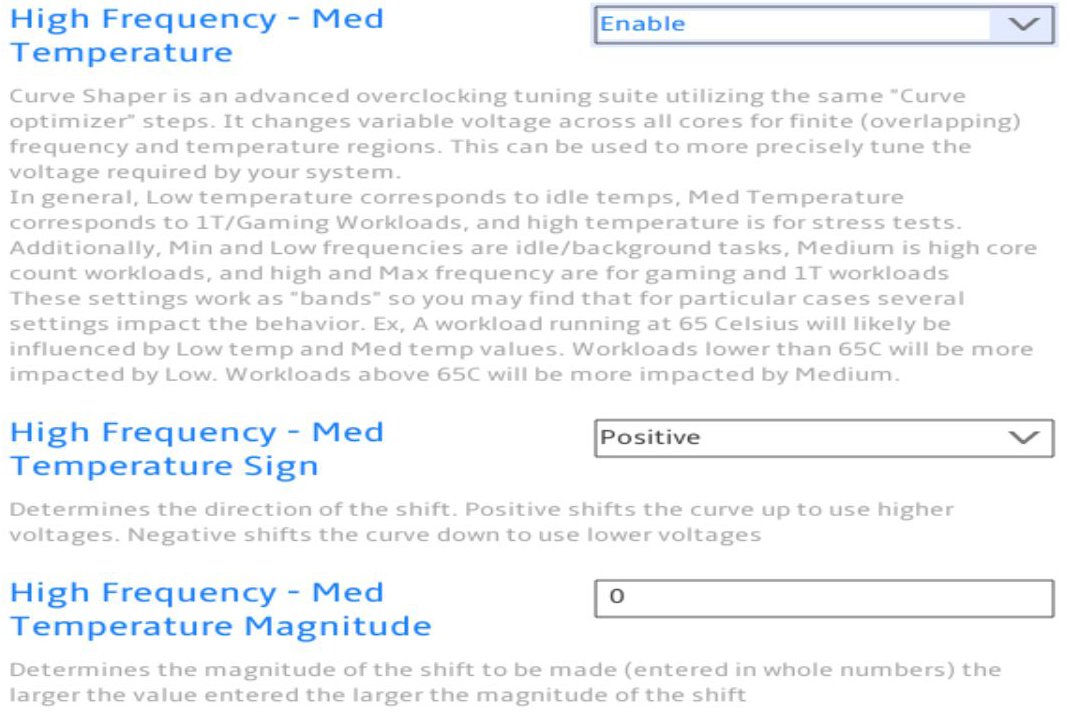
- For High Frequency – Med Temperature, you can set it to Auto, Enable, or Disable.
- If you set it to Enable, you can set the High Frequency – Med Temperature Sign to Positive or Negative.
- If you set it to Enable, you can also enter a number for High Frequency – Med Temperature Magnitude.
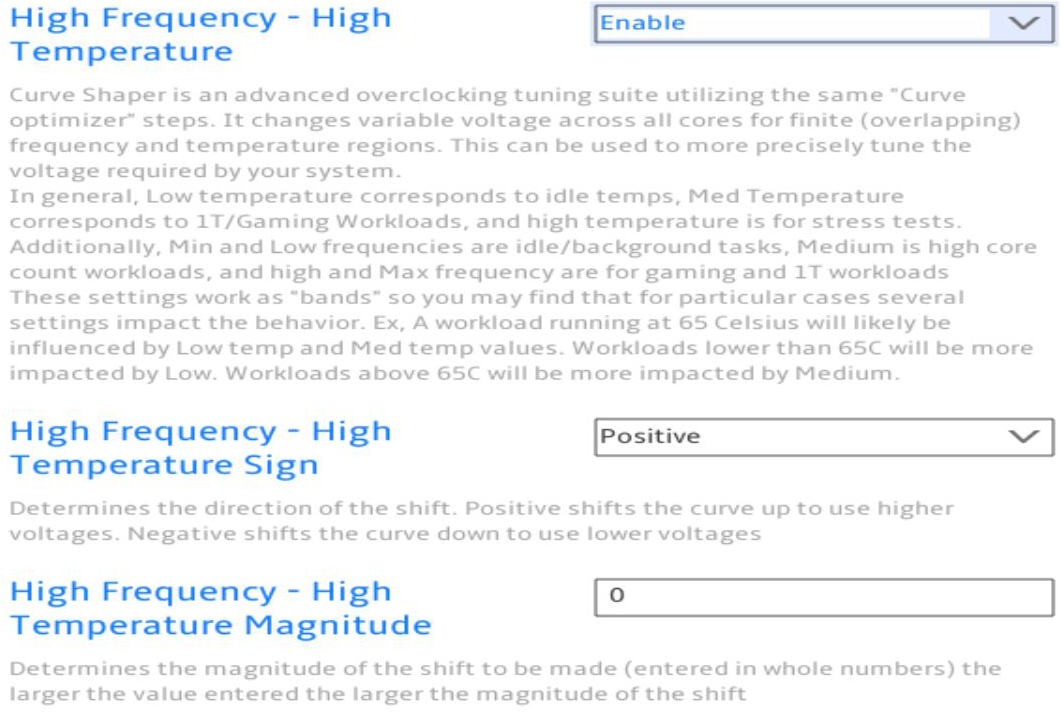
- For High Frequency – High Temperature, you can set it to Auto, Enable, or Disable.
- If you set it to Enable, you can set the High Frequency – High Temperature Sign to Positive or Negative.
- If you set it to Enable, you can also enter a number for High Frequency – High Temperature Magnitude.
- For Max Frequency – Low Temperature, you can set it to Auto, Enable, or Disable.
- If you set it to Enable, you can set the Max Frequency – Low Temperature Sign to Positive or Negative.
- If you set it to Enable, you can also enter a number for Max Frequency – Low Temperature Magnitude.

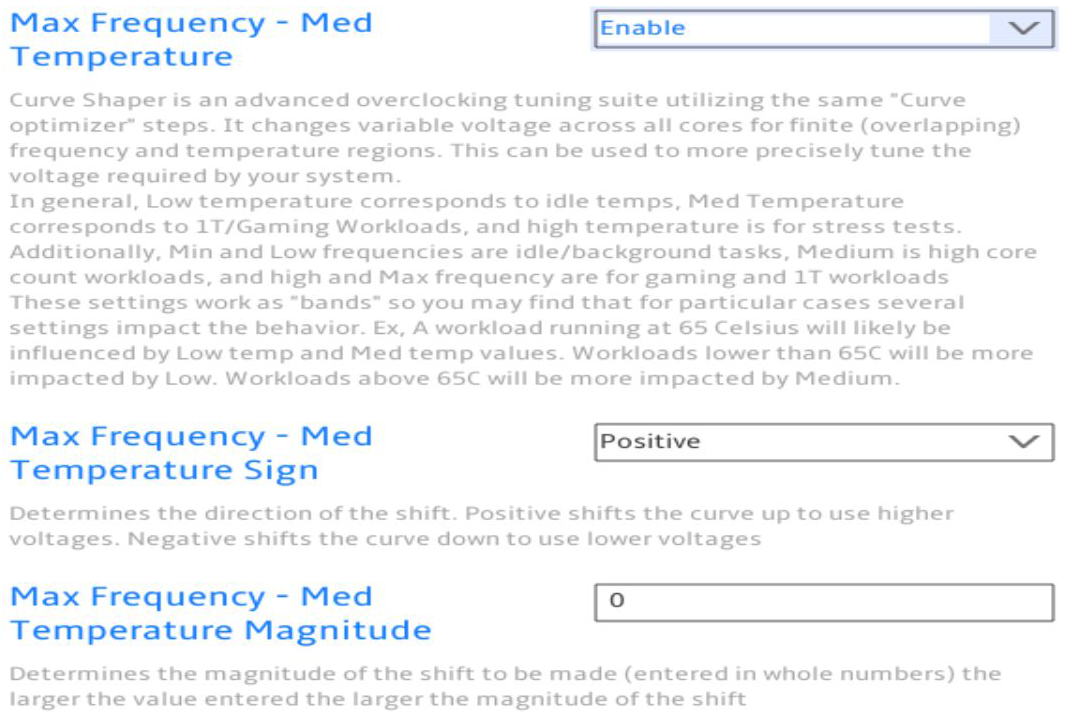
- For Max Frequency – Med Temperature, you can set it to Auto, Enable, or Disable.
- If you set it to Enable, you can set the Max Frequency – Med Temperature Sign to Positive or Negative.
- If you set it to Enable, you can also enter a number for Max Frequency – Med Temperature Magnitude.
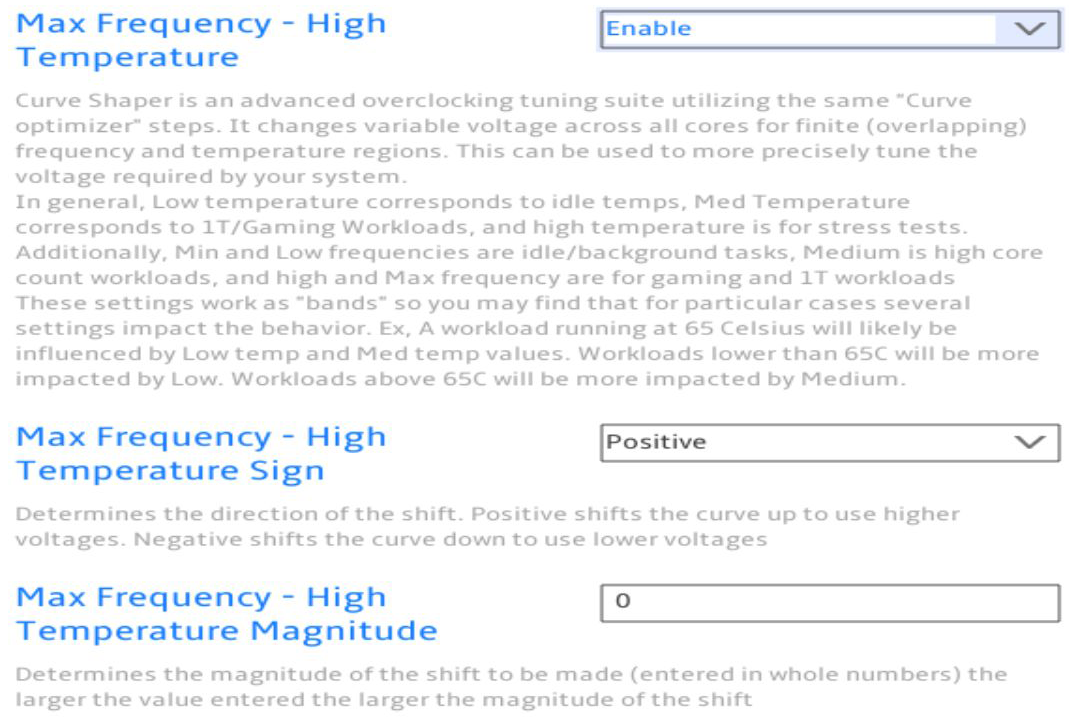
- For Max Frequency – High Temperature, you can set it to Auto, Enable, or Disable.
- If you set it to Enable, you can set the Max Frequency – High Temperature Sign to Positive or Negative.
- If you set it to Enable, you can also enter a number for Max Frequency – High Temperature Magnitude.
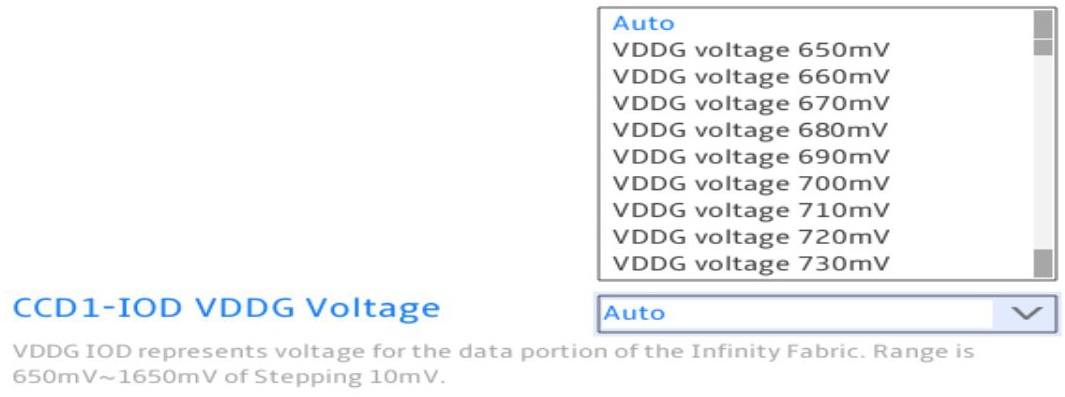
Advanced > AMD Overclocking > VDDG Voltage Control
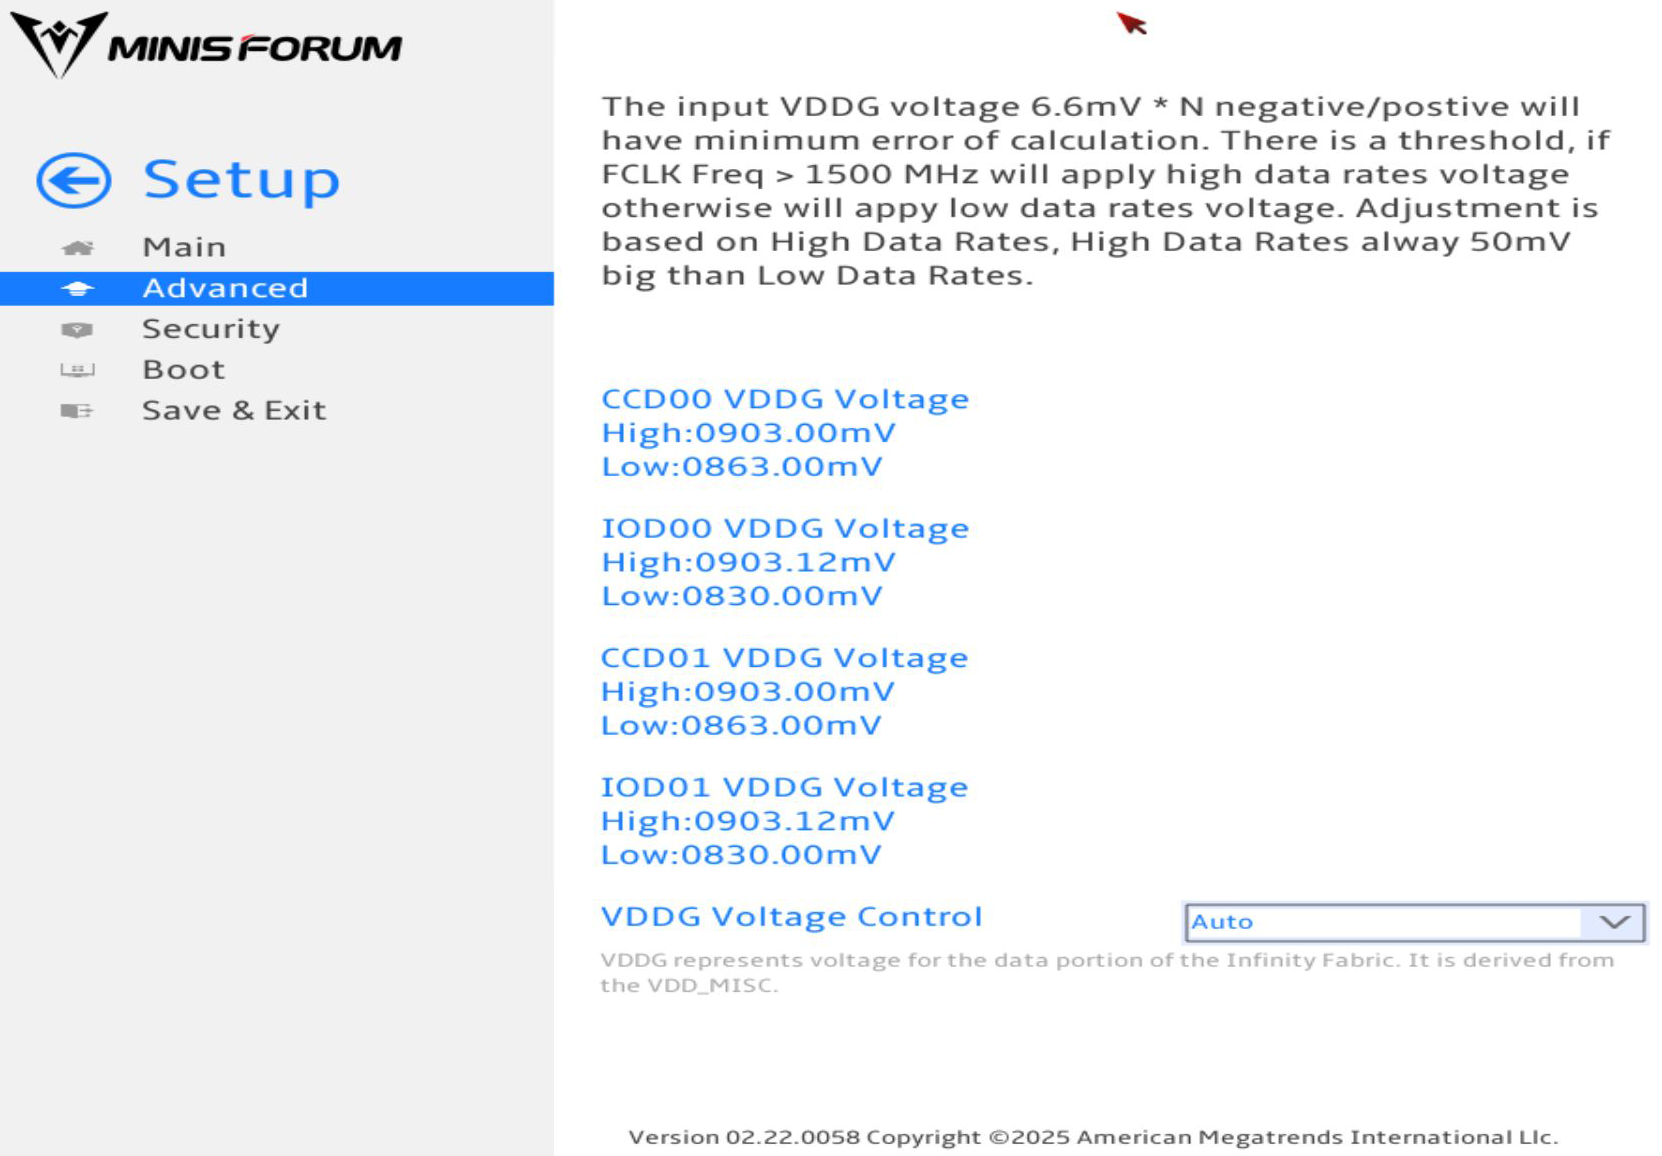
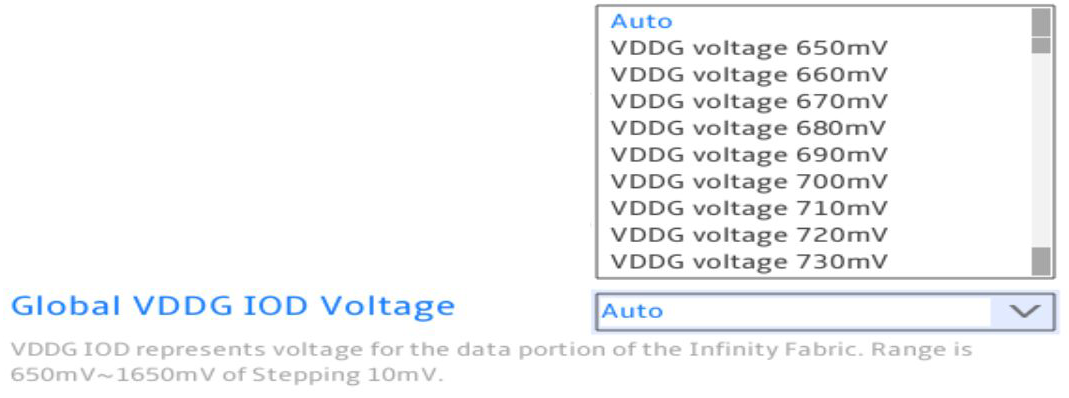
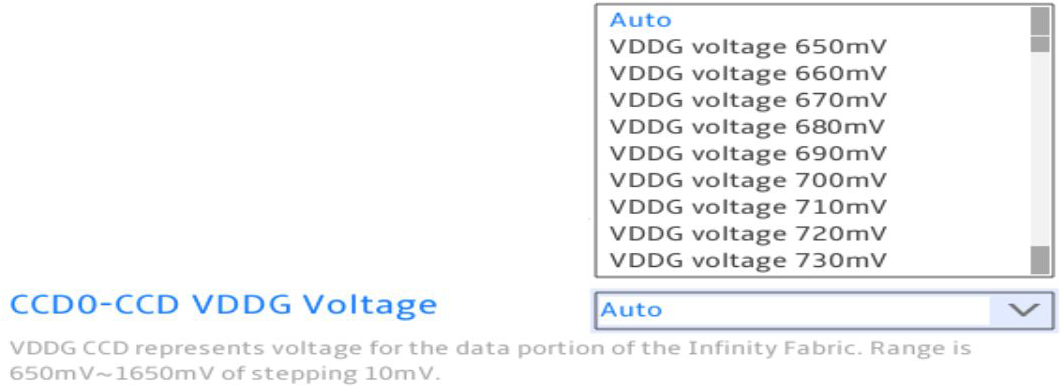
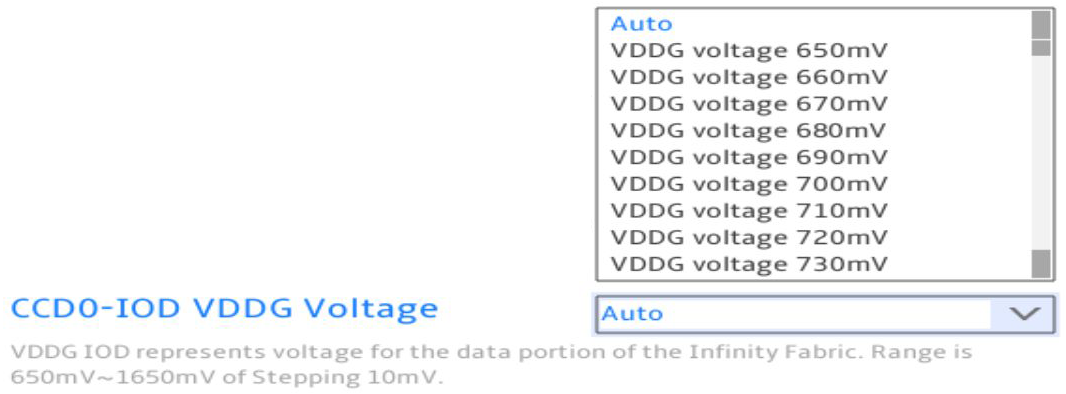
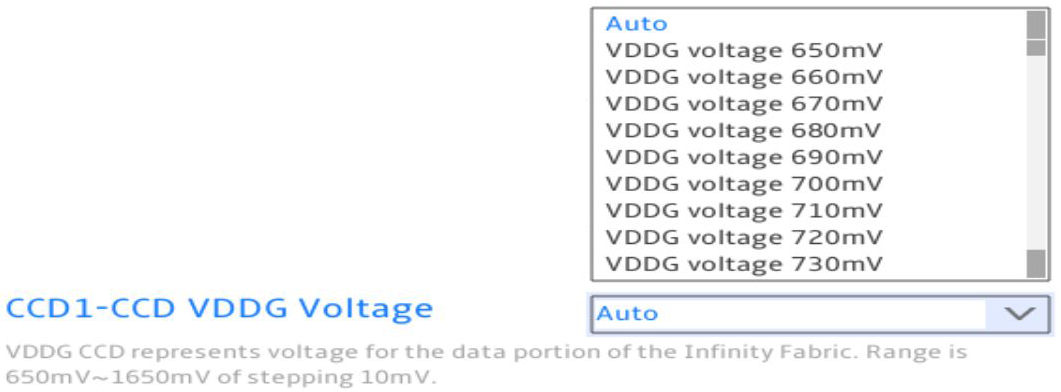
- For VDDG Voltage Control, you can set it to Auto, Global VDDG Voltage Control, or Per-CCD VDDG Voltage Control. If you set it to Global VDDG Voltage Control or Per-CCD Voltage Control, you unlock more options.
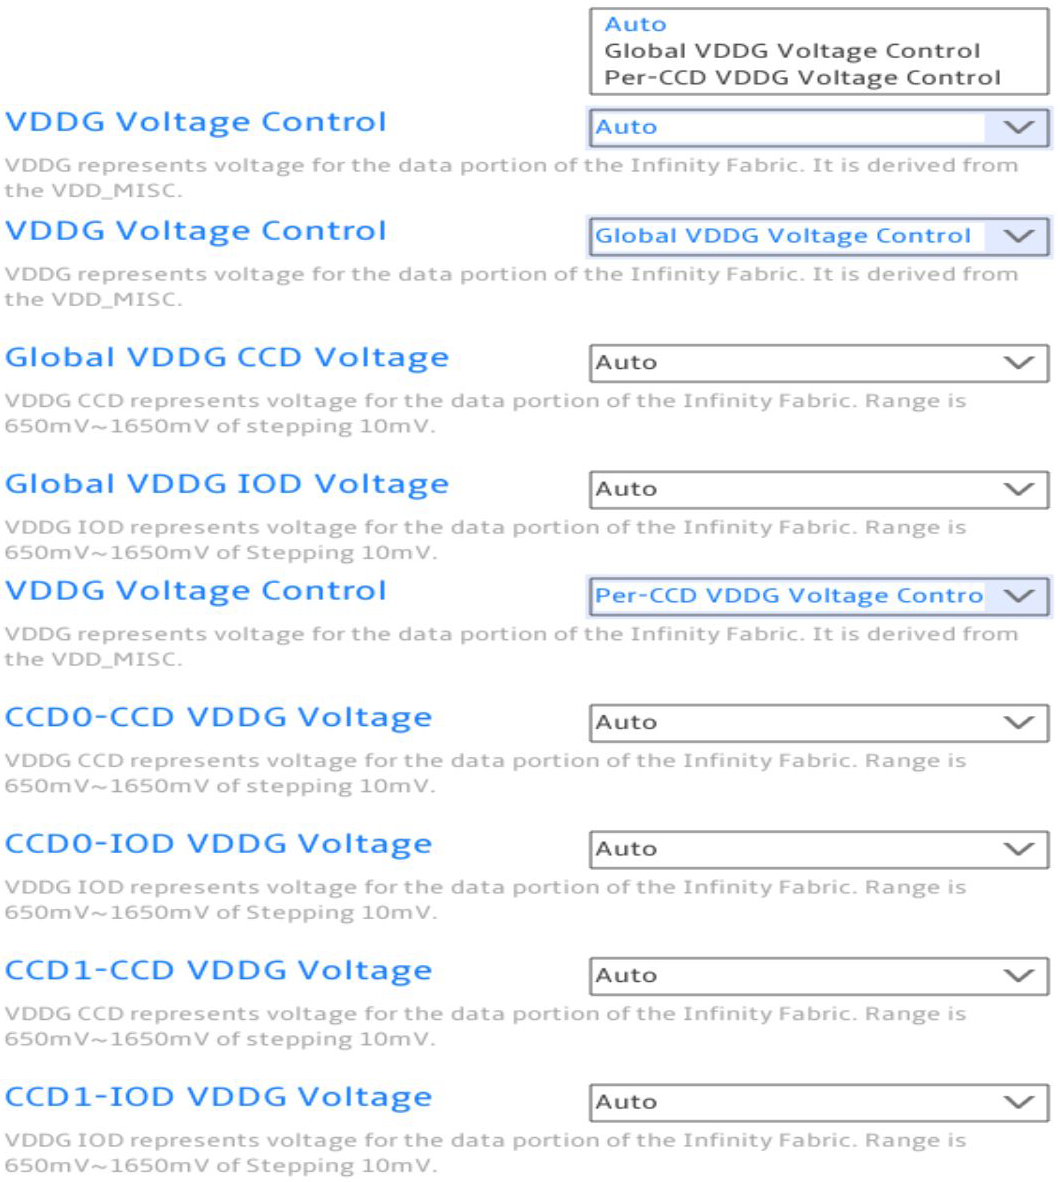
- For Global VDDG CCD Voltage, you can set it to Auto or a predefined value.

- For Global VDDG IOD Voltage, you can set it to Auto or a predefined value.
- For CCD0-CCD VDDG Voltage, you can set it to Auto or a predefined value.
- For CCD0-IOD VDDG Voltage, you can set it to Auto or a predefined value.
- For CCD1-CCD VDDG Voltage, you can set it to Auto or a predefined value.
- For CCD1-IOD VDDG Voltage, you can set it to Auto or a predefined value.
Advanced > AMD Overclocking > VDDP Voltage Control
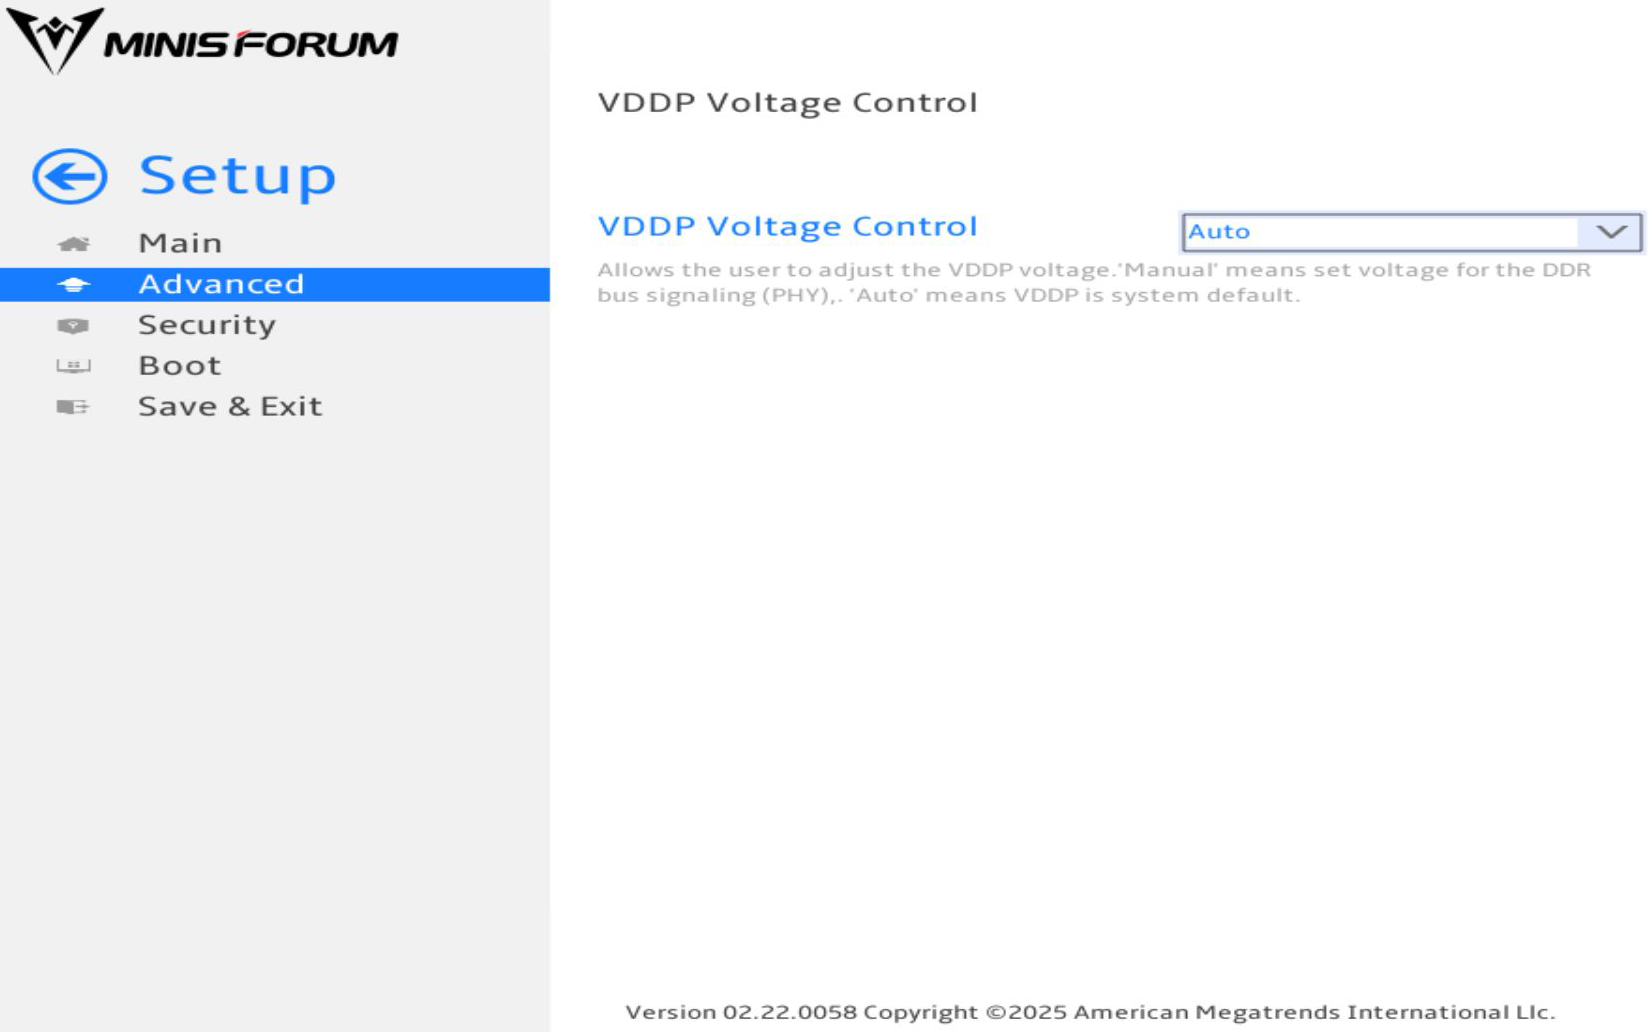
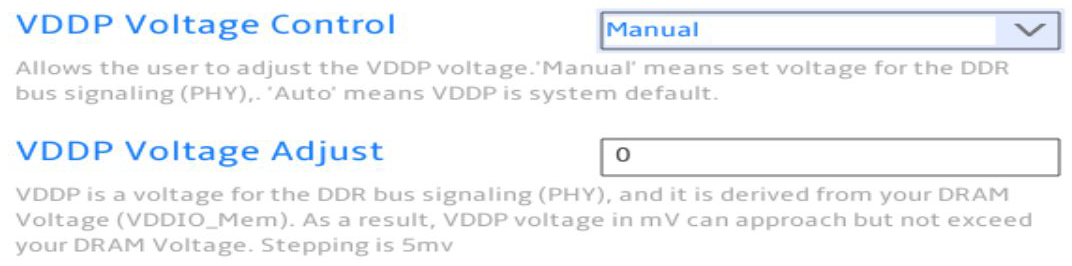
- For VDDP Voltage Control, you can set it to Auto or Manual.
- If you set it to manual, you can enter a number for VDDP Voltage Adjust.
Advanced > AMD Overclocking > SoC/Uncore OC Mode
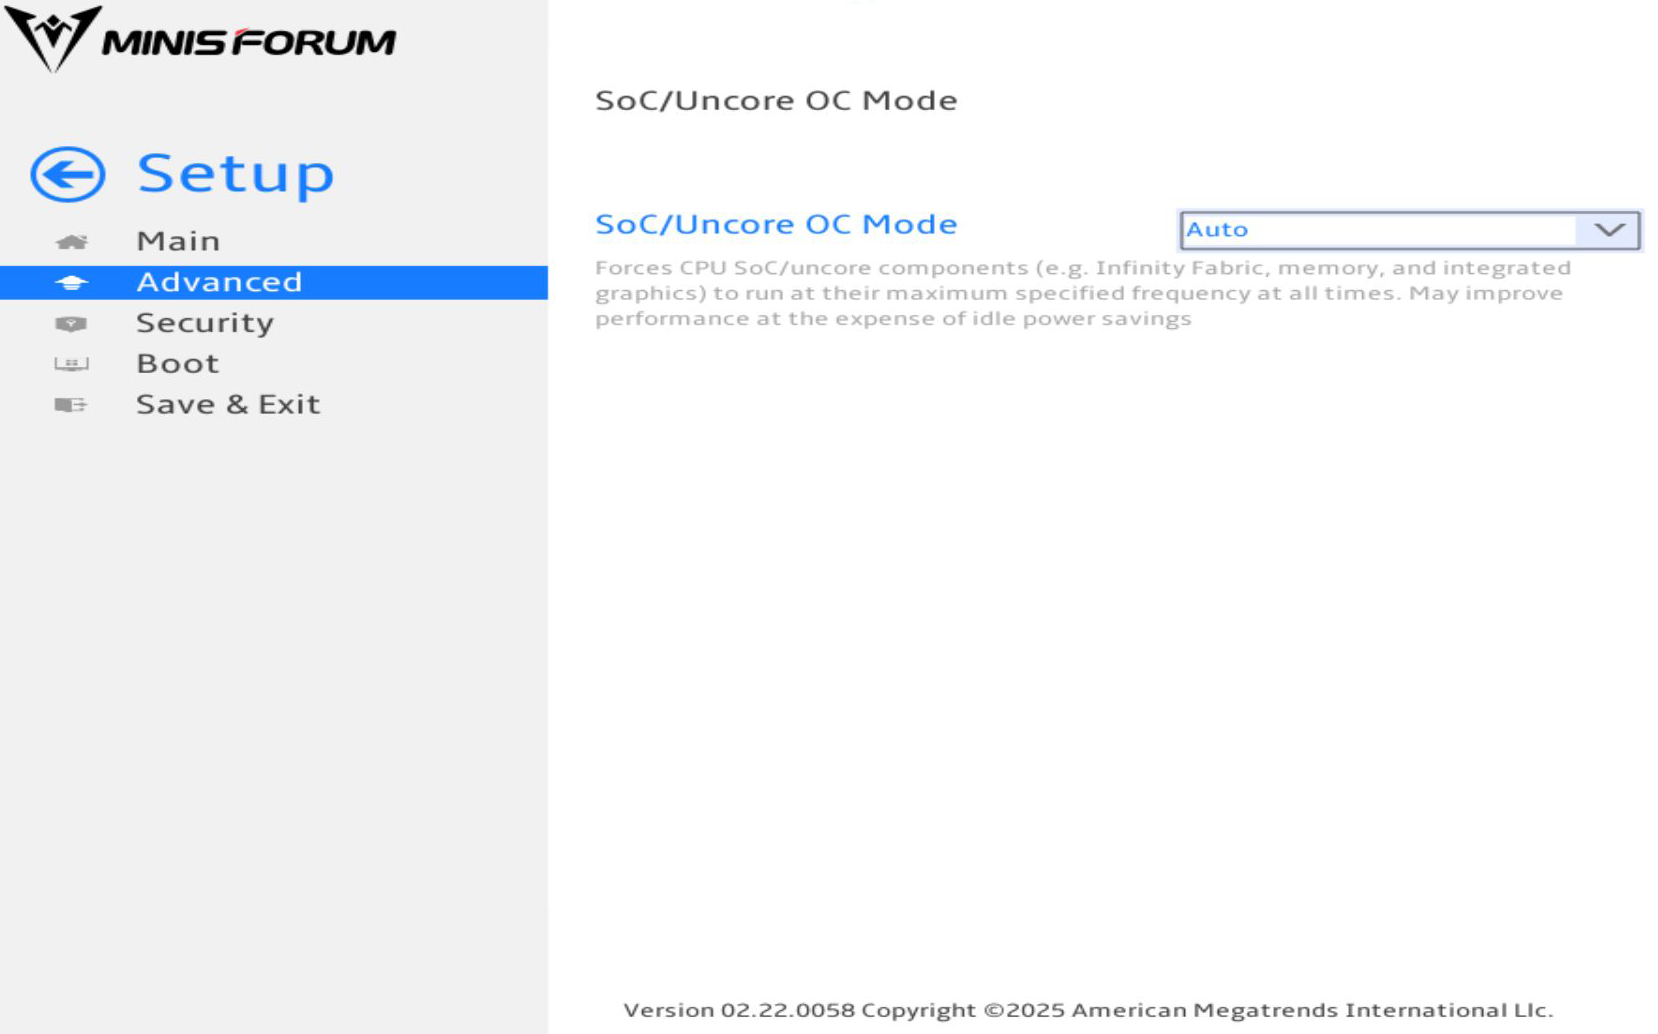
- For SoC/Uncore OC Mode, you can set it to Auto, Enabled, or Disabled.
Advanced > AMD Overclocking > SoC Voltage
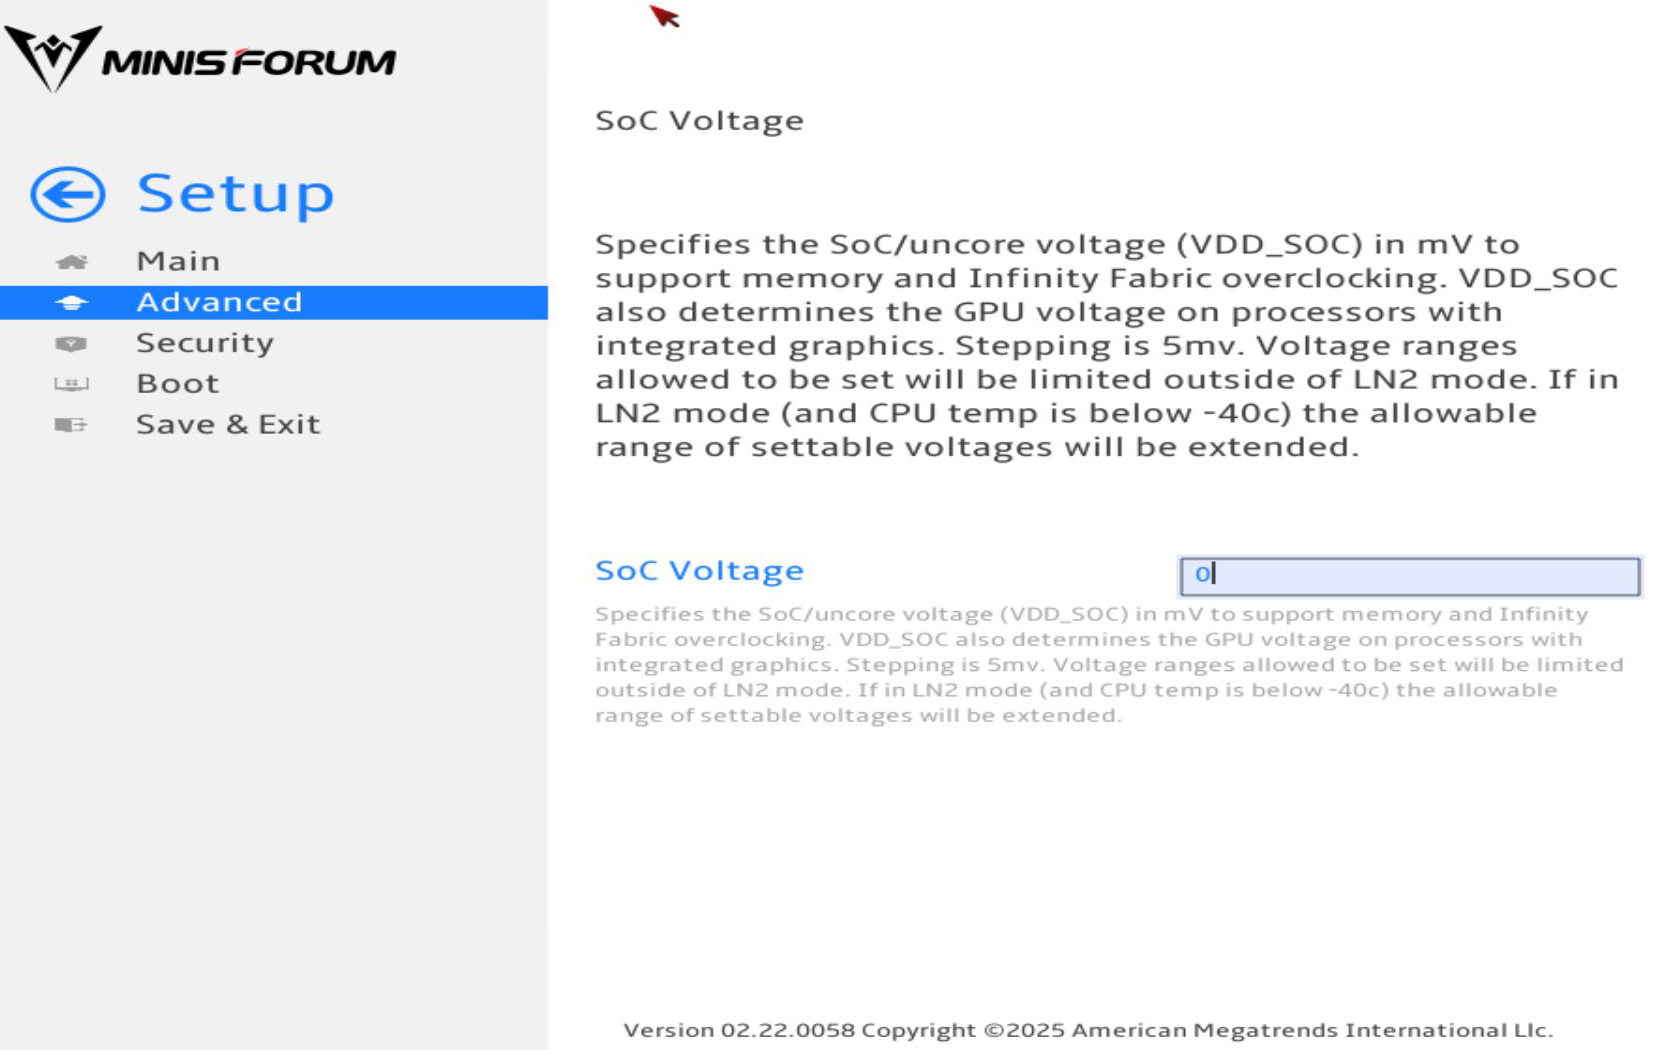
- For SoC Voltage, you can enter a number.
Advanced > AMD Overclocking > VDD Misc
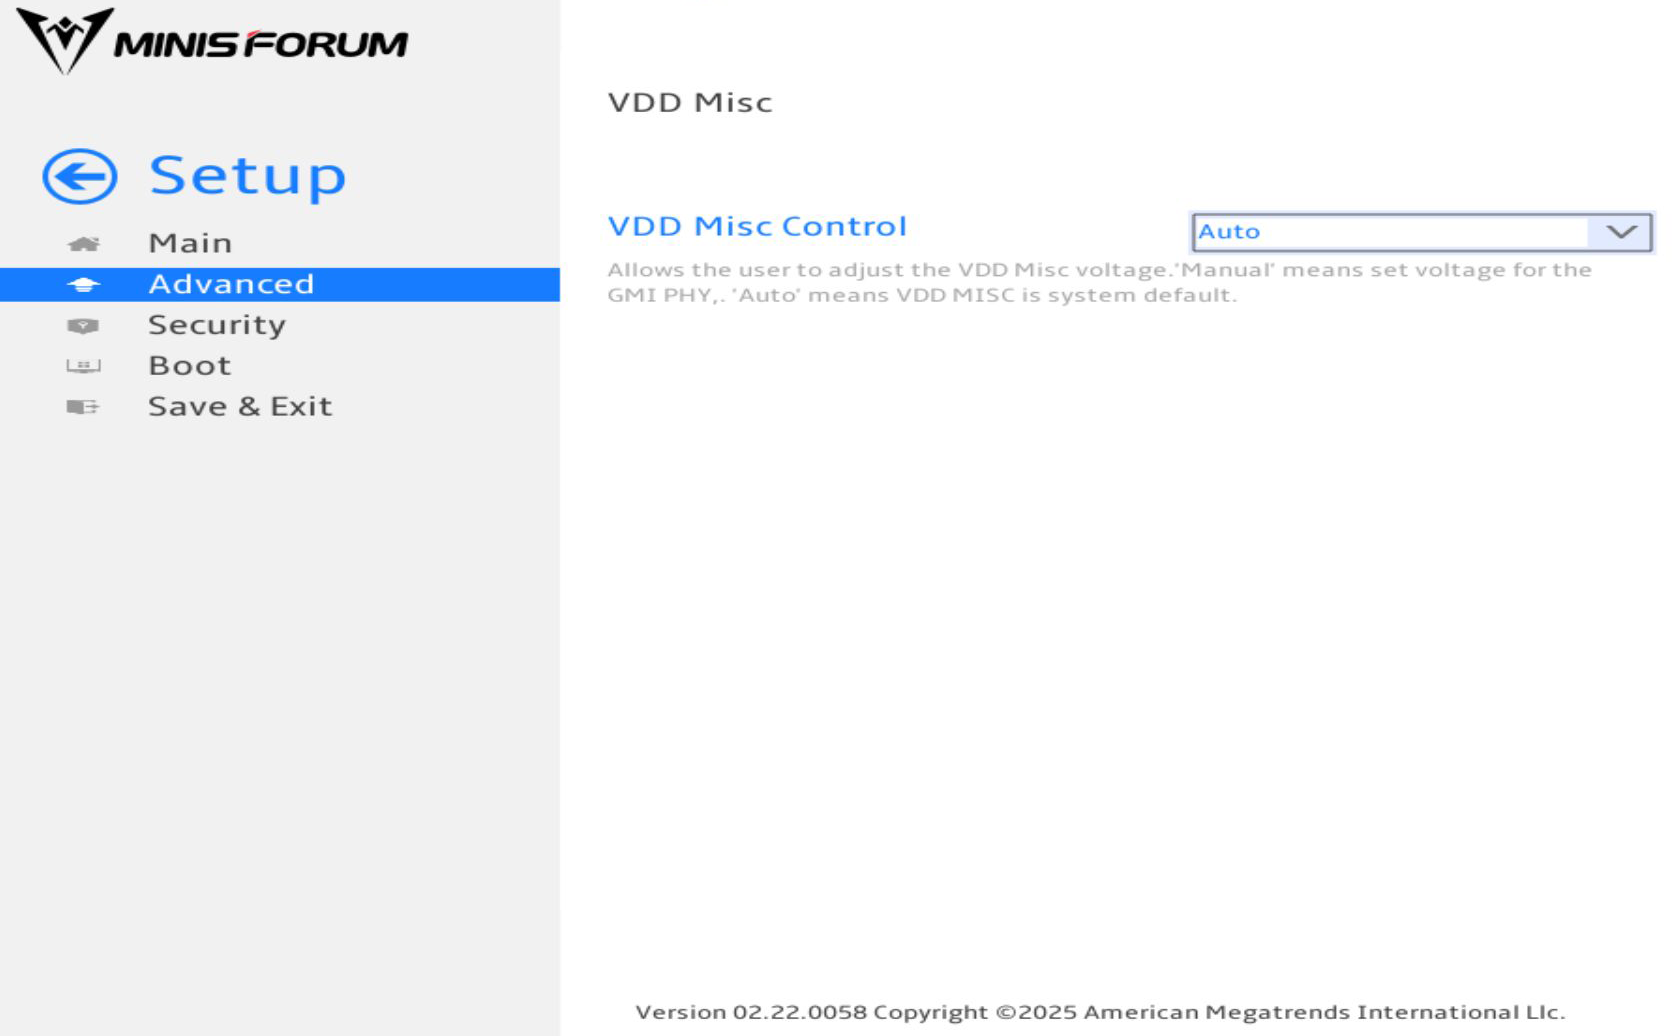
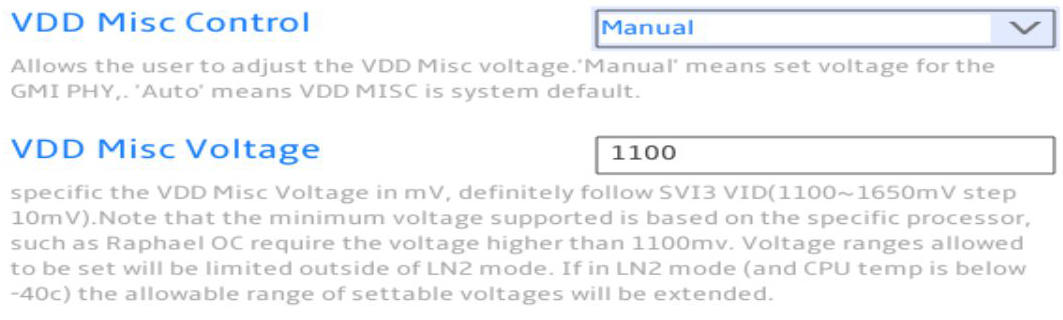
- For VDD Misc Control, you can set it to Auto or Manual.
- If you set it to manual, you can also define a number for VDD Misc Voltage.
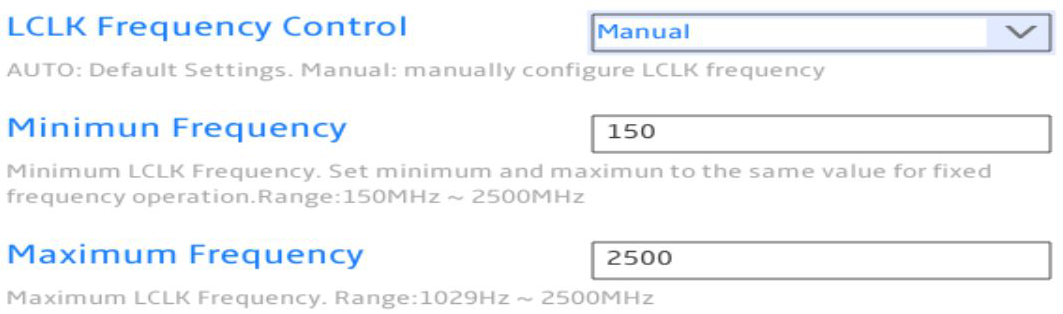
Advanced > AMD Overclocking > LCLK Frequency Control
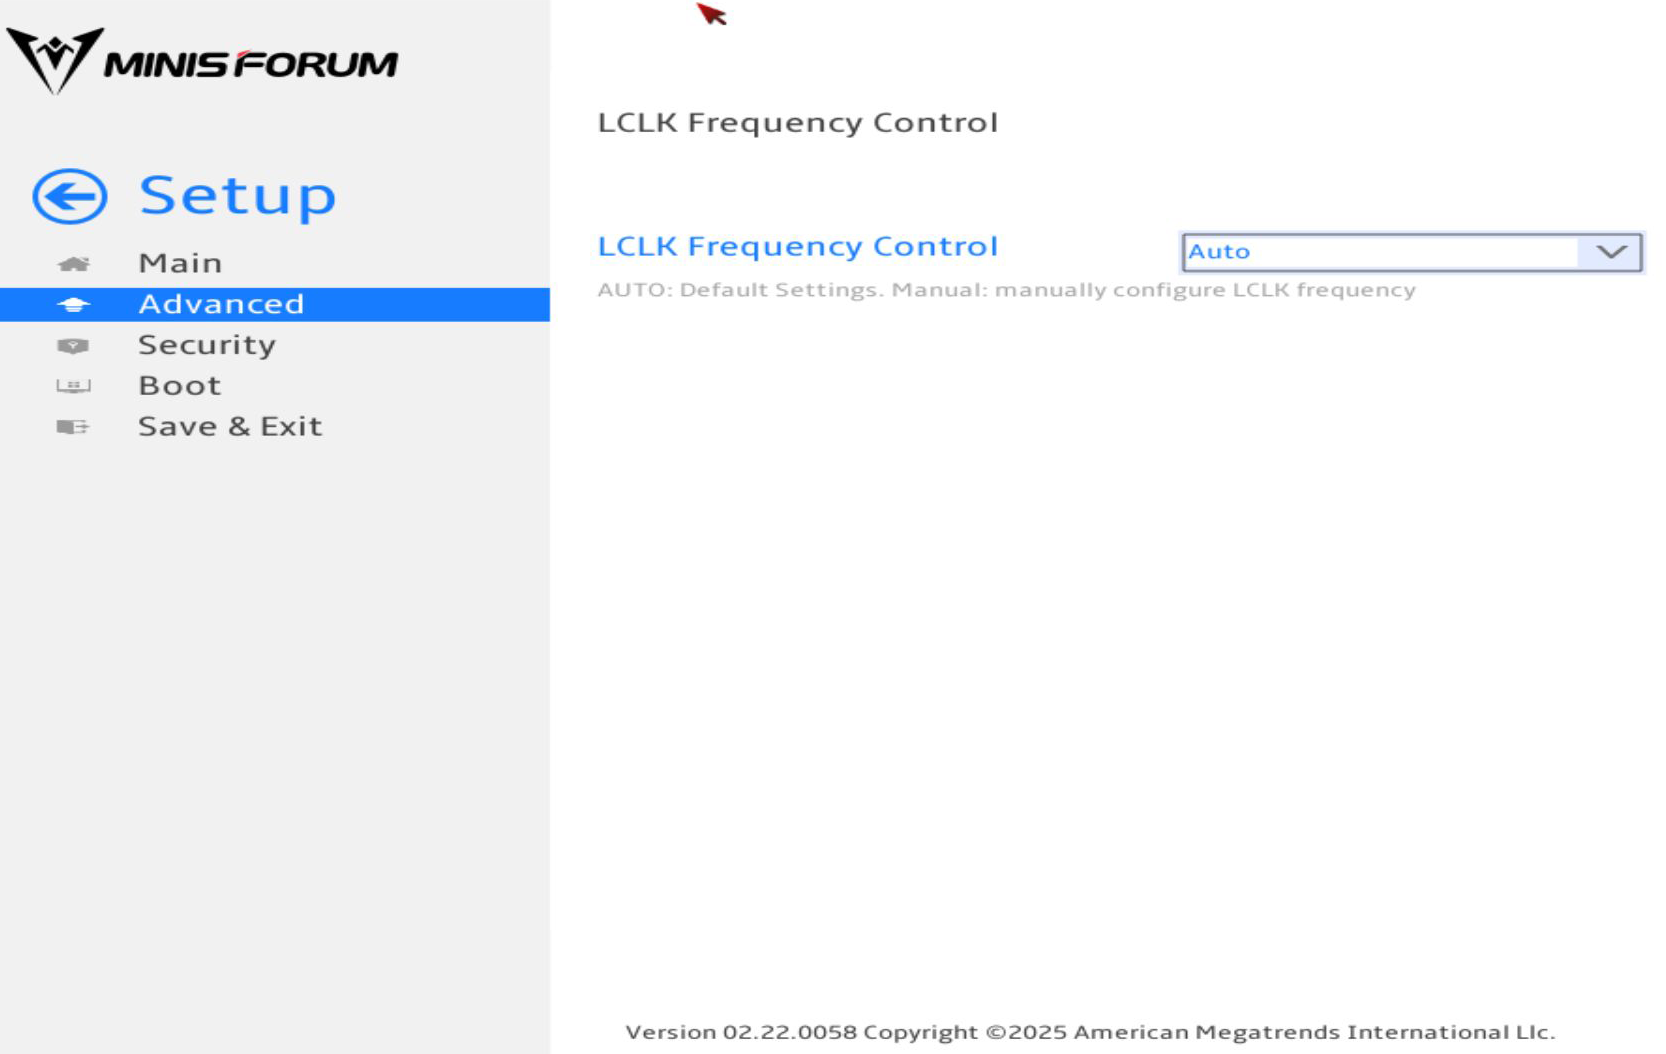
- For LCLK Frequency Control, you can set it to Auto or Manual.
- If you set it to manual, you can also define the numbers for Minimum Frequency and Maximum Frequency.
Advanced > AMD Overclocking > Onboard Voltage Control
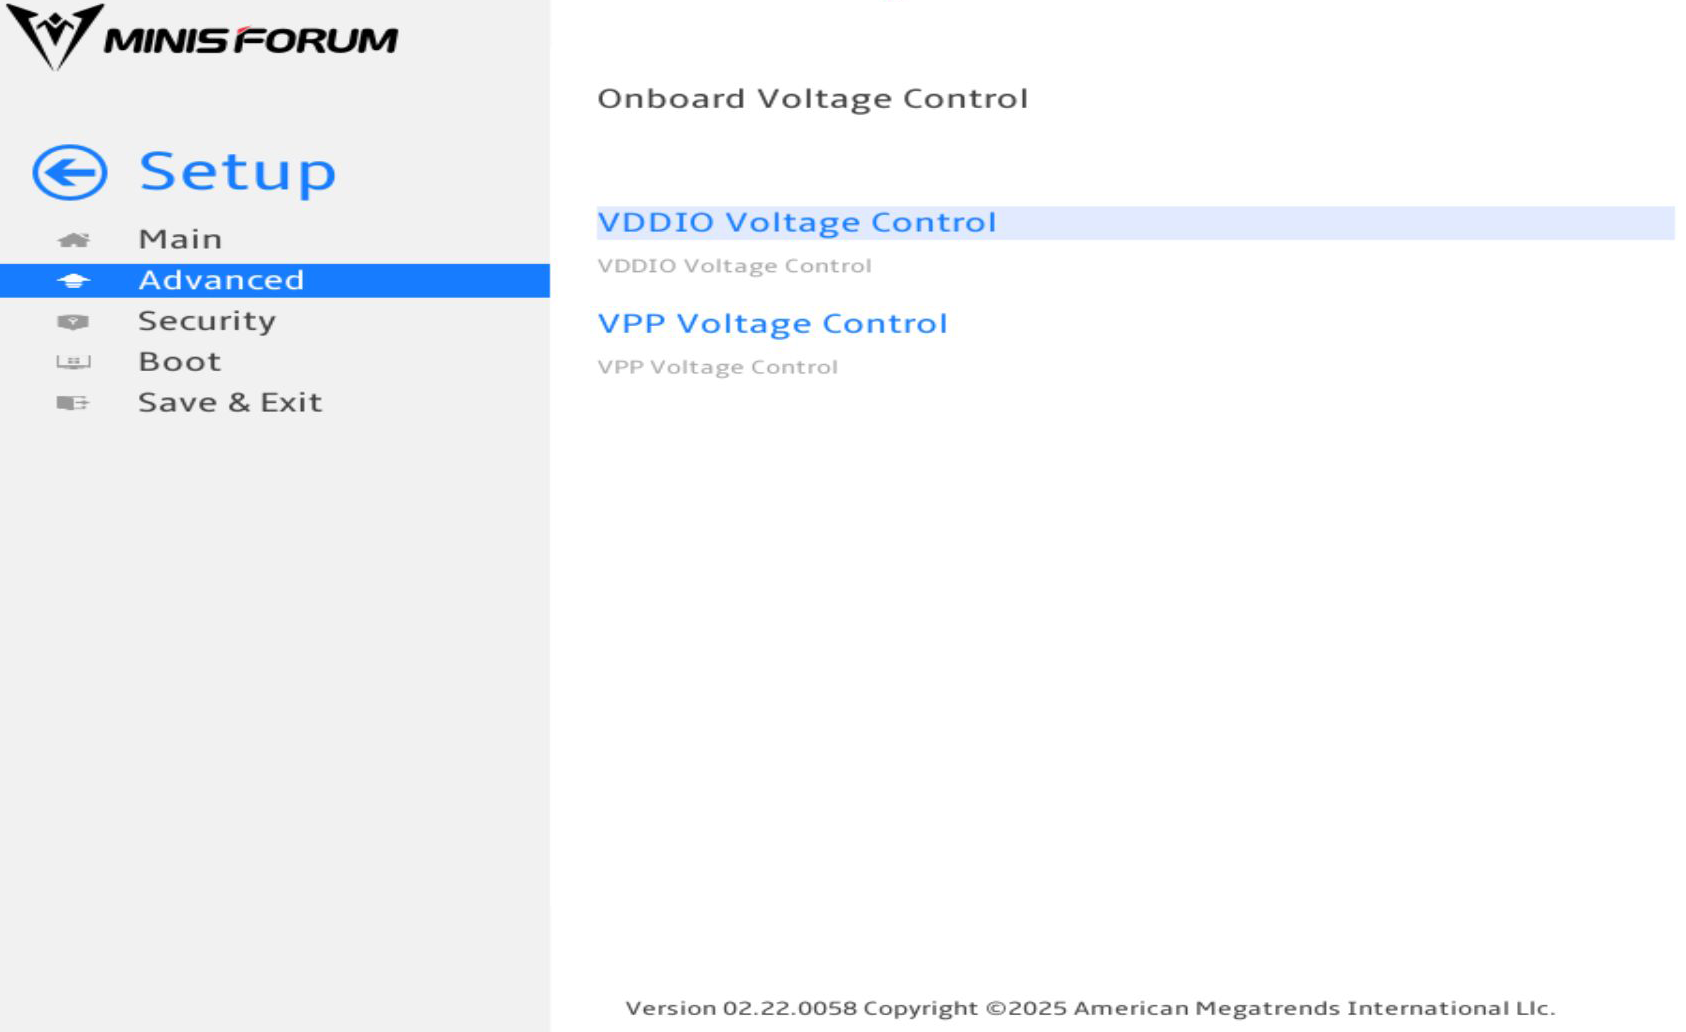
- VDDIO Voltage Control is a menu.
- VPP Voltage Control is a menu.
Advanced > AMD Overclocking > Onboard Voltage Control > VDDIO Voltage Control
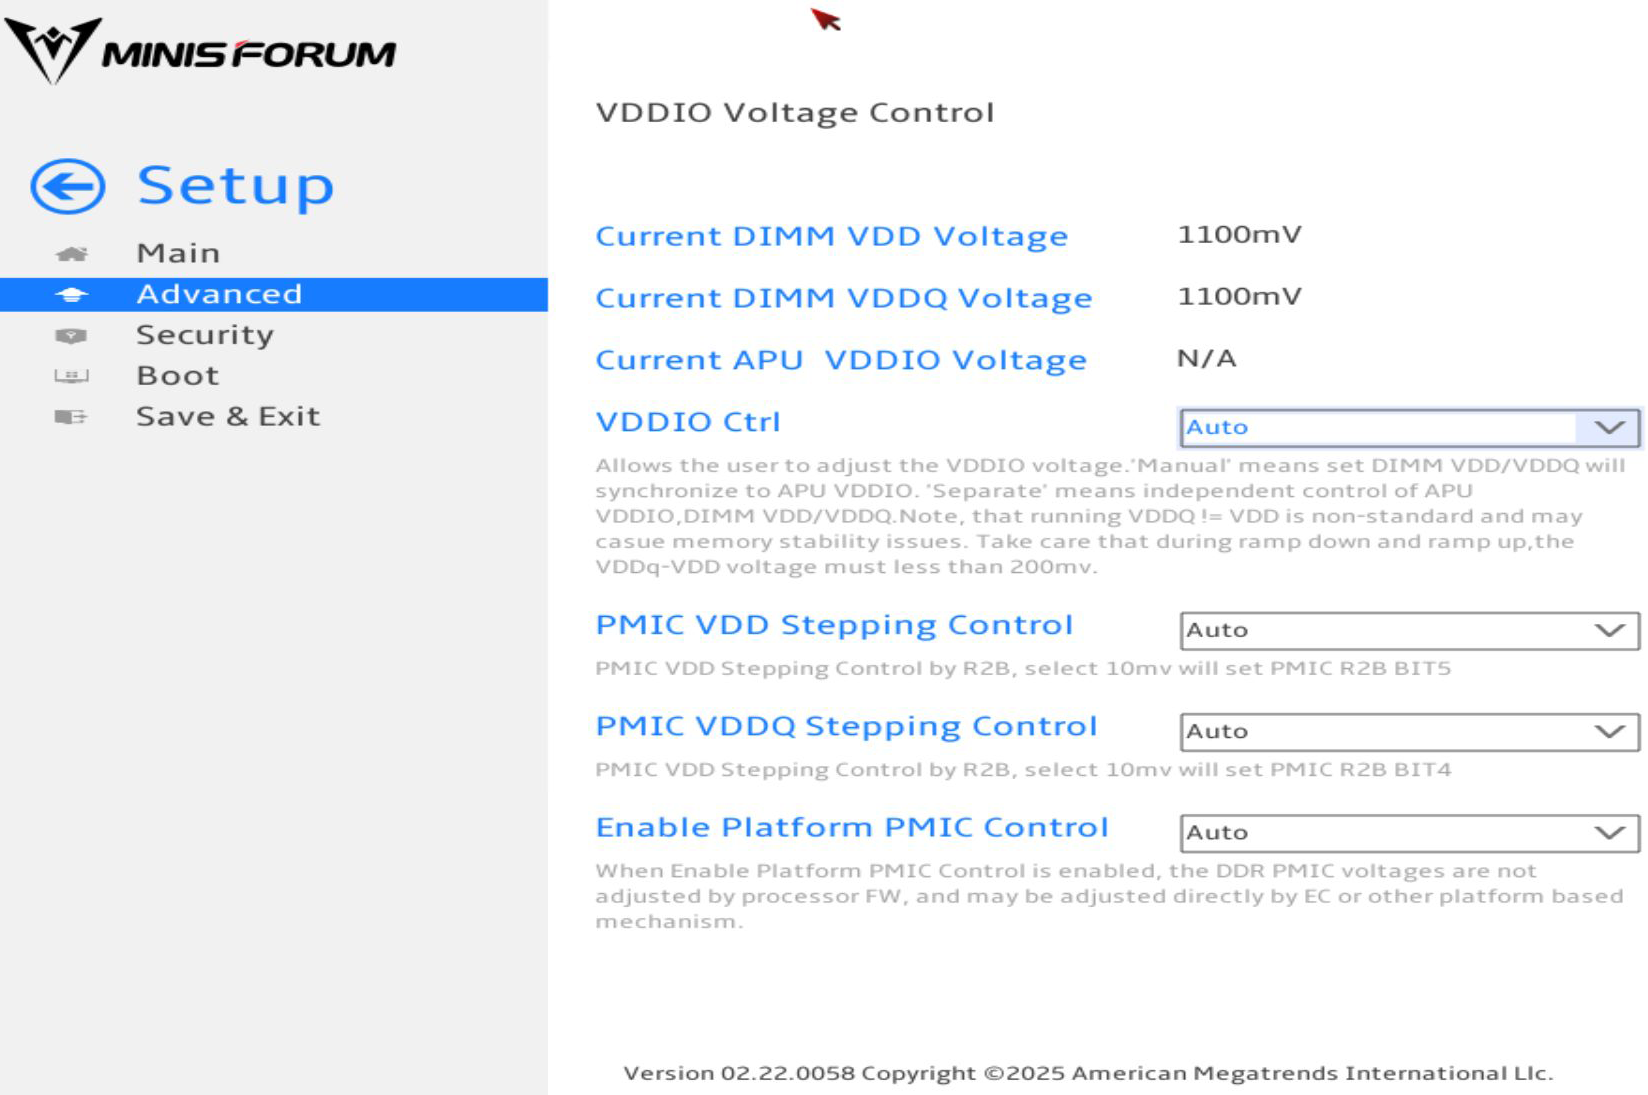
- For VDDIO Ctrl, you can set it to Auto, Manual, or Separate. If you set it to manual or separate, you unlock more options.
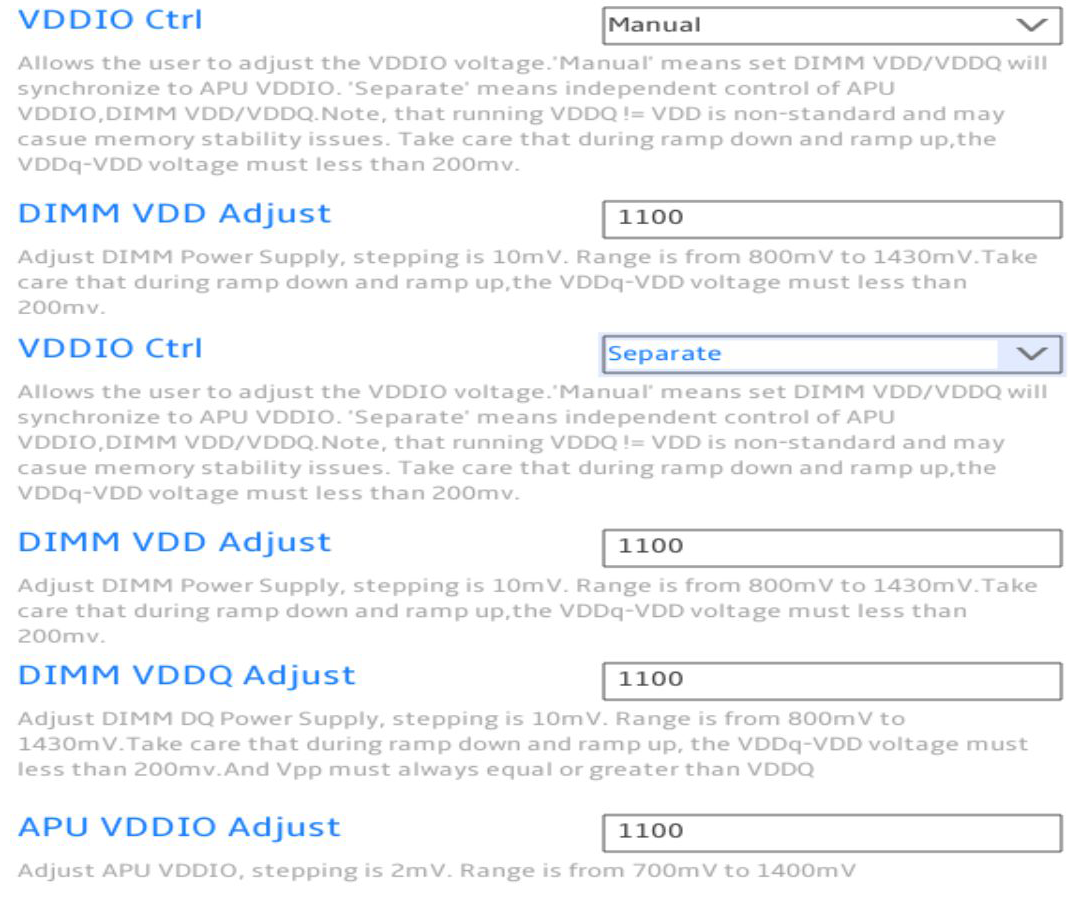
- For DIMM VDD Adjust, you can enter a number. This is unlocked if VDDIO Ctrl is set to Manual or Separate.
- For DIM VDDQ Adjust, you can enter a number. This is unlocked if VDDIO Ctrl is set to Separate.
- For APU VDDIO Adjust, you can enter a number. This is unlocked if VDDIO Ctrl is set to Separate.
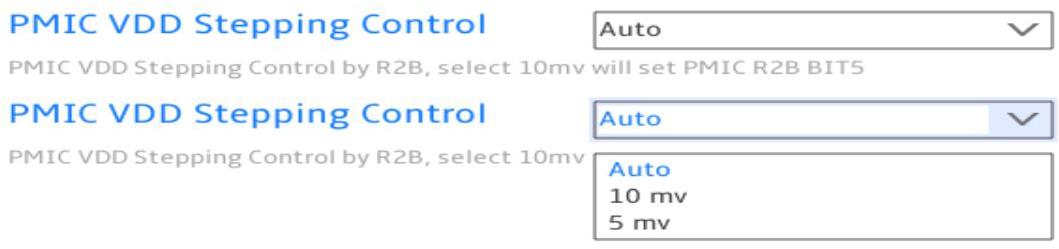
- For PMIC VDD Stepping Control, you can set it to Auto, 10 mv, or 5 mv.
- For PMIC VDDQ Stepping Control, you can set it to Auto, 10 mv, or 5 mv.

- For Enable Platform PMIC Control, you can set it to Auto, Enable or Disable.
Advanced > AMD Overclocking > Onboard Voltage Control > VPP Voltage Control
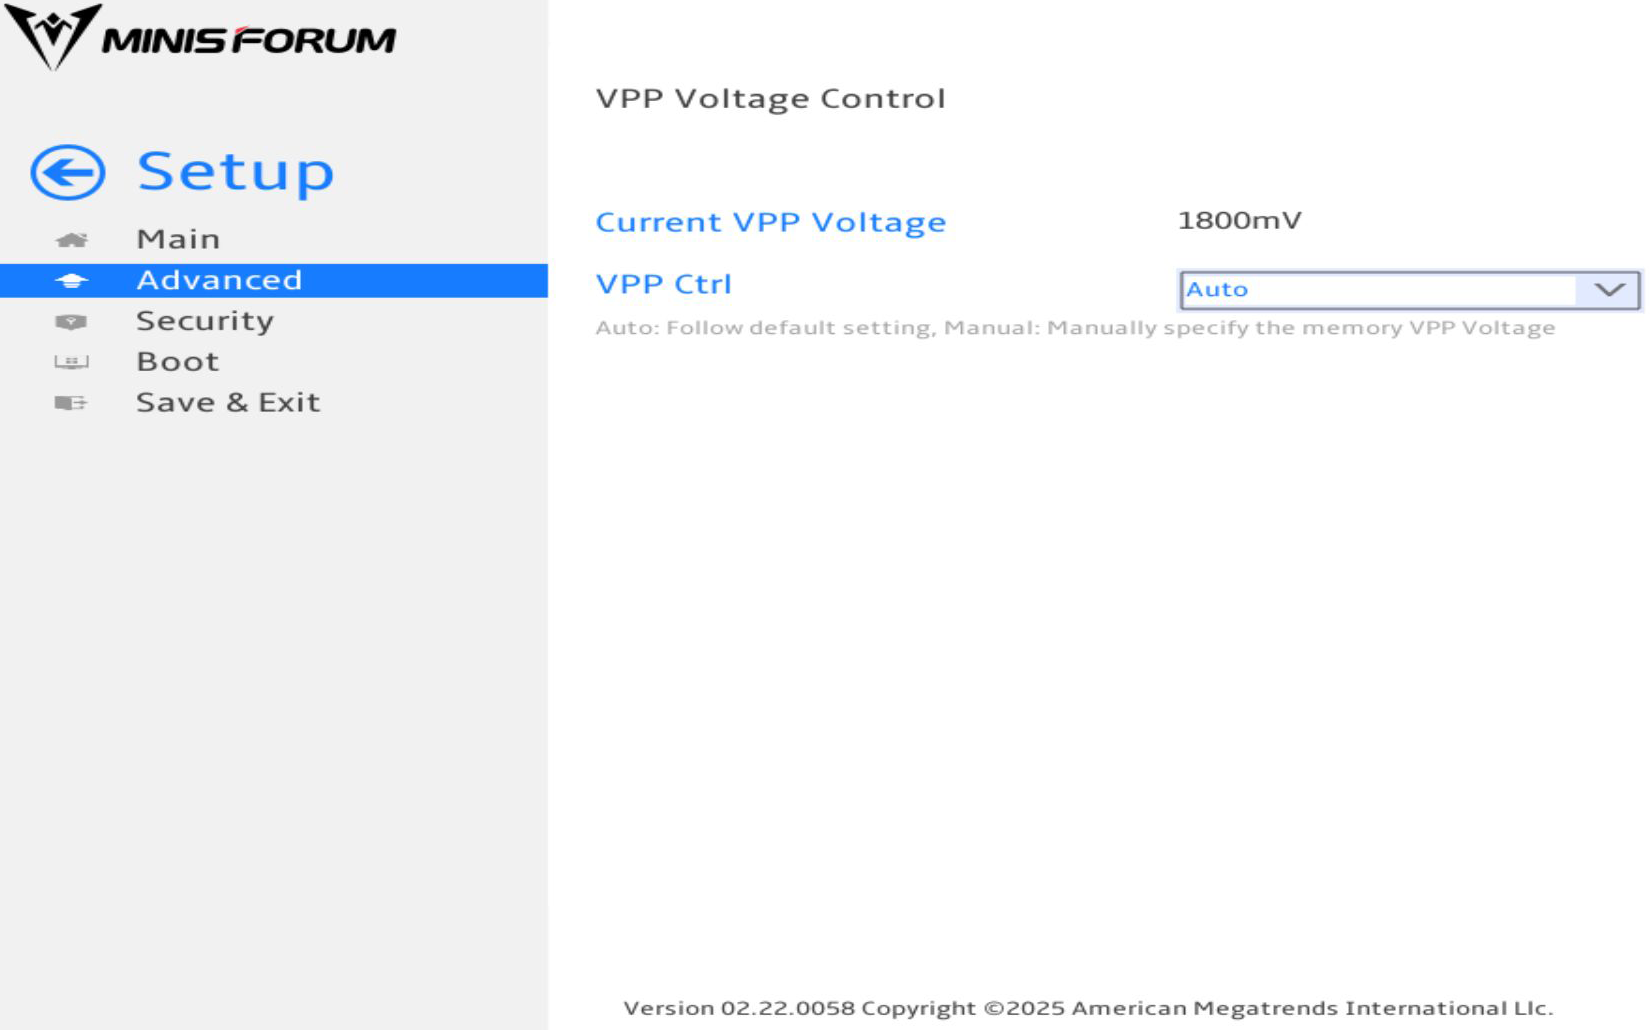
- For VPP Ctrl, you can set it to Auto or Manual. If you set it to manual, you unlock more options.

- For VPP Adjust, you can enter a number.
Advanced > AMD Overclocking > ECO Mode
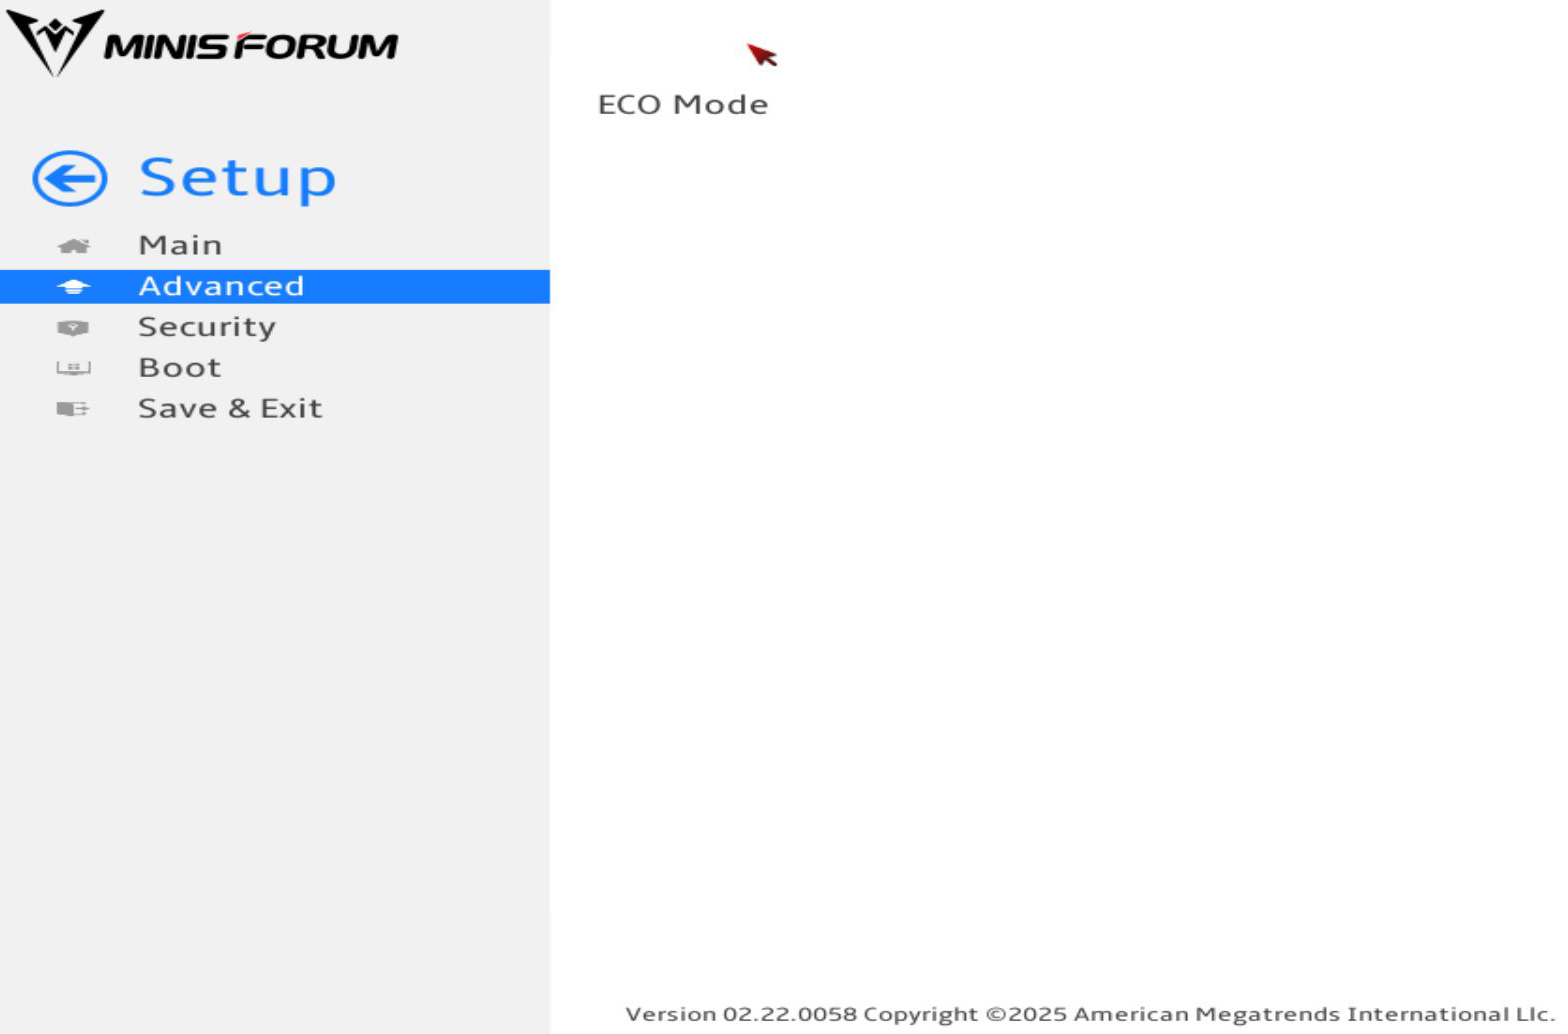
In ECO mode, there are no options.
Advanced > Addons
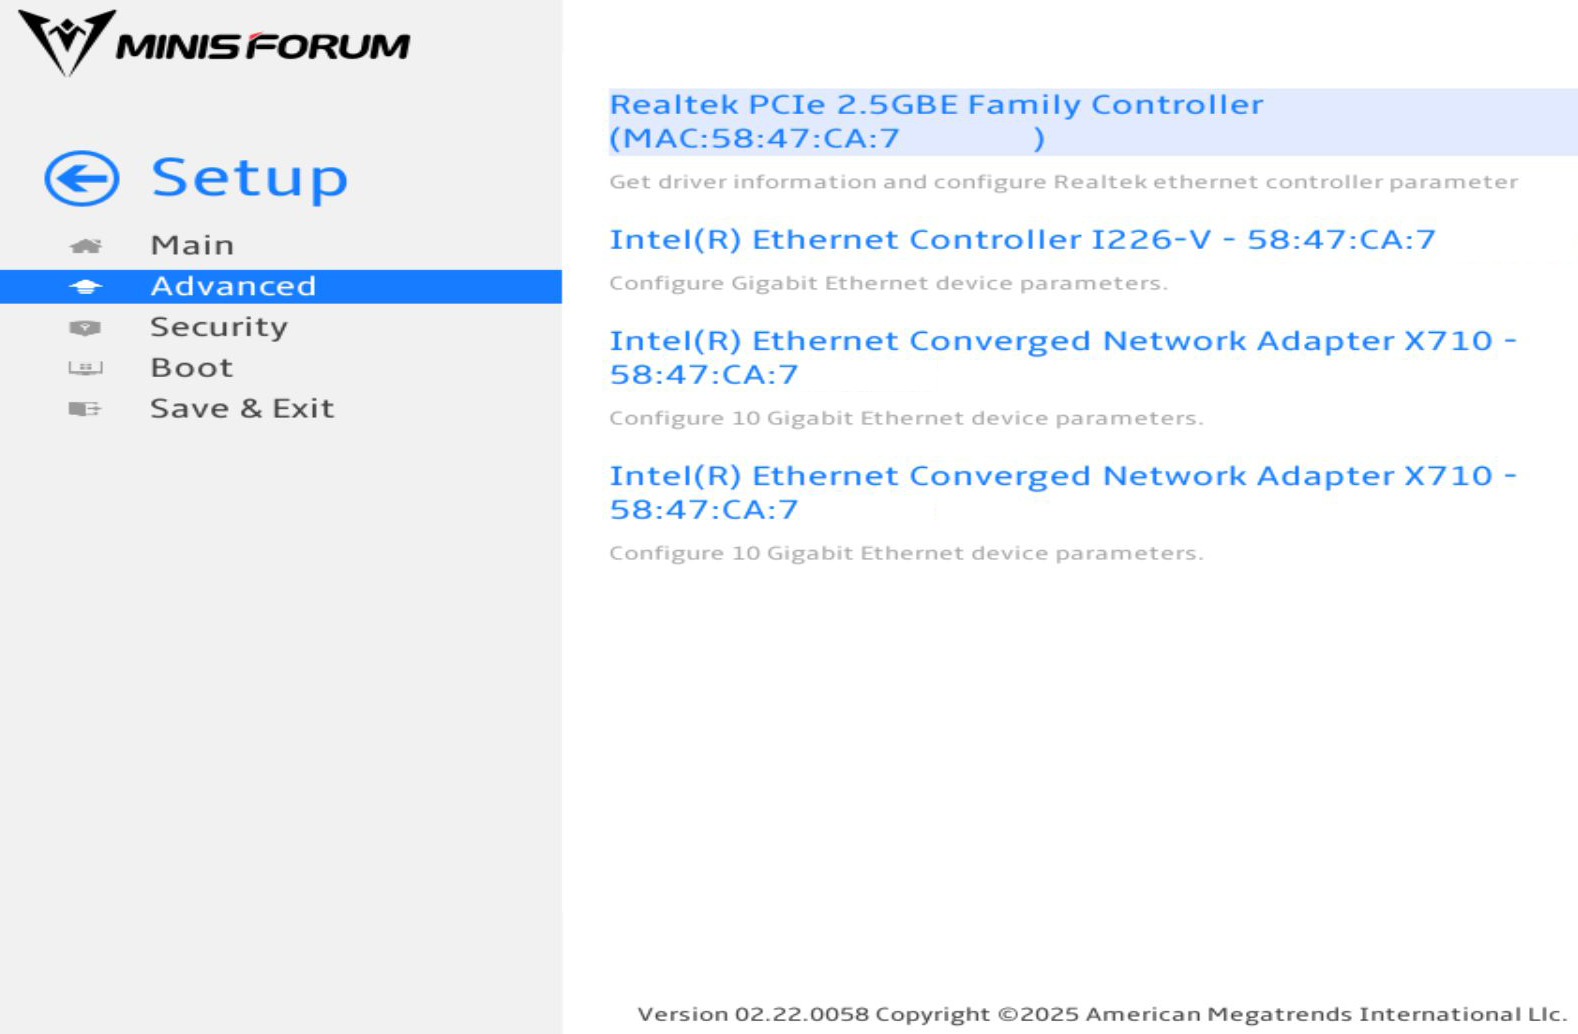
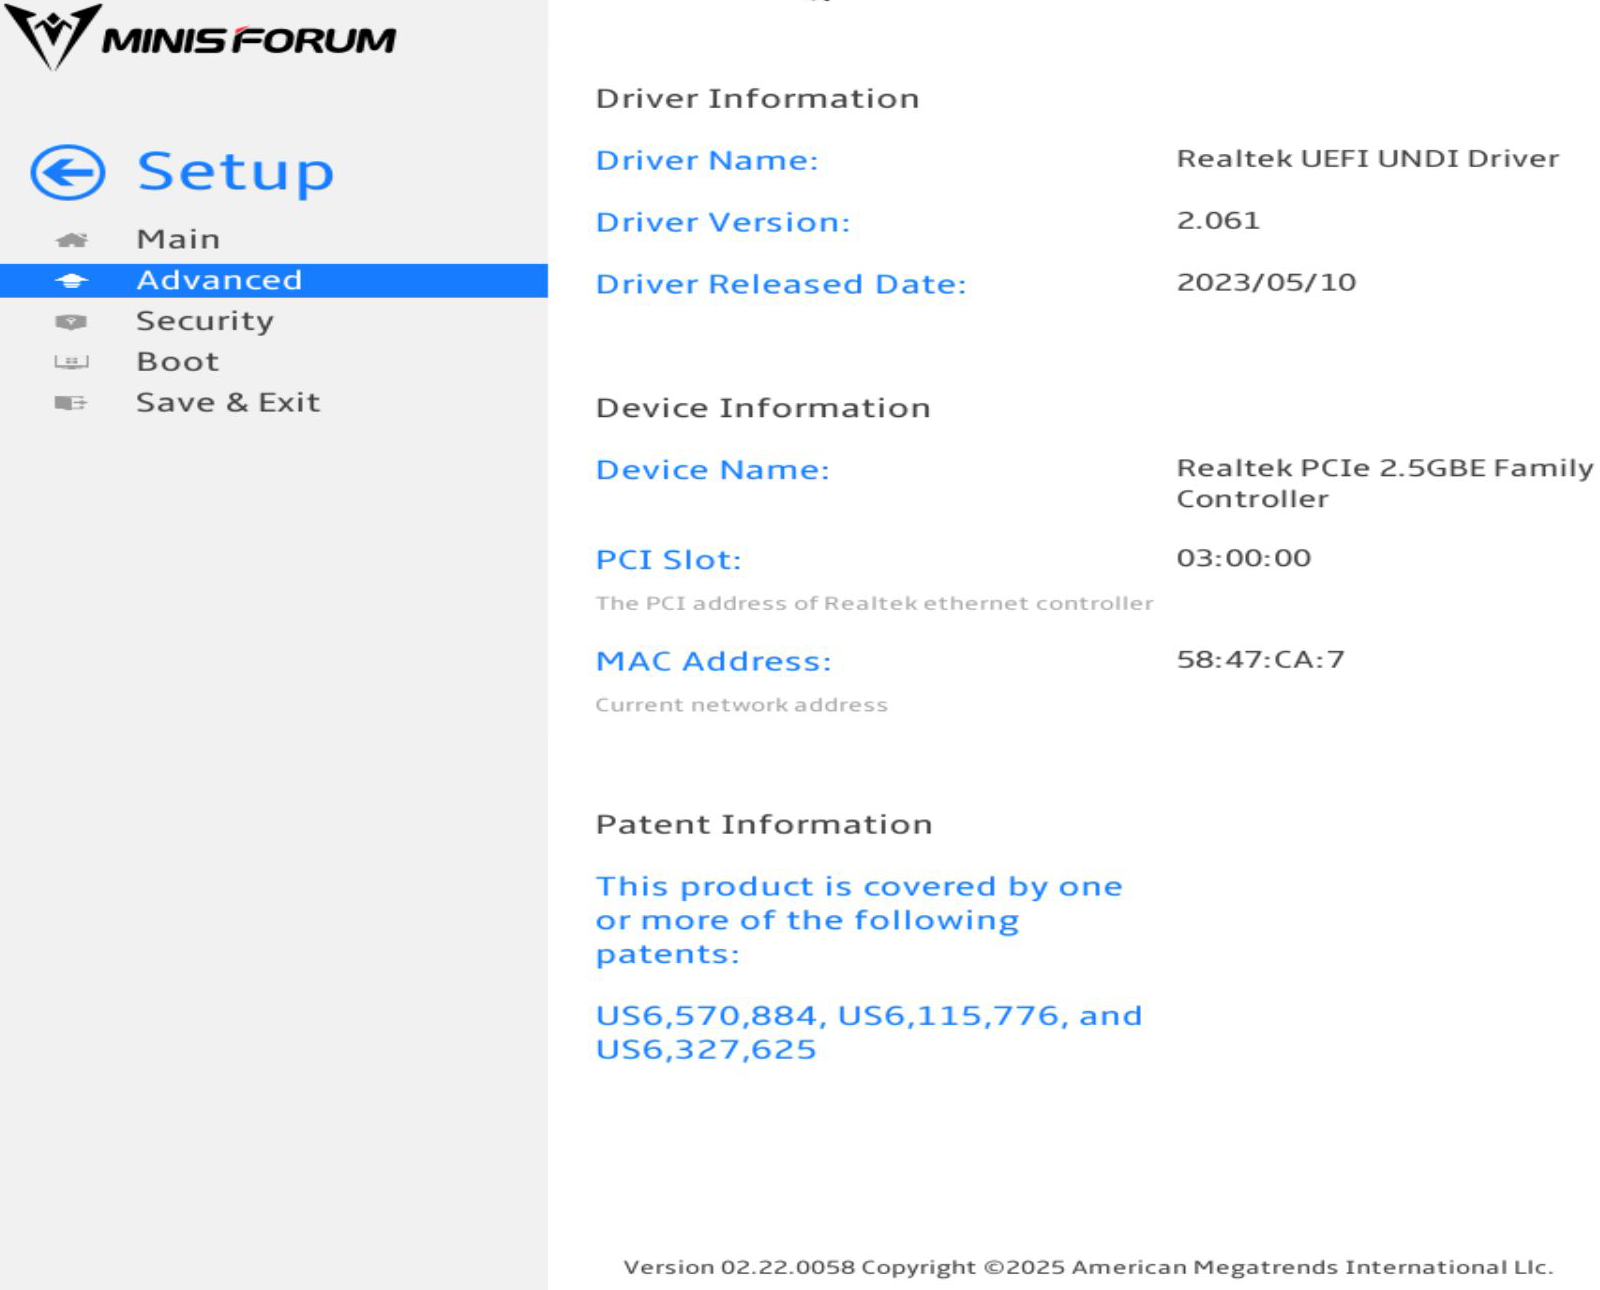
- Realtek PCIe 2.5 GBE Family Controller is a menu.
- Intel(R) Ethernet Controller I226-V is a menu.
- Intel(R) Ethernet Converged Network Adapter X710 is a menu. This is a dual-port SFP+ card, which is why it is listed twice.
Advanced > Addons > Realtek PCIe 2.5 GBE Family Controller
There are no options to change in this menu.
Advanced > Addons > Intel(R) Ethernet Controller I226-V
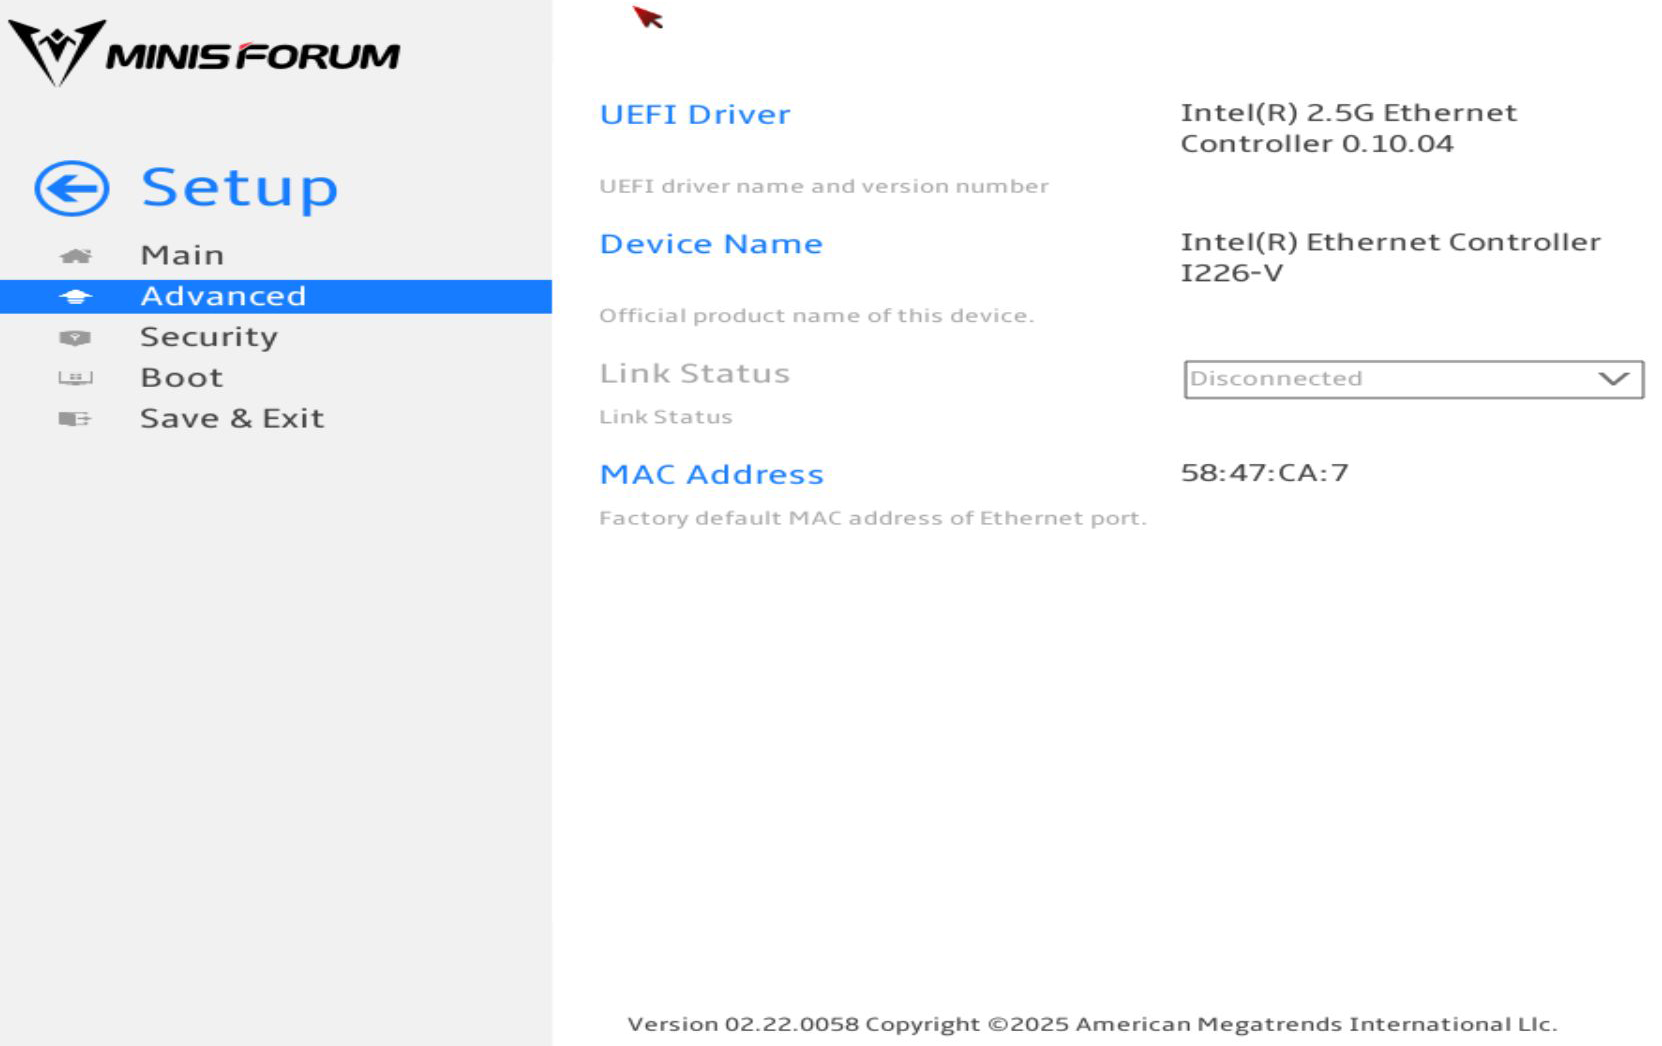
There are no options to change in this menu.
Advanced > Addons > Intel(R) Ethernet Converged Network Adapter X710
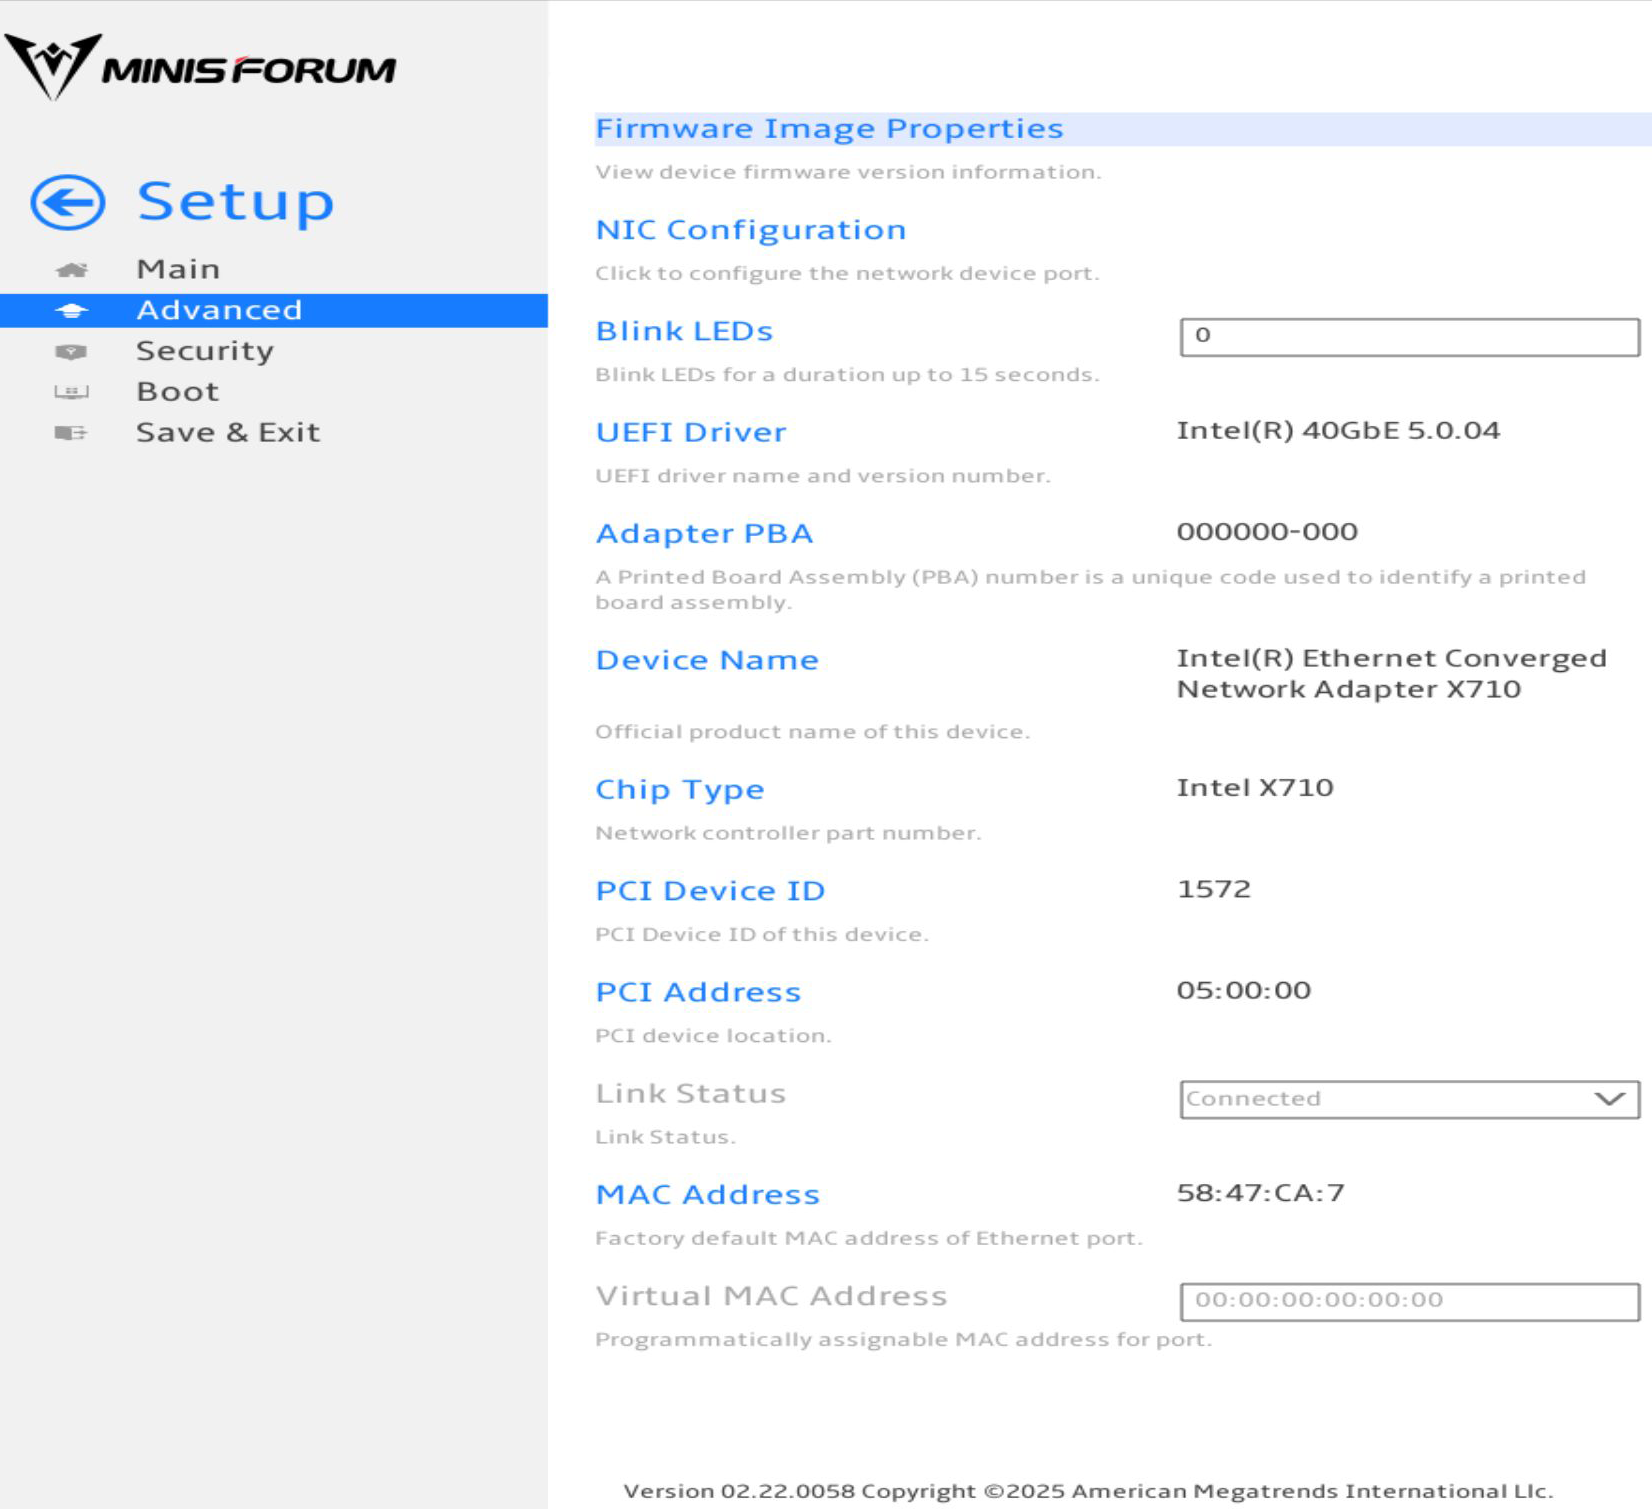
- Firmware Image Properties is a menu.
- NIC Configuration is a menu.
- For Blink LEDs, you can enter a number.
Advanced > Addons > Intel(R) Ethernet Converged Network Adapter X710 > Firmware Image Properties
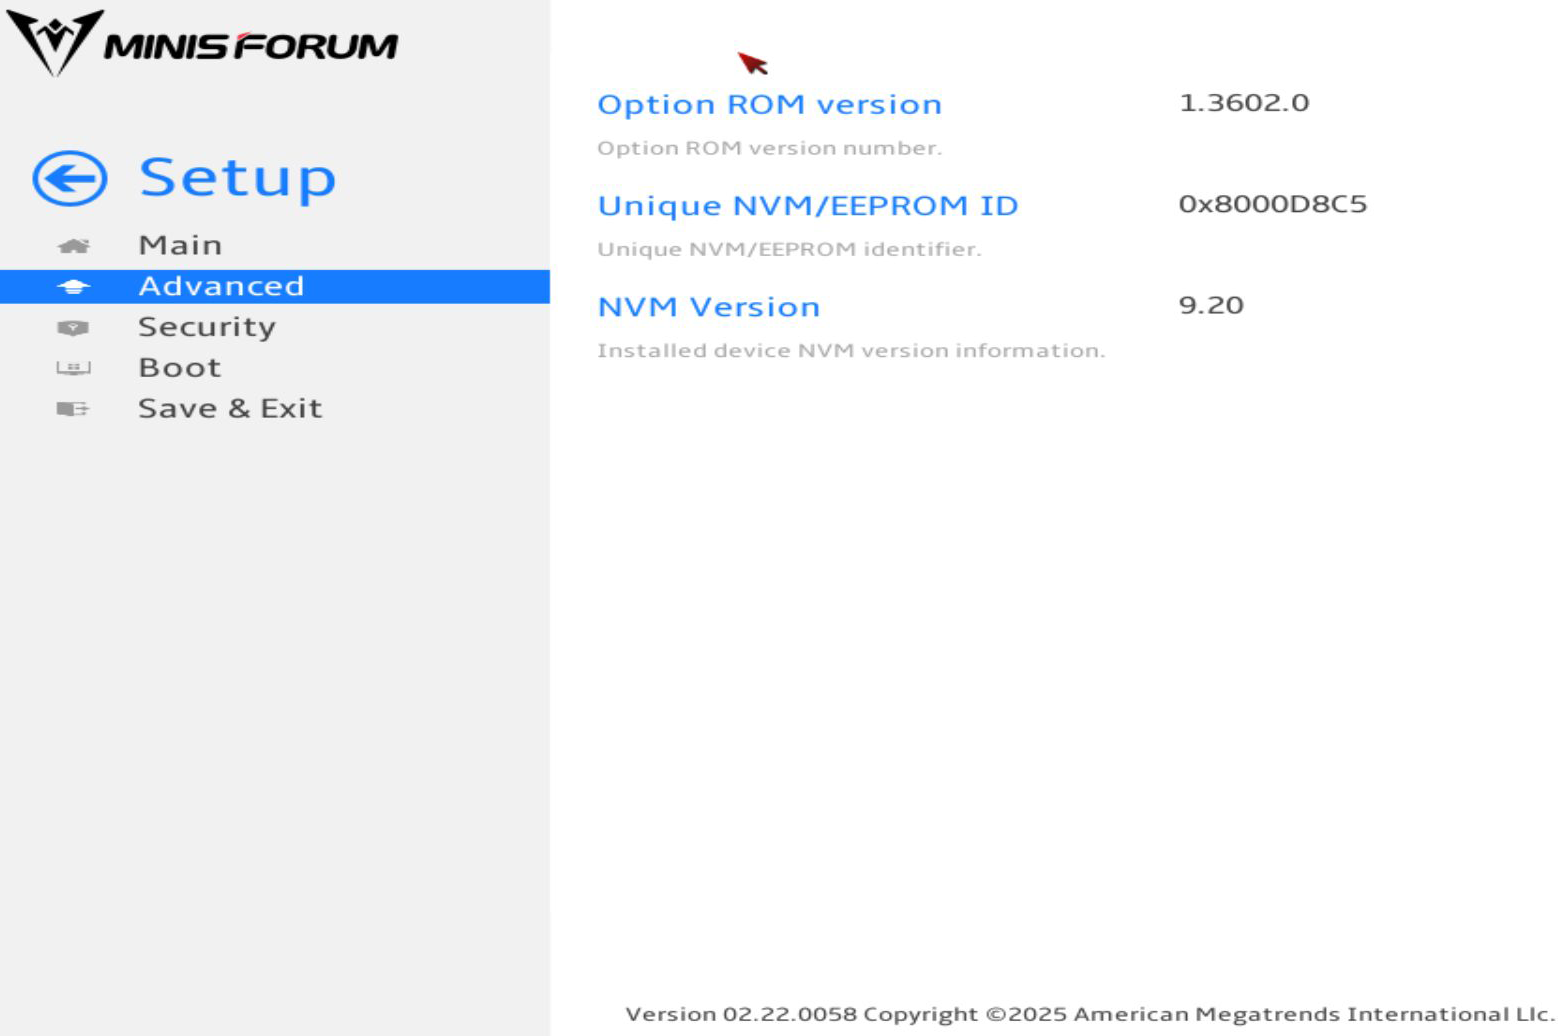
There are no options to change in this menu.
Advanced > Addons > Intel(R) Ethernet Converged Network Adapter X710 > NIC Configuration

- For Wake On LAN, you can Enable or Disable it.
- For Legacy Virtual LAN ID, you can enter a VLAN number.
- For LLDP Agent, you can Enable or Disable it.
Security
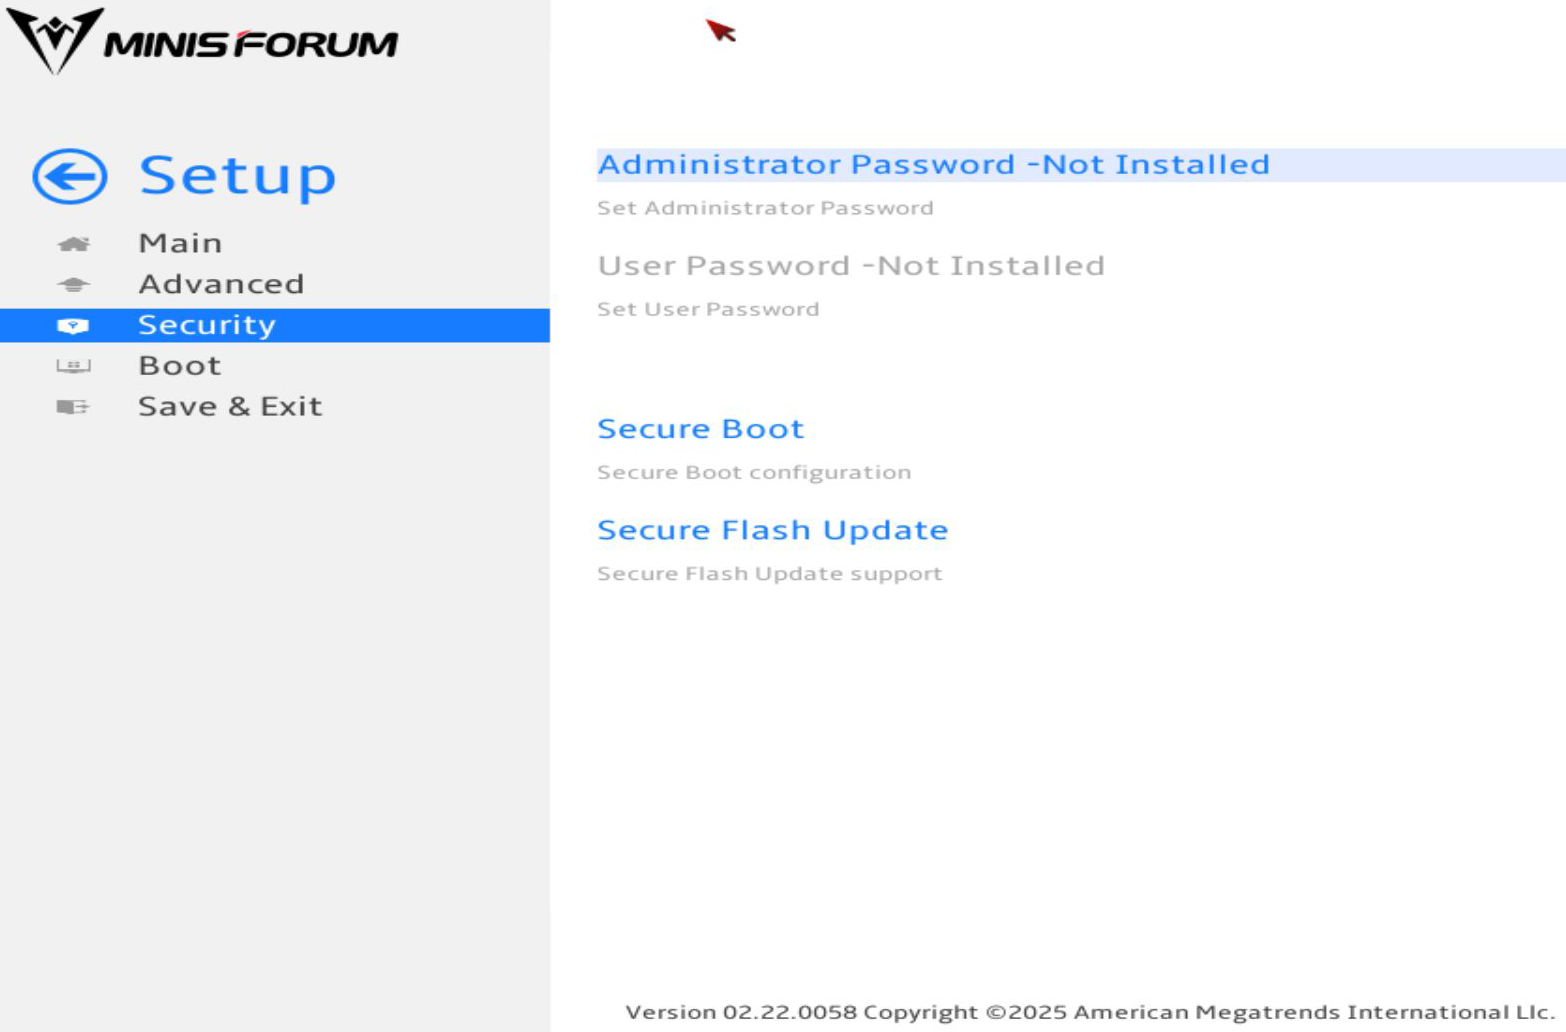
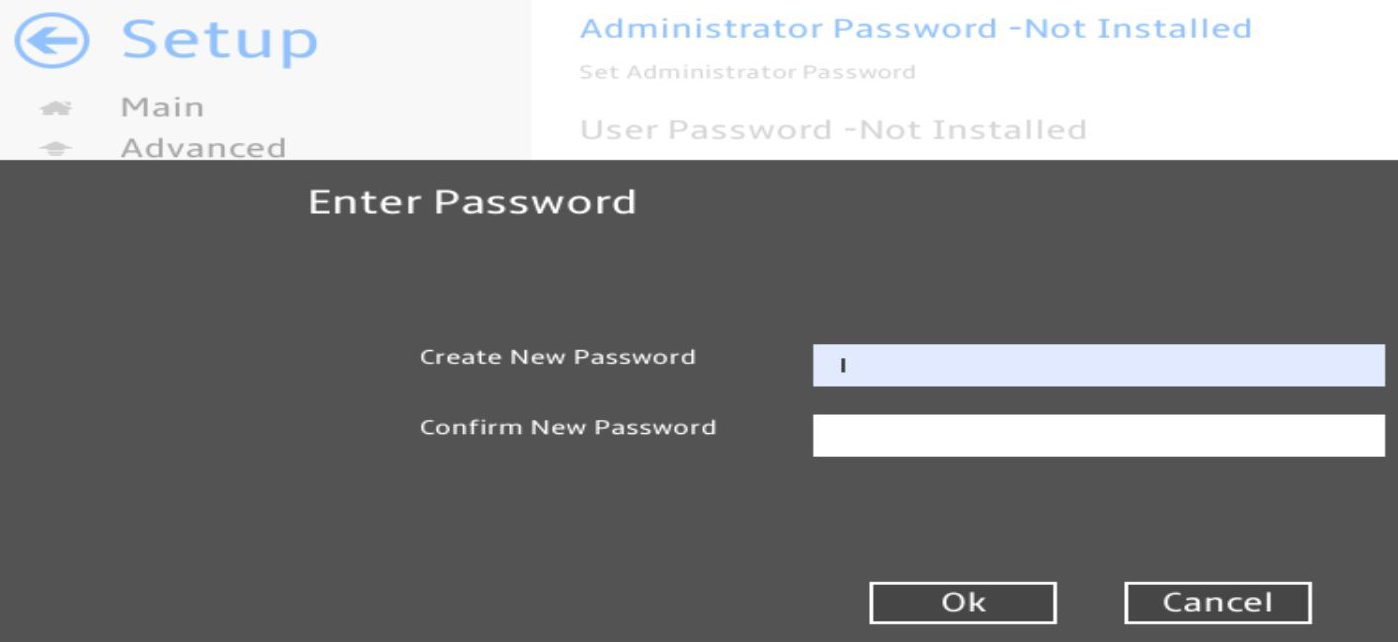
- For Administrator Password, you can set an administrator password.
- Secure Boot is a menu.
- Secure Flash Update is a menu.
Security > Secure Boot
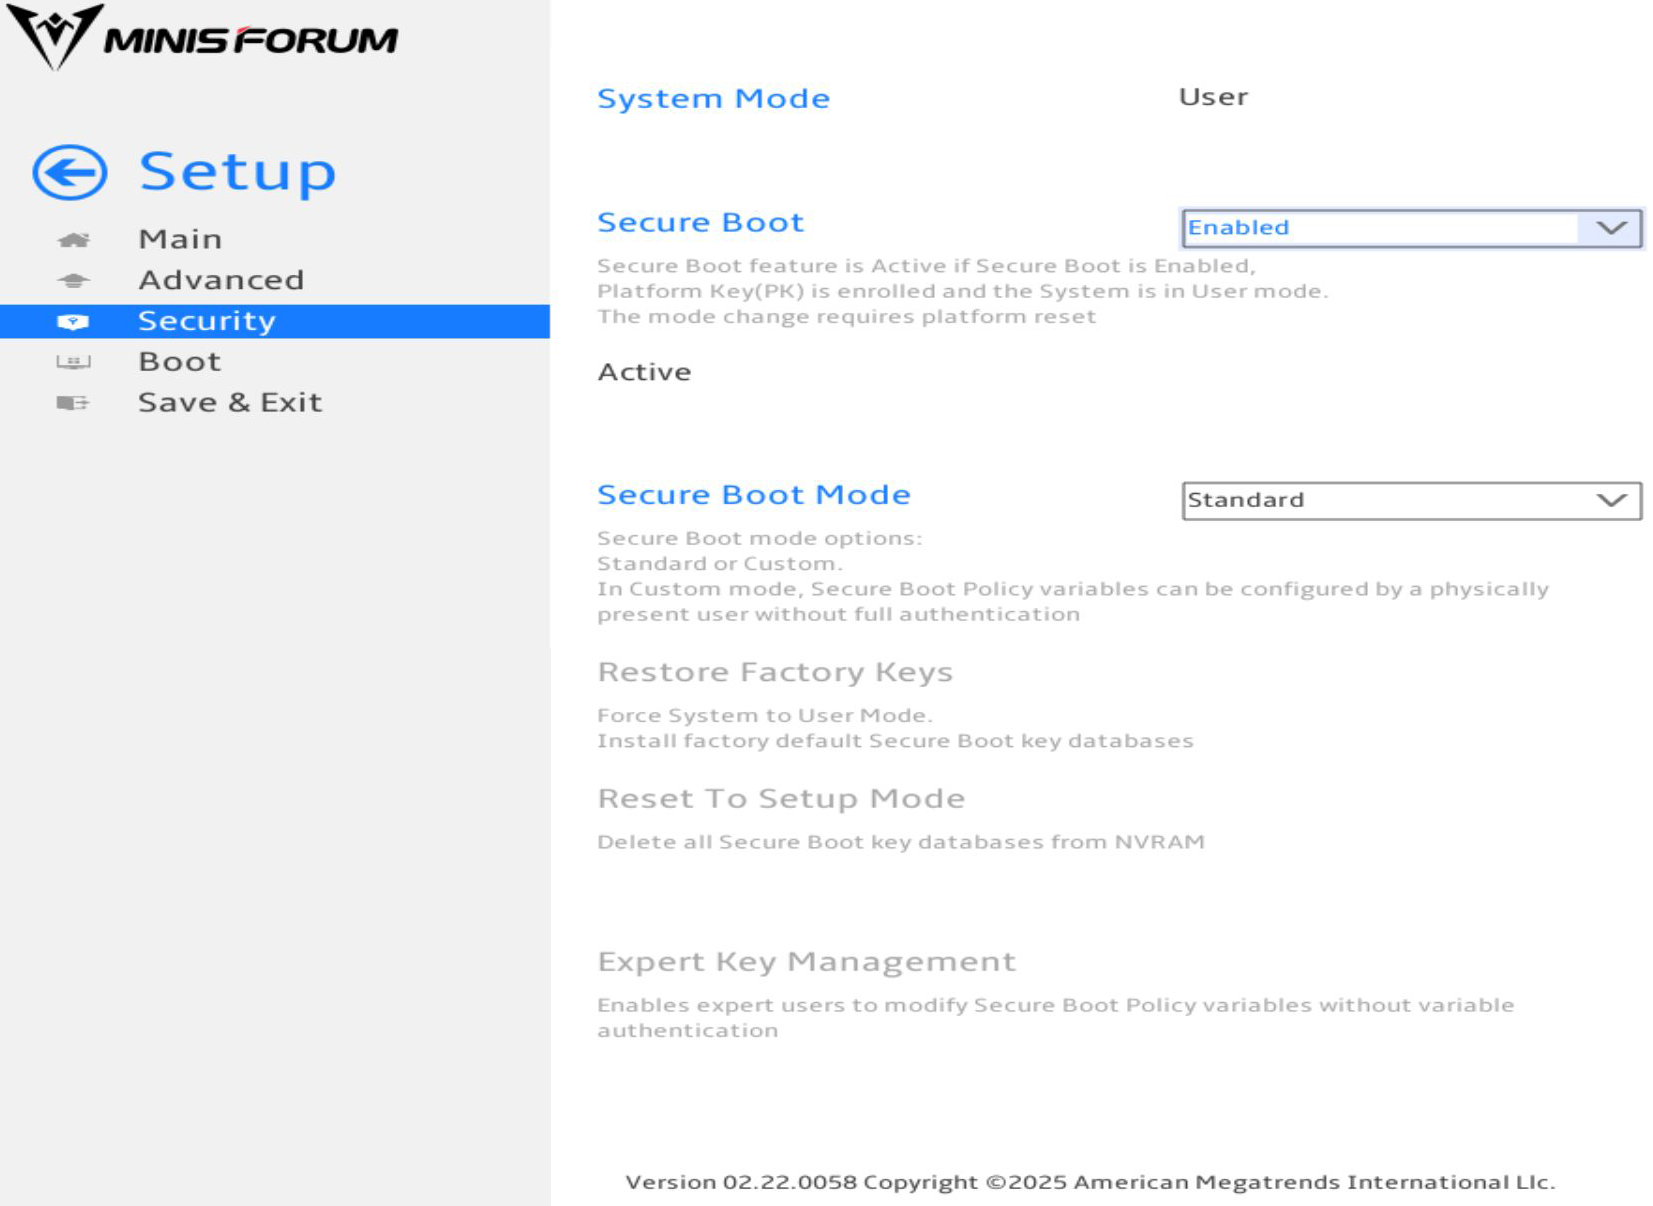
- For Secure Boot, you can set it to Enabled or Disabled.
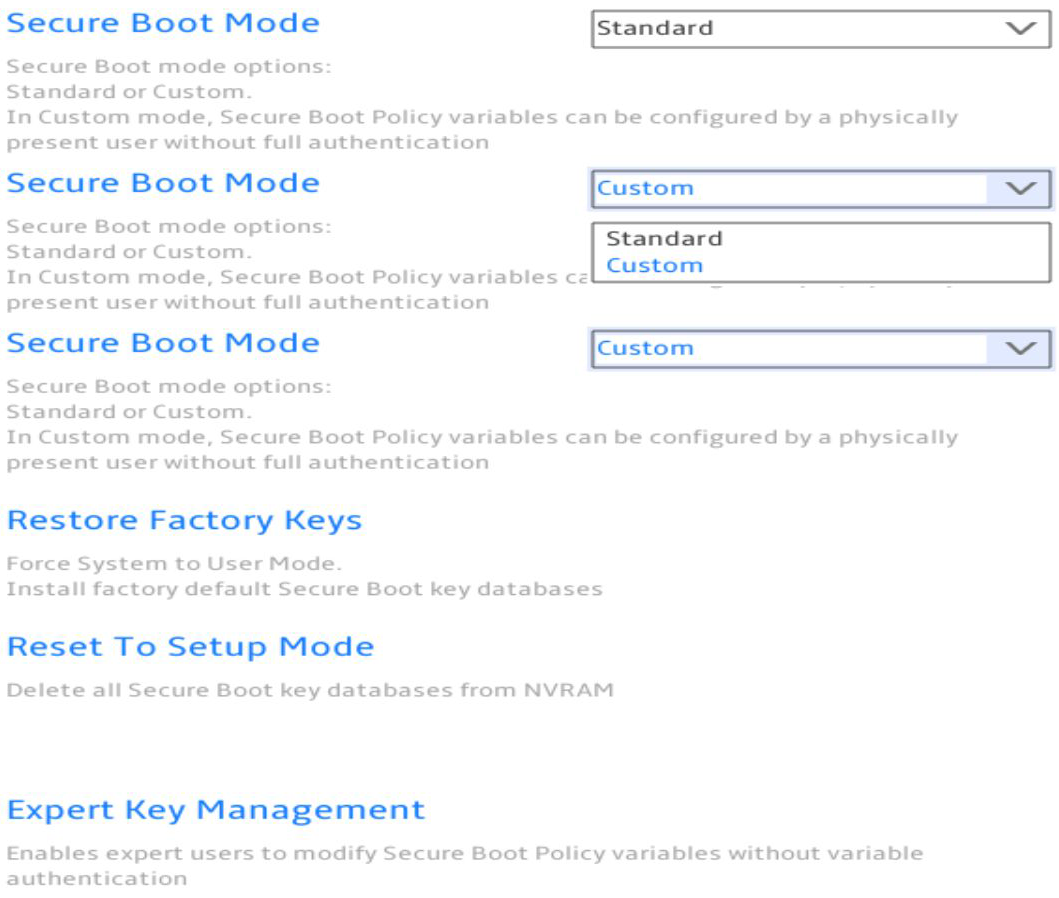
- For Secure Boot Mode, you can set it to Standard or Custom. If you set it to custom, you unlock a few more options.
- For Restore Factory Keys, you will need to confirm if you want to install the factory default keys.

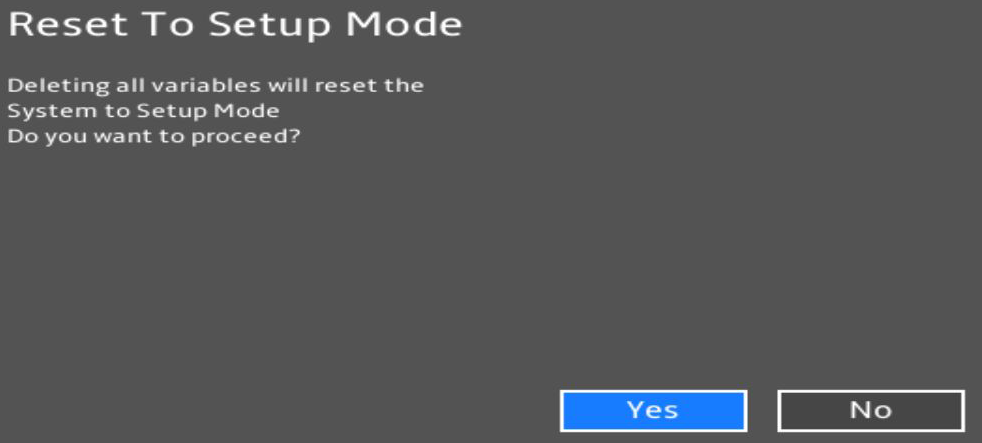
- For Reset to Setup Mode, you will need to confirm whether you want to proceed.
- Expert Key Management is a menu.
Security > Secure Boot > Expert Key Management
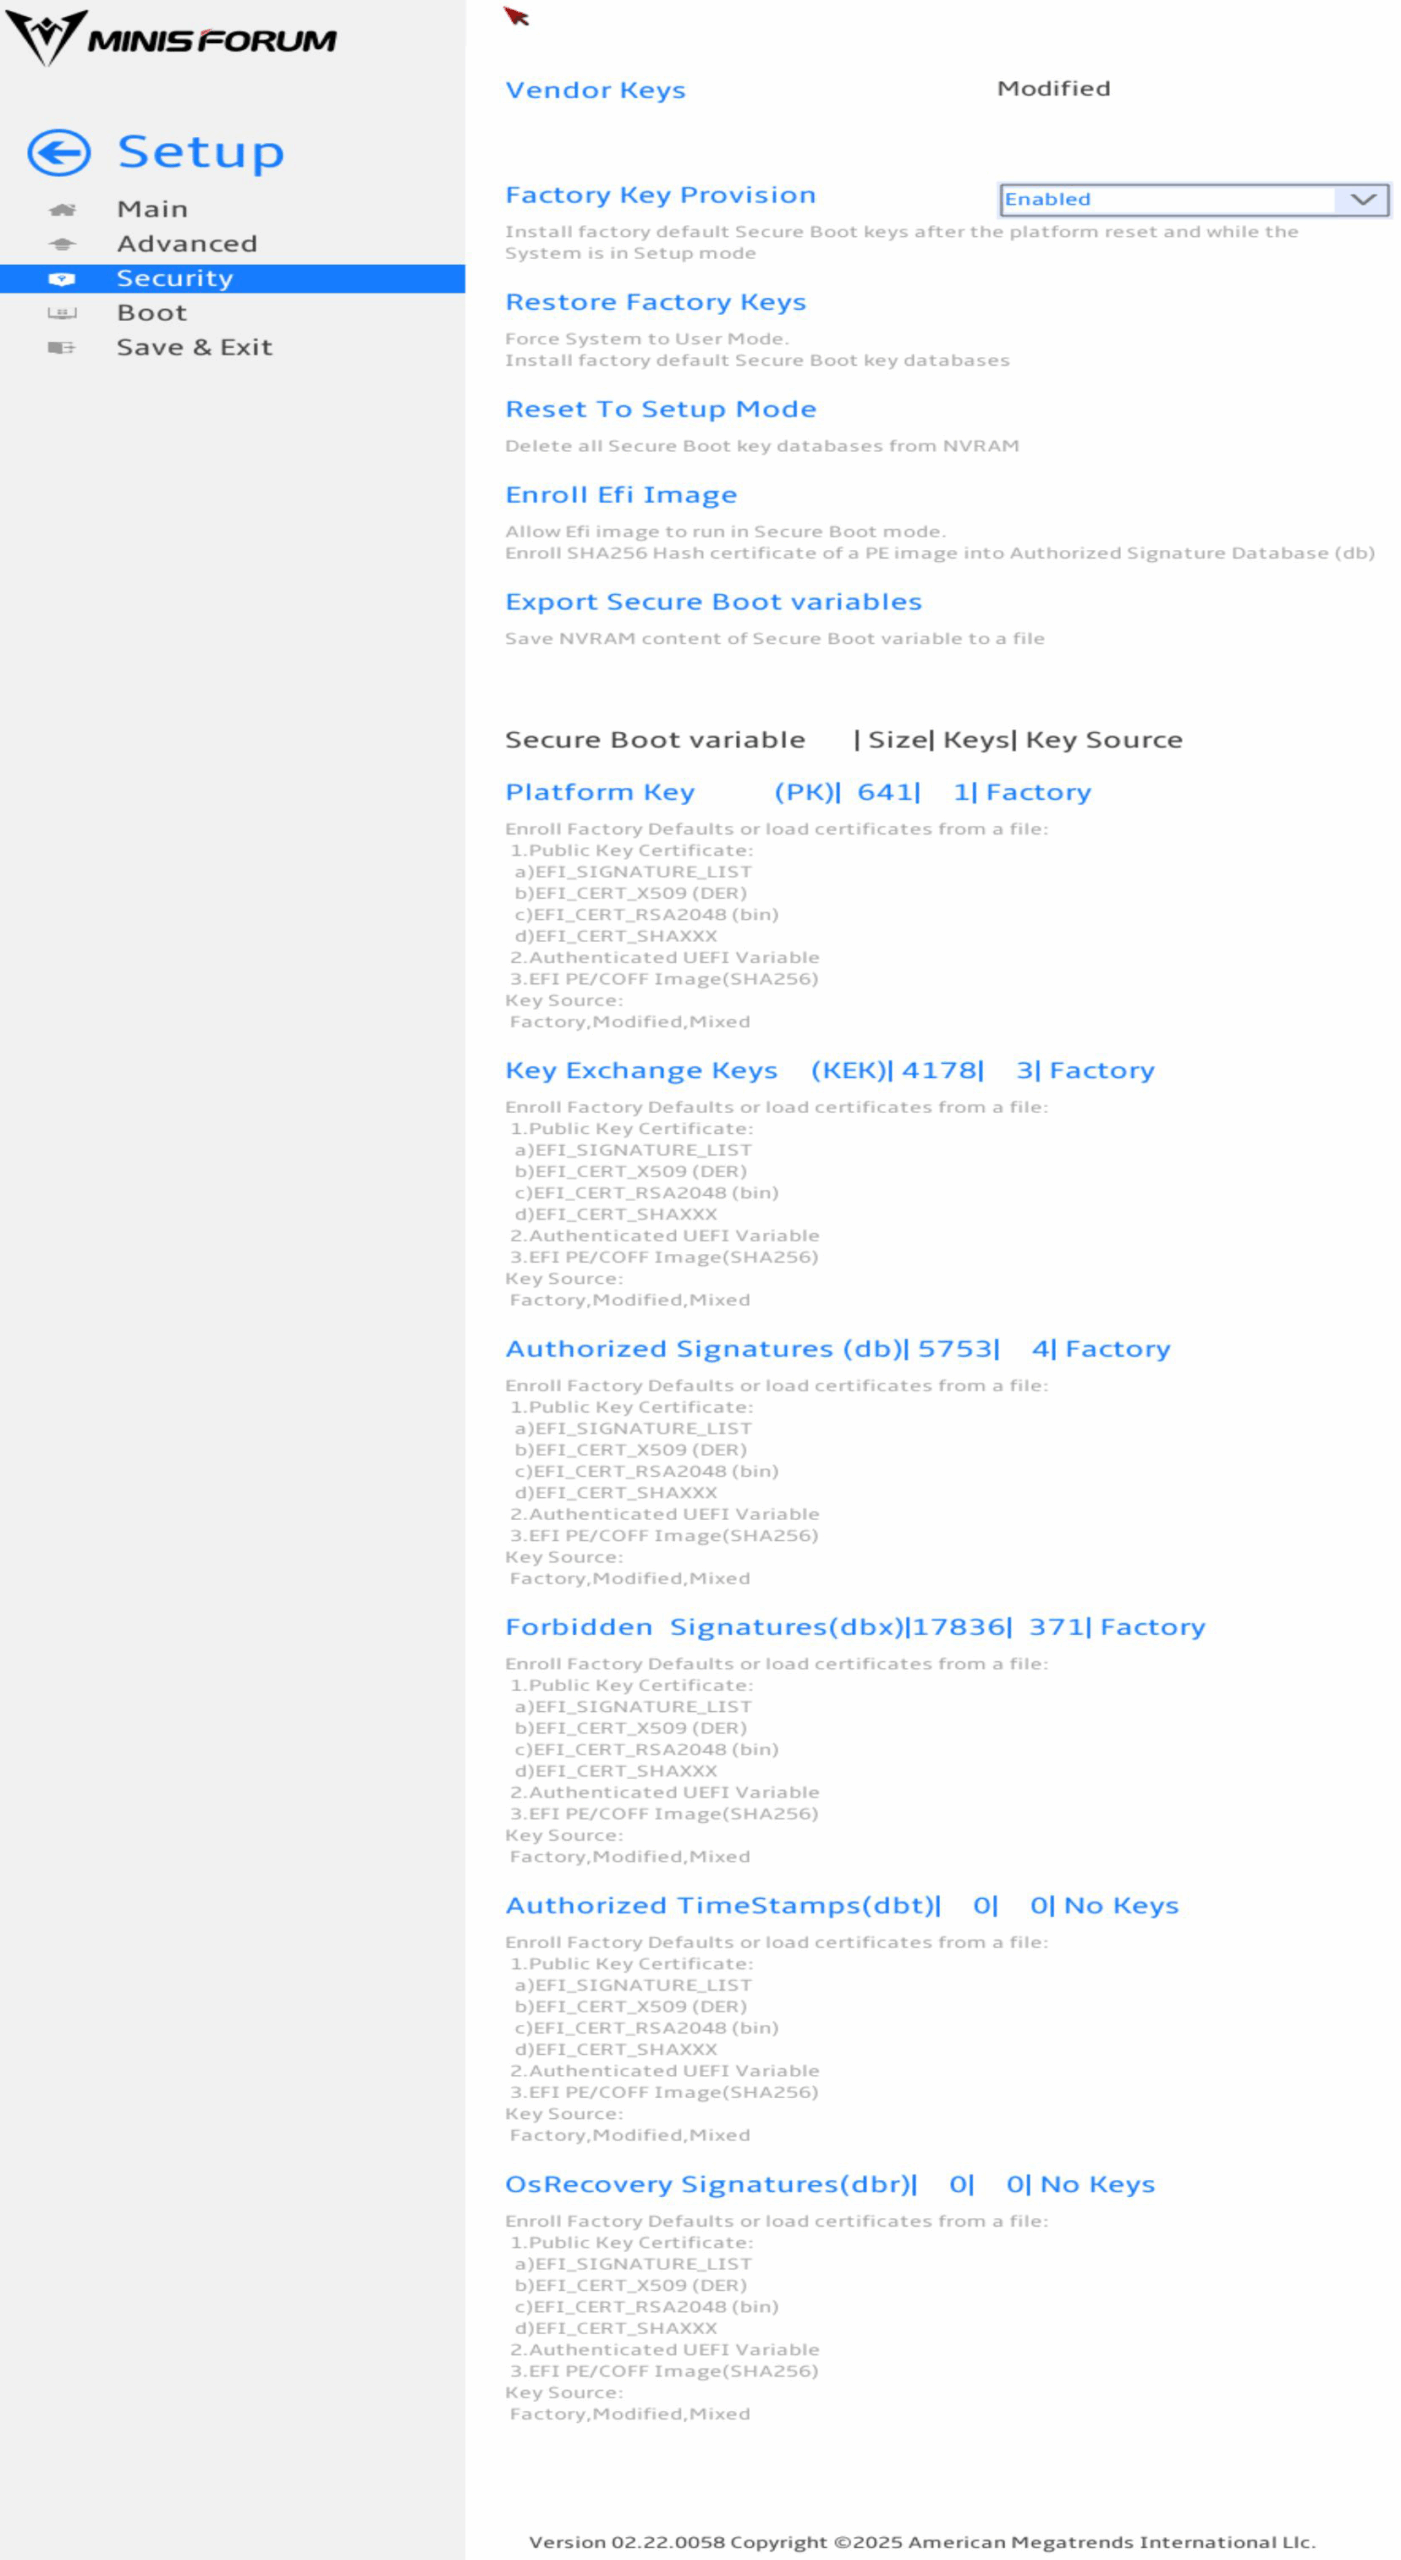
- For Factory Key Provision, you can set it to Enabled or Disabled.
- For Restore Factory Keys, you will need to confirm if you want to restore the keys.
- For Reset to Setup Mode, you will need to confirm if you want to proceed.
- For Enroll Efi Image, you can select an EFI image to enroll.
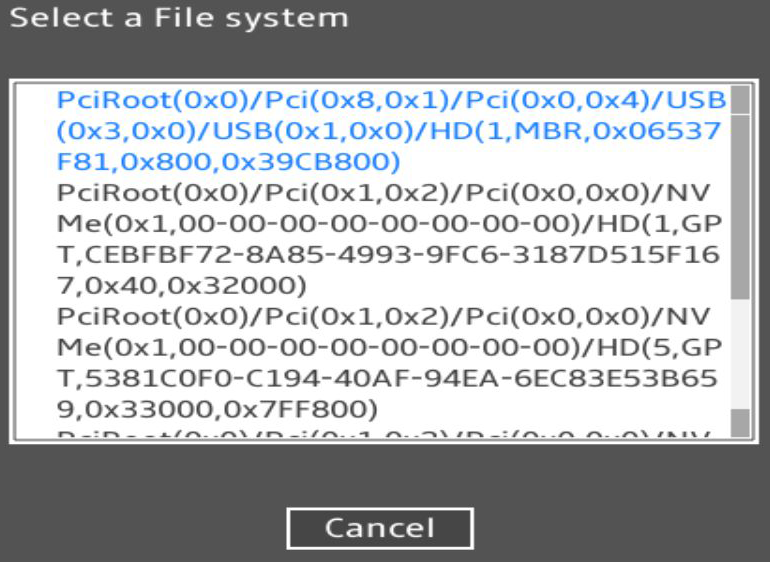
- For Export Secure Boot variables, you can select where you want to export them.
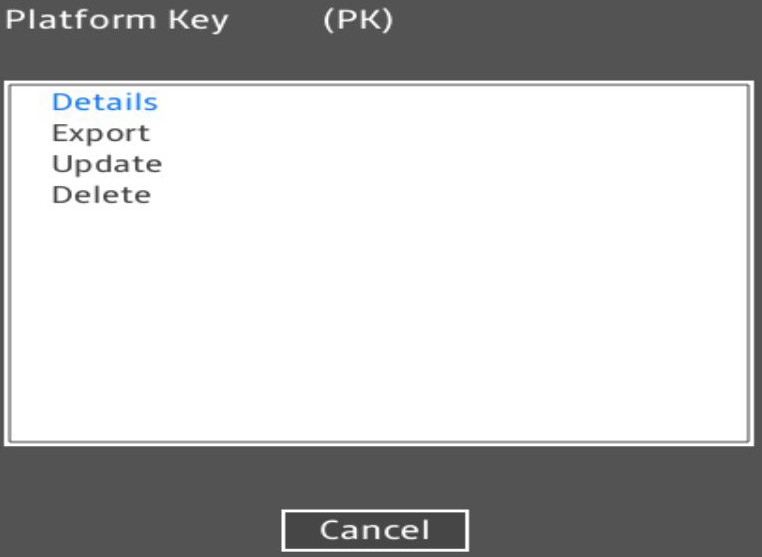
- For Platform Key (PK), you can view the details, export, update, or delete them.
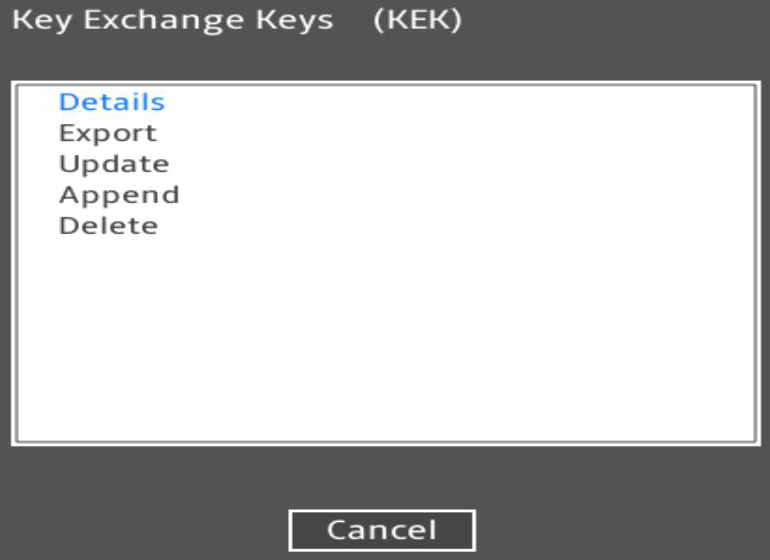
- For Key Exchange Keys (KEK), you can view the details, export, update, append, or delete them.
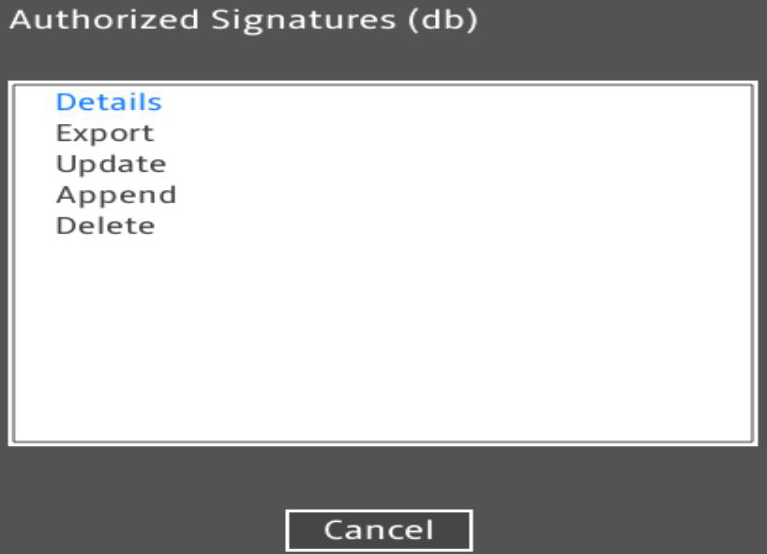
- For Authorized Signatures (db), you can view the details, export, update, append, or delete them.
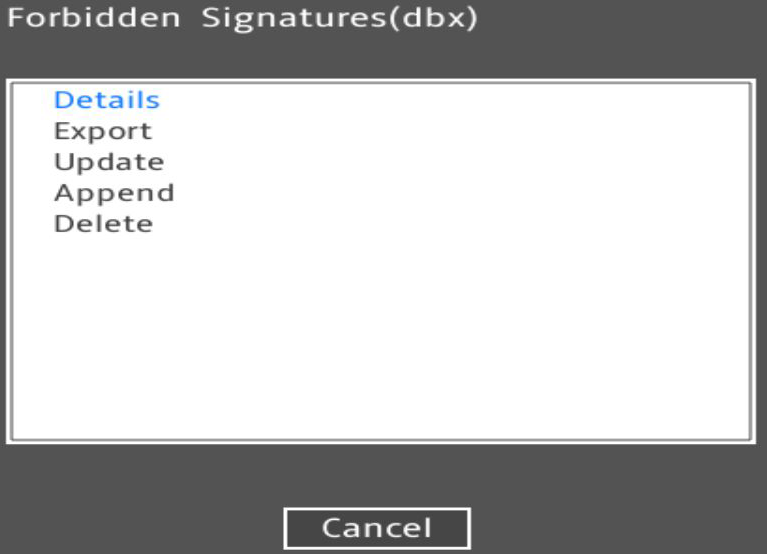
- For Forbidden Signatures (dbx), you can view the details, export, update, append, or delete them.
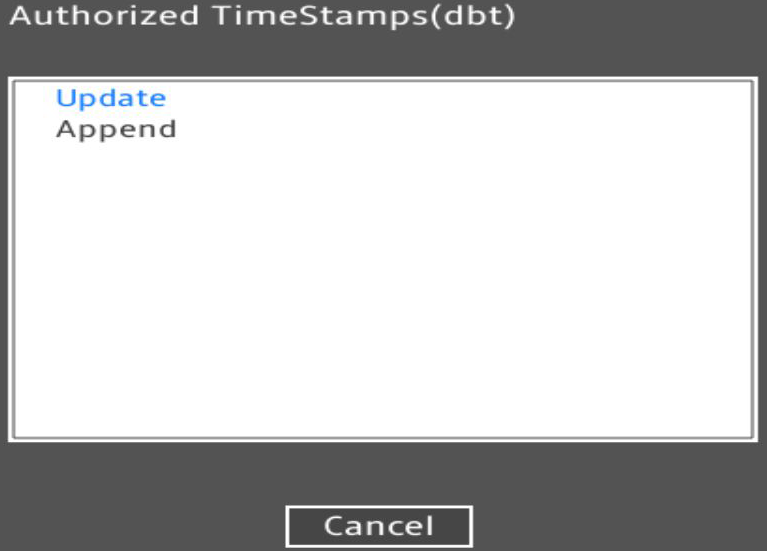
- For Authorized TimeStamps(dbt), you can update or append them.
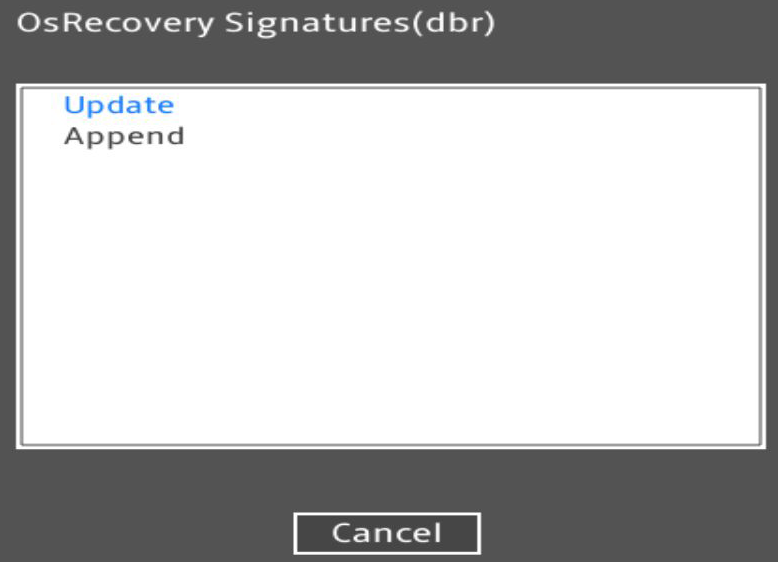
- For OsRecovery Signatures(dbr), you can update or append them.
Security > Secure Flash Update
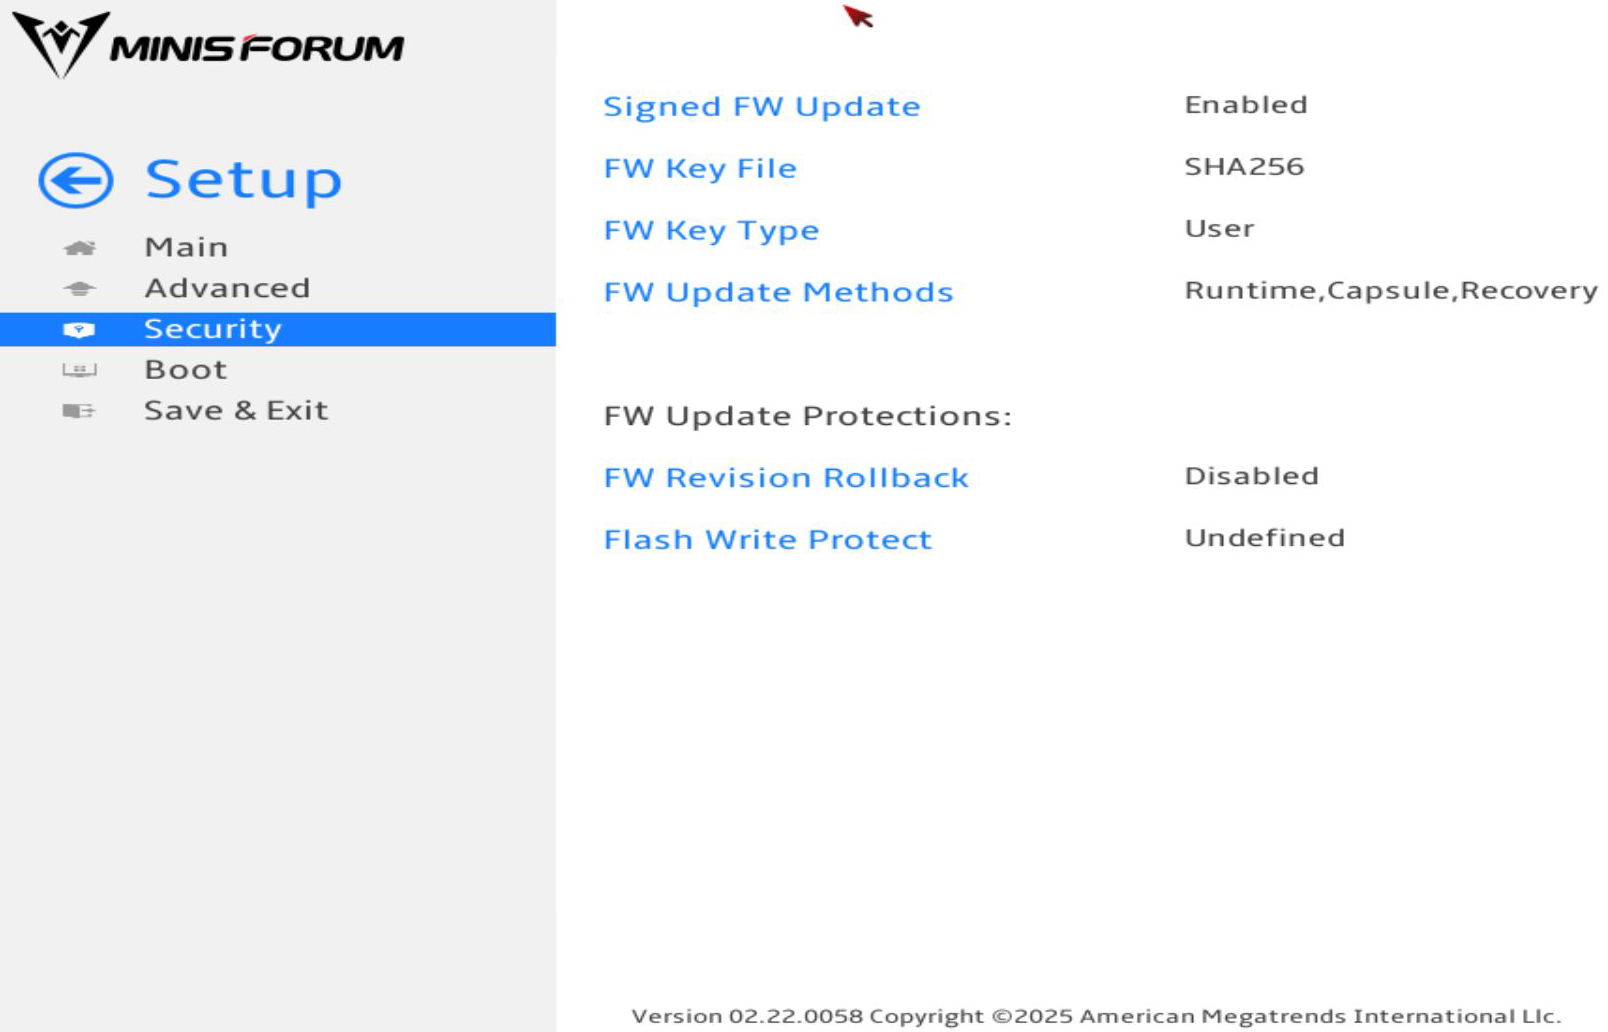
There are no settings that can be changed.
Boot
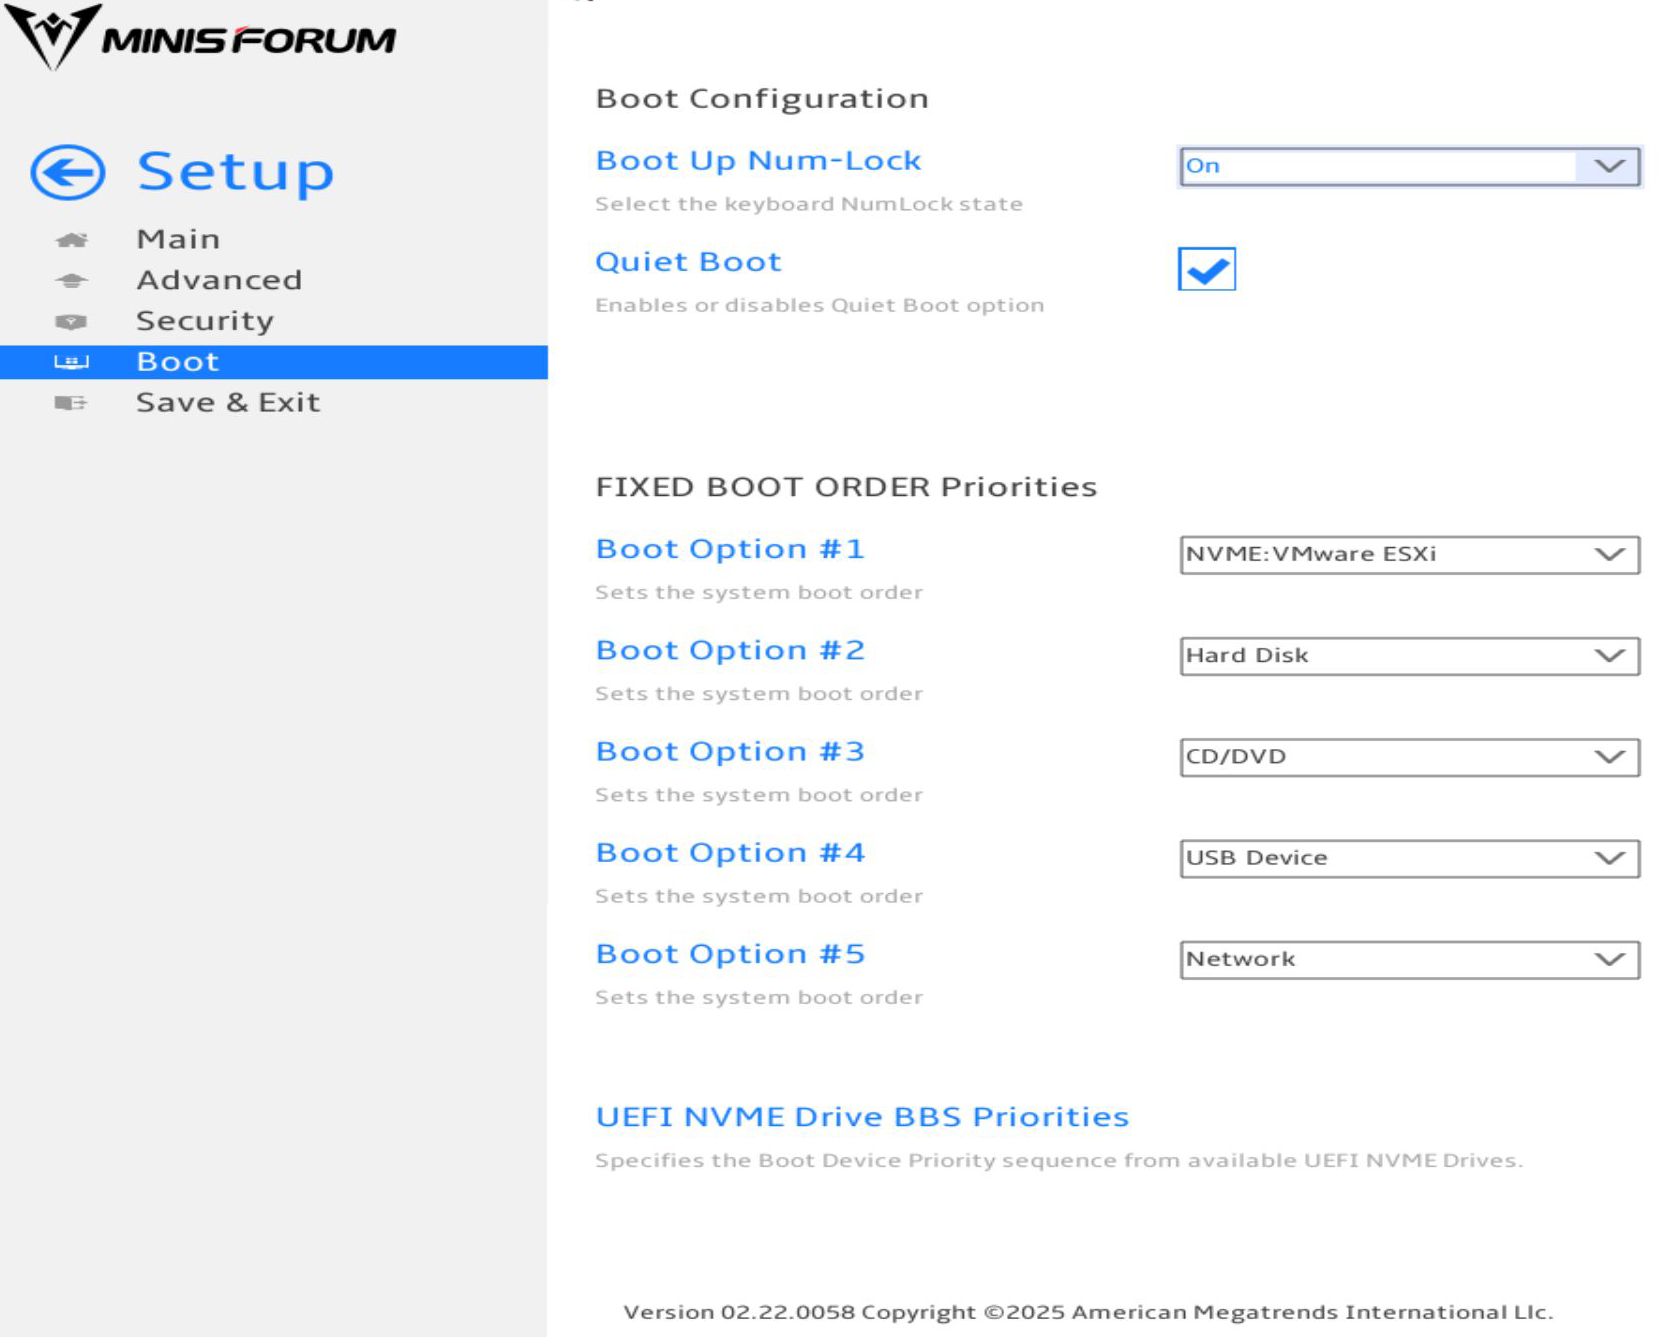
- For Boot Up Num-Lock, you can set it to On or Off.
- For Quiet Boot, you can check the box to enable it or disable it.
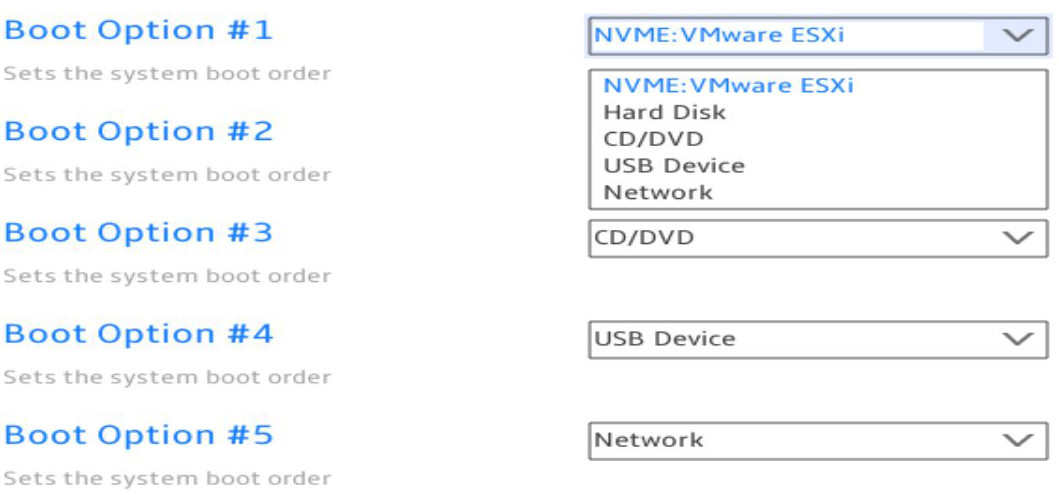
- For Boot Option #1, #2, #3, and #4, you can select NVME, Hard Disk, CD/DVD, USB Device, or Network.
- UEFI NVME Drive BBS Priorities is a menu.
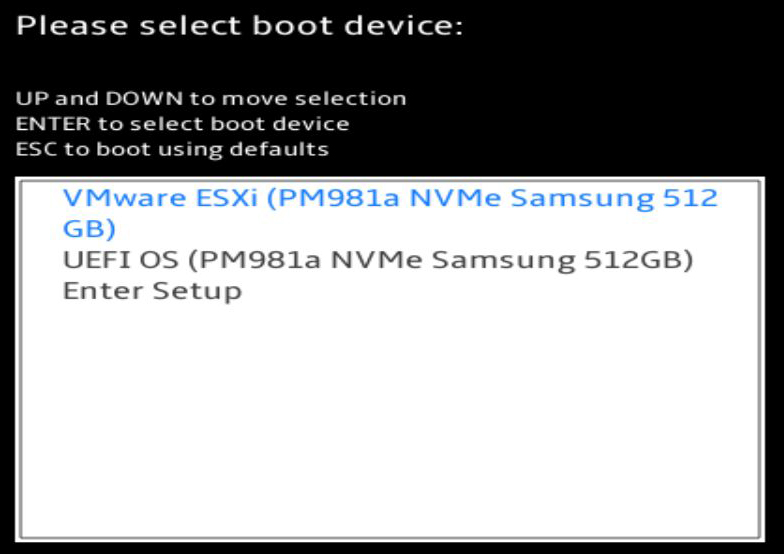
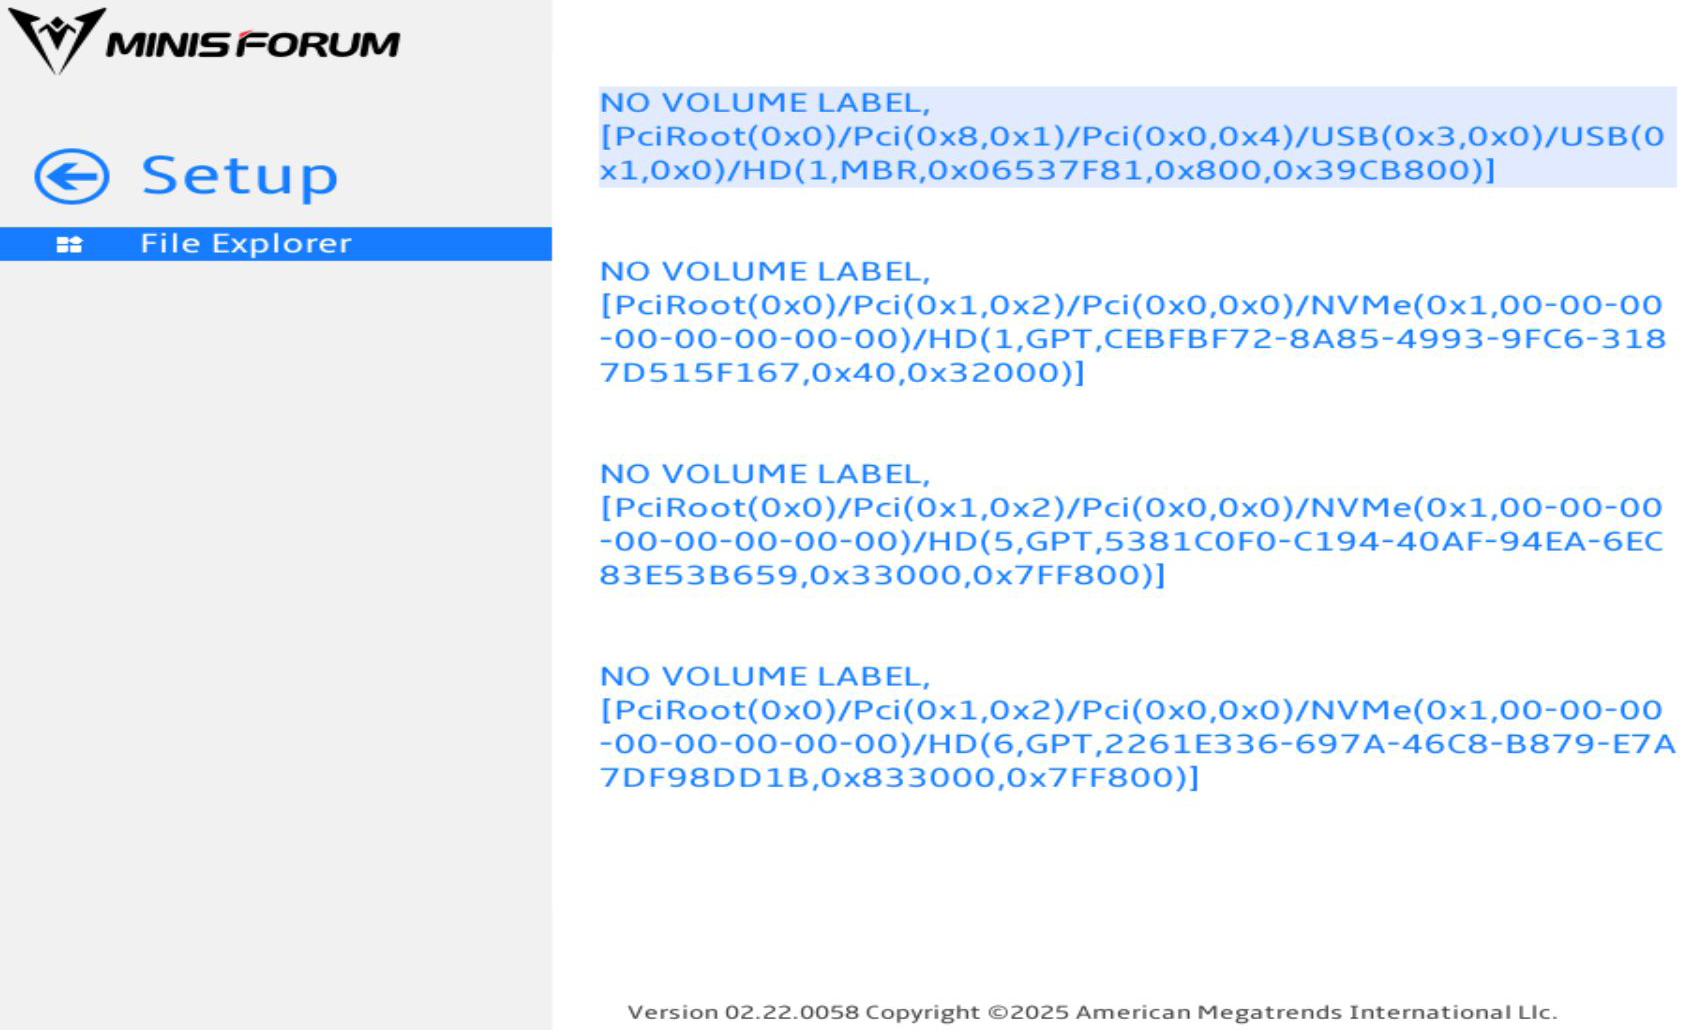
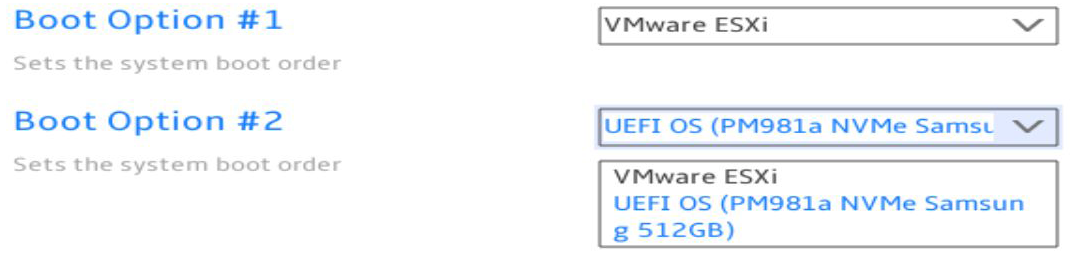
Boot > UEFI NVME Drive BBS Priorities
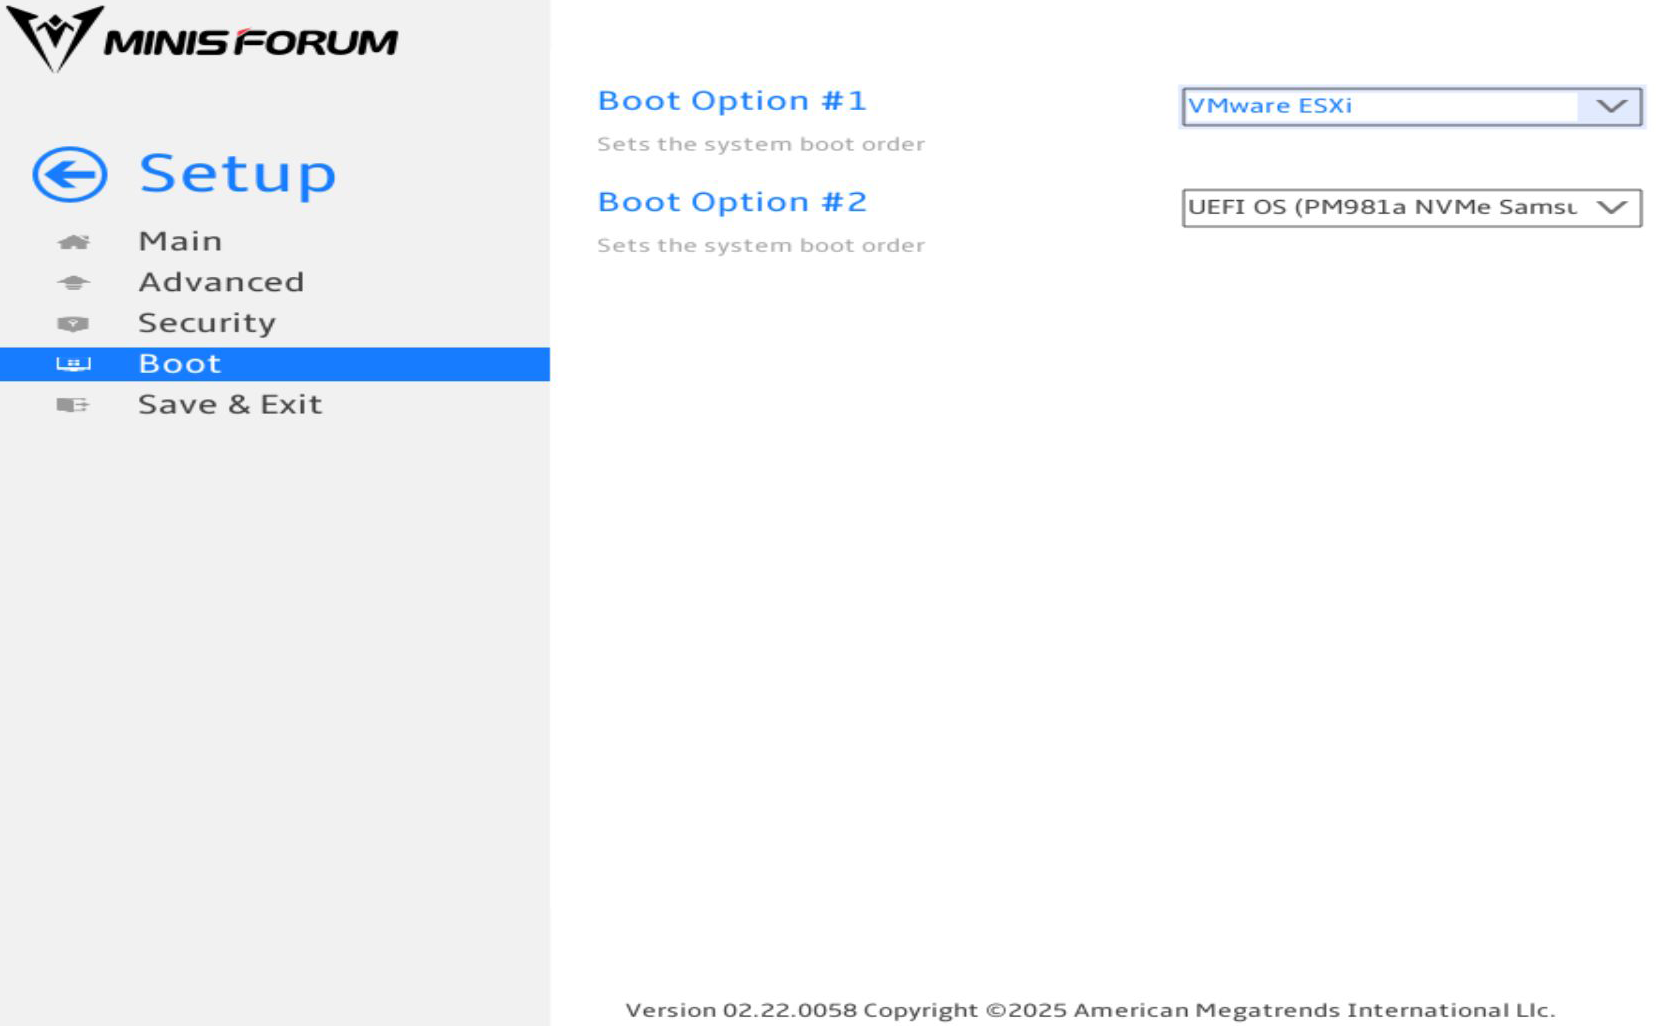
- For Boot Option #1 and #2, you can set it to VMware ESXi or UEFI OS. (Your options may be different depending on which OS you have installed.)
Save & Exit
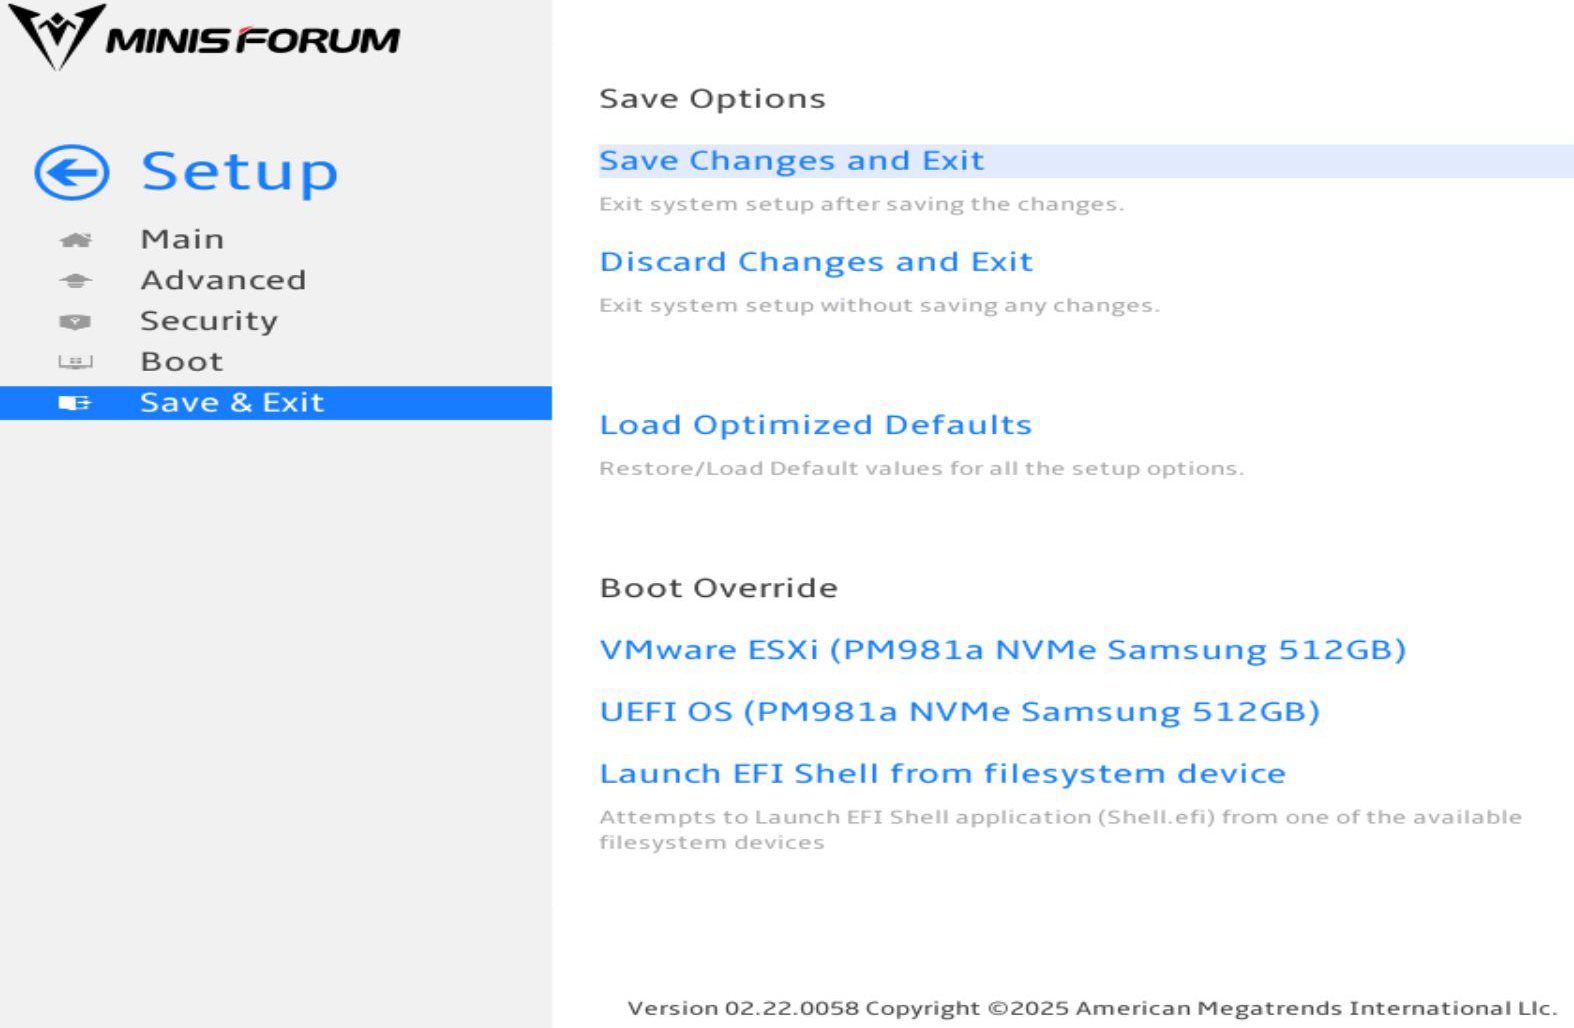
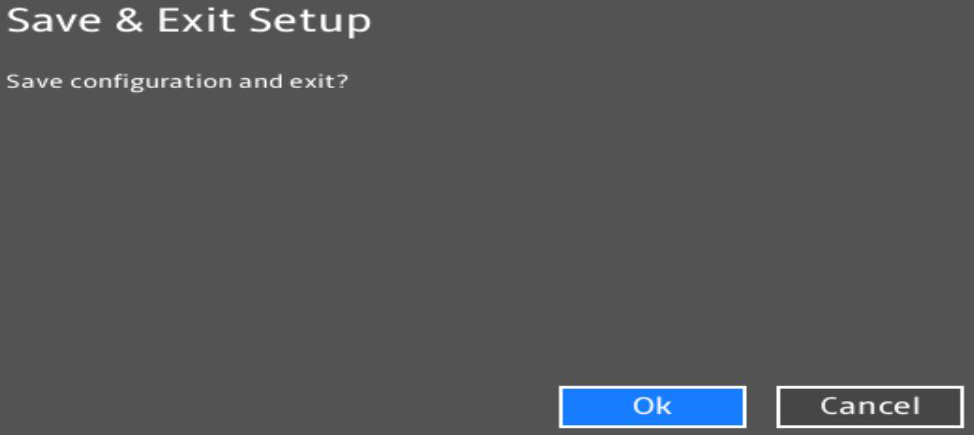
- For Save Changes and Exit, you will need to confirm that you want to save the configuration and exit.
- For Discard Changes and Exit, you will need to confirm that you want to quit without saving.

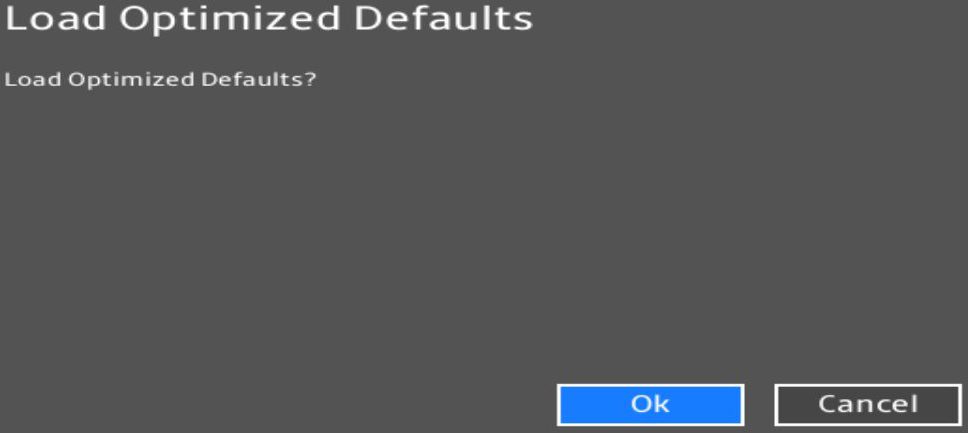
- For Load Optimized Defaults, you will need to confirm that you want to load the optimized defaults.
- For the options under Boot Override, selecting any of them will exit the BIOS and try to boot from that device.